
GRIFEMA GB1007-4
Contents
GRIFEMA GB1007-4 TV Wall Mount Instruction Manual
Model: GB1007-4
Introduction
Thank you for choosing the GRIFEMA GB1007-4 TV Wall Mount. This universal tilting bracket is designed to securely hold flat and curved screen televisions ranging from 26 to 65 inches, with a maximum weight capacity of 55 kg (121 lbs) and VESA compatibility up to 400x400mm. This manual provides detailed instructions for safe installation, operation, and maintenance of your TV wall mount. Please read all instructions carefully before beginning installation to ensure proper setup and to prevent damage or injury.
Safety Information
- Ensure the wall structure can safely support the combined weight of the mount and the television. If unsure, consult a qualified professional.
- Do not install this product on plaster walls, cavity walls, or soft walls. It is designed for solid concrete, concrete block, or brick walls.
- Always use appropriate safety gear, including eye protection, during installation.
- Do not overtighten screws, as this may cause damage to the mount or the wall.
- Keep all small parts and packaging materials away from children.
- Verify all connections are secure before mounting the TV.
- This product is intended for indoor use only.
Package Contents
Before installation, please verify that all components are present and undamaged. If any parts are missing or damaged, contact GRIFEMA customer support.
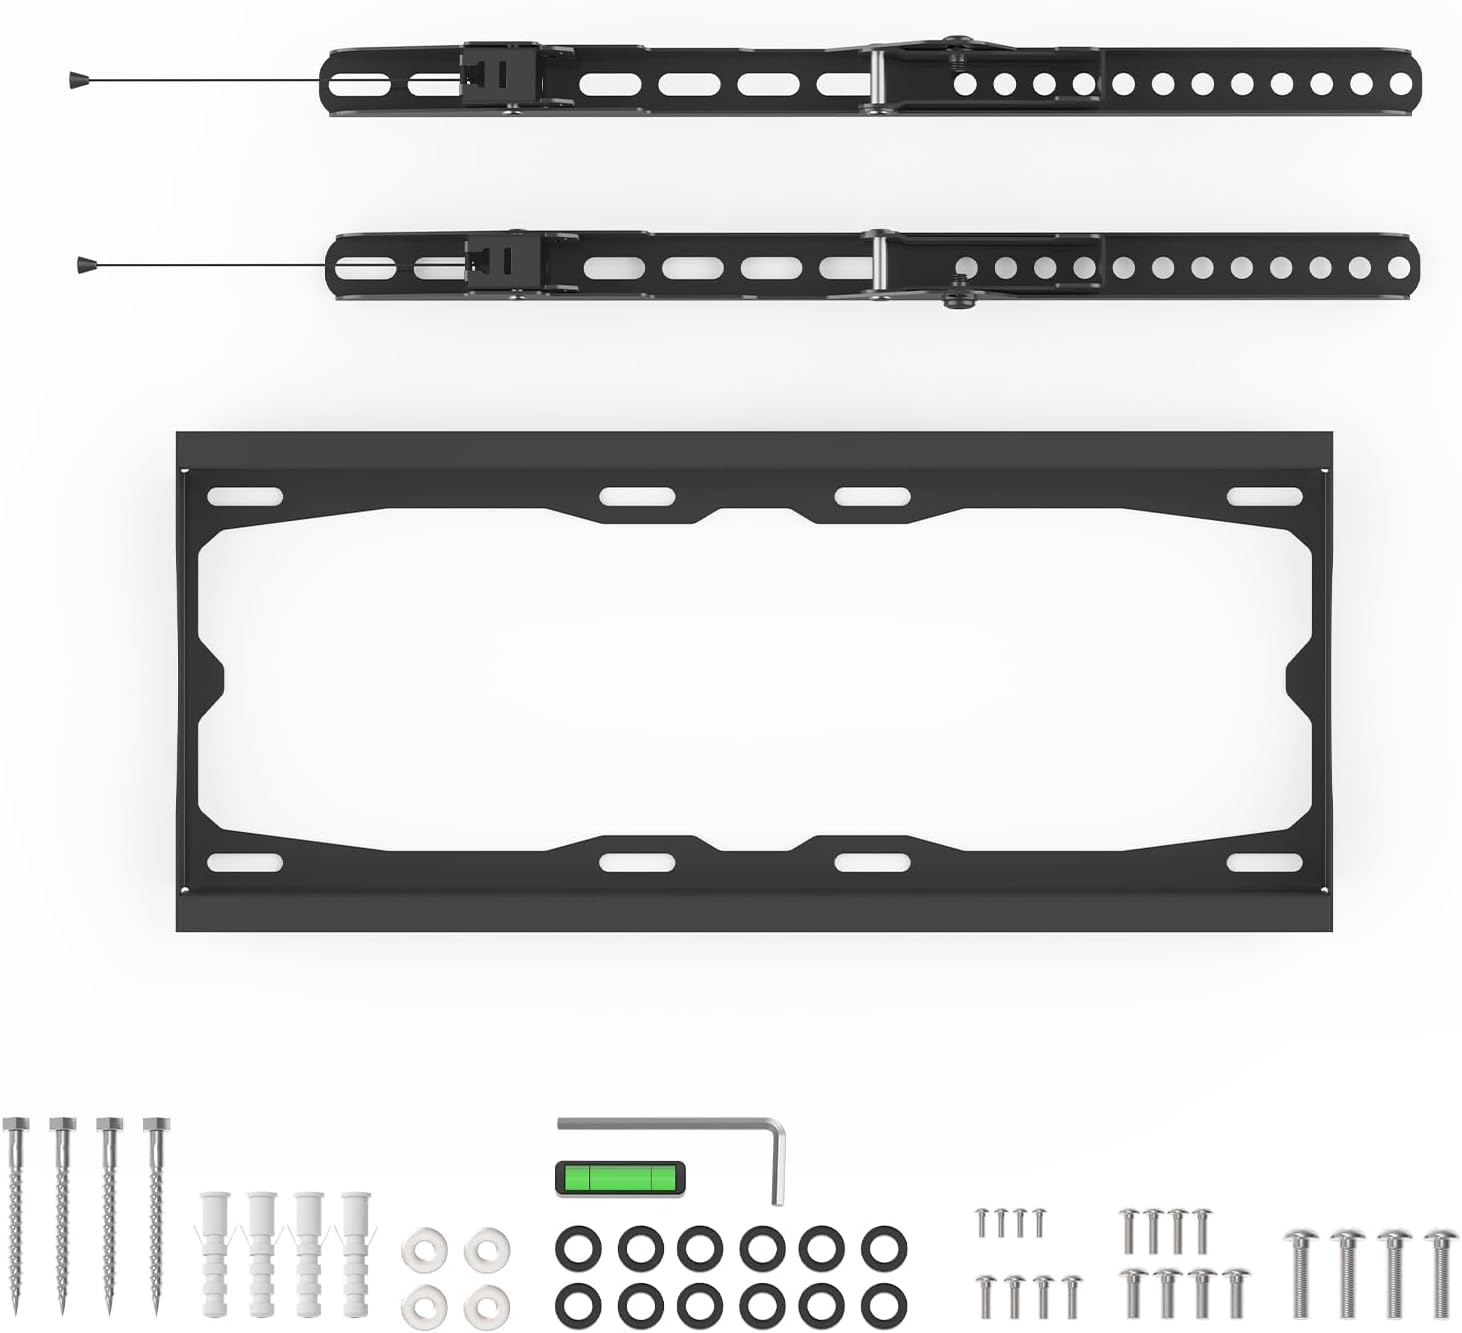
Image: Overview of all included parts for the GRIFEMA GB1007-4 TV wall mount. This includes the main wall plate, two vertical TV brackets, a variety of screws (M4, M6, M8), wall anchors, washers, spacers, a small spirit level, and an Allen key, along with the instruction manual.
- Wall Plate (1x)
- TV Brackets (2x)
- Mounting Hardware Kit (Screws, Anchors, Washers, Spacers)
- Spirit Level (1x)
- Allen Key (1x)
- Instruction Manual (1x)
Specifications
| Model | GB1007-4 |
| Material | High-Quality Steel Alloy |
| Screen Size Compatibility | 26 - 65 inches (flat and curved TVs) |
| Maximum Weight Capacity | 55 kg (121 lbs) |
| VESA Compatibility | Min 75x75mm, Max 400x400mm |
| Tilt Angle | +2° (up) to -12° (down) |
| Distance from Wall | 3.5 cm (1.38 inches) |
| Product Dimensions | 44 x 41.8 x 3.5 cm |
| Product Weight | 1.34 kg |

Image: This diagram illustrates the key compatibility features of the mount, including supported screen sizes (26-65 inches), maximum weight capacity (55 kg / 121 lbs), and VESA mounting patterns (minimum 75x75mm, maximum 400x400mm).

Image: A technical drawing detailing the available VESA patterns (400x400, 400x300, 400x200, 300x300, 300x200, 200x200, 200x100, 100x100, 75x75) and the overall dimensions of the mount, including its slim 35mm profile when installed.
Installation Guide
1. Choose a Suitable Wall Type
The GRIFEMA GB1007-4 TV Wall Mount is designed for installation on solid concrete, concrete block, or brick walls. DO NOT install on plaster walls, cavity walls, or soft walls. Ensure the chosen wall location can support the combined weight of your TV and the mount.

Image: This visual guide shows the types of walls suitable for installation: solid concrete/concrete block and brick walls. A clear warning indicates that the product should not be mounted on plaster, cavity, or soft walls.
2. Attach TV Brackets to Your TV
- Carefully place your TV face down on a soft, clean surface to prevent screen damage.
- Identify the VESA mounting holes on the back of your TV.
- Select the appropriate screws (M4, M6, or M8) and spacers from the hardware kit that fit your TV's VESA holes.
- Align the two vertical TV brackets with the VESA holes. Ensure the pull cords are facing downwards.
- Securely fasten the brackets to the TV using the selected screws and washers. Do not overtighten.

Image: This image demonstrates the process of attaching the VESA mounting plate to the back of the television using a screwdriver and the provided screws.
3. Mount the Wall Plate to the Wall
- Determine the desired height for your TV. Mark the position for the wall plate on the wall.
- Hold the wall plate against the wall at the marked position and use the integrated spirit level to ensure it is perfectly horizontal.
- Mark the drilling points through the holes on the wall plate.
- Drill pilot holes at the marked points using an appropriate drill bit for your wall type.
- Insert the wall anchors into the drilled holes.
- Align the wall plate with the anchors and secure it to the wall using the long mounting screws. Ensure it is firmly attached.

Image: This image illustrates the installation of the wall plate, highlighting the use of a spirit level to ensure accurate horizontal positioning before securing it to the wall.
4. Hang the TV on the Wall Plate
- With assistance, carefully lift the TV with the attached brackets.
- Hook the TV brackets onto the top edge of the wall plate.
- Gently lower the TV until the brackets fully engage with the wall plate. You should hear a click or feel it lock into place.
- Pull the quick-release cords (located at the bottom of the TV brackets) to ensure the TV is securely locked onto the wall plate. Release the cords to lock.

Image: This image shows the television being carefully lowered onto the wall-mounted bracket, demonstrating the final step of the installation process.

Image: This image displays the mounted TV and highlights the easy locking quick release mechanism on the TV brackets. It also visually represents the vertical tilt adjustment range, allowing the TV to tilt +2 degrees upwards and -12 degrees downwards.
Operating Instructions
Adjusting the Tilt Angle
The GRIFEMA GB1007-4 TV Wall Mount allows for vertical tilt adjustment to optimize your viewing experience and reduce glare. The tilt range is from +2° (upwards) to -12° (downwards).
- To adjust the tilt, gently push or pull the bottom of the TV to the desired angle.
- The friction mechanism will hold the TV in place once the desired angle is achieved.
- Ensure the TV is stable after adjustment.
Maintenance
- Regularly check all screws and connections to ensure they remain tight and secure.
- Clean the mount with a soft, dry cloth. Avoid abrasive cleaners or solvents.
- Do not hang objects from the TV mount.
Troubleshooting
| Problem | Possible Cause | Solution |
|---|---|---|
| TV is not level after installation. | Wall plate not installed level. | Remove TV, re-level and re-install wall plate using a spirit level. |
| TV feels loose on the mount. | Screws not tightened, or TV not properly engaged with wall plate. | Ensure all screws are tightened. Verify TV brackets are fully seated and locked onto the wall plate. Pull the quick-release cords to confirm engagement. |
| Cannot tilt the TV. | Mechanism is stiff or obstructed. | Ensure no cables are obstructing the tilt mechanism. Apply gentle, even pressure. If still stiff, check for any debris. |
| Missing parts. | Packaging error. | Contact GRIFEMA customer support with your purchase details. |
Warranty and Support
GRIFEMA products are manufactured with high-quality materials and undergo strict quality control. For information regarding warranty coverage or technical support, please refer to the warranty card included with your product or visit the official GRIFEMA website. Please have your model number (GB1007-4) and purchase details ready when contacting support.
For further assistance, you may also refer to the GRIFEMA Store on Amazon.
Ask a question about this manual
Ask about setup, troubleshooting, compatibility, parts, safety, or missing instructions. Manuals+ will review the question and use this page’s manual context to help answer it.