SWDSTP SWD-601
SWDSTP AM/FM Personal Portable Mini Radio User Manual
Model: SWD-601
Introduction
This user manual provides comprehensive instructions for the operation and maintenance of your SWDSTP AM/FM Personal Portable Mini Radio, Model SWD-601. This compact and lightweight radio features digital tuning, an LCD display with backlight, and a built-in rechargeable battery, making it ideal for various activities such as walking, jogging, and camping. Please read this manual thoroughly before using the product to ensure proper function and longevity.

Figure 1: SWDSTP Portable AM/FM Radio with included earphones and belt clip.
What's in the Box
Upon opening the package, please verify that all the following items are included:
- SWDSTP AM/FM Portable Radio
- Earphones
- USB Cable (for charging)
- Detachable Belt Clip and Lanyard
- Owner's Manual (this document)

Figure 2: All components included in the product packaging.
Setup
Initial Charging
Before first use, it is recommended to fully charge the radio for 2-3 hours. Connect the provided USB cable to the radio's USB charging jack and to a compatible USB power source (e.g., computer USB port, USB wall adapter). The battery indicator on the LCD display will show charging status.

Figure 3: The radio's backlit display, indicating battery status and time. Ensure the radio is charged before initial use.
Attaching the Belt Clip
The radio comes with a detachable belt clip for convenient portability. To attach, align the clip with the designated slot on the back of the radio and slide it into place until it clicks securely. The clip can be removed by sliding it off in the opposite direction.
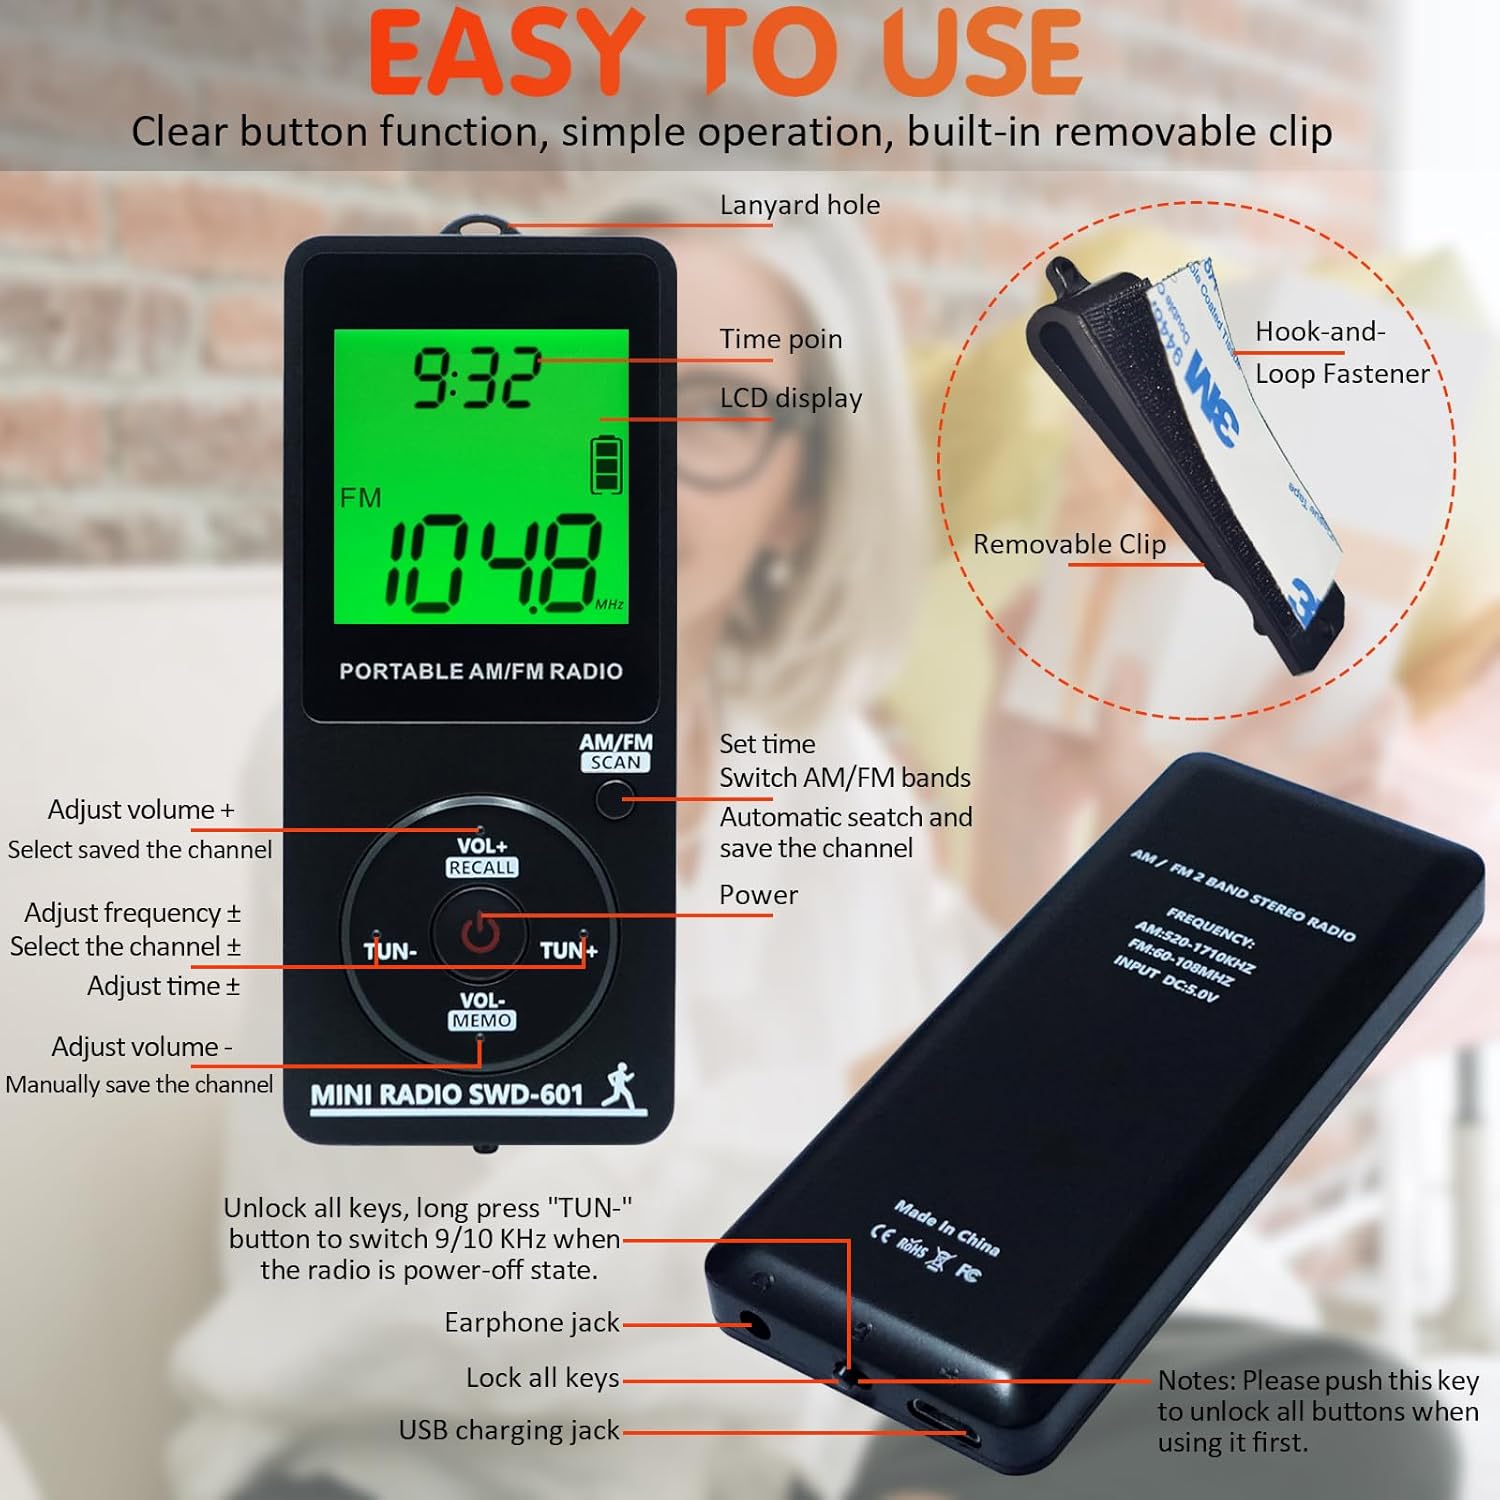
Figure 4: Detailed view of the radio's features, including the removable belt clip and lanyard hole.

Figure 5: Correct insertion of earphones into the radio's jack. Ensure the plug is fully inserted for optimal sound and reception.
Operating Instructions
Power On/Off and Lock Function
To power on the radio, short press the POWER button. To turn off, long press the POWER button. The radio features a lock button on the bottom to prevent accidental operation. Slide the lock button to the right to unlock all buttons, and to the left to lock them.
Important Note: Always unlock the buttons before attempting to operate the radio.
Setting the Time
- When the radio is turned off, long press the AM/FM(SCAN) button to enter time setting mode. The time will appear on the screen.
- Click the TUN+/- button to switch between 12-hour and 24-hour time systems.
- Click the set time number again. Then, use the TUN+/- button to adjust the time number (hours and minutes).
- Finally, click the AM/FM(SCAN) button to confirm the time setting.
Automatic Station Search and Save
To automatically search and save available radio stations, long press the AM/FM(SCAN) button while the radio is on. The radio will scan through frequencies and save channels automatically. After completing the search, it will automatically play the first searched channel.
Manual Station Tuning and Saving
- Click the TUN+/- button to adjust the frequency. Select the desired channel you wish to save.
- Long press the VOL-(MEMO) button. The "MEMO" logo will be displayed on the screen.
- While "MEMO" is displayed, click the TUN+/- button to adjust to the desired channel number (P01, P02, etc.) where you want to save the station.
- Click the VOL-(MEMO) button again to confirm. The channel will be saved successfully.
Recalling Saved Channels
To recall a saved channel, long press the VOL+(RECALL) button. Then, click the TUN+/- button to select the desired saved channel number (P01, P02, etc.).
Adjusting Volume
Adjust the volume by clicking the VOL+/- buttons on the radio. You can also adjust the volume using the controls on the included earphones.
Setting Timing Shutdown
The radio features a timing shutdown function, allowing you to set it to turn off automatically after a set period.
- When the radio is turned off, long press the POWER button to set the timing automatic shutdown. "90" will appear on the screen, indicating 90 minutes.
- Continue to click the POWER button to cycle through shutdown times (90, 80, 70, ..., 10 minutes).
- Wait for 3 seconds after selecting your desired time; the timing shutdown will be set successfully.
- To turn off the timing shutdown, cycle through the options until "OFF" appears, or simply turn the radio off and on again.

Figure 6: The timing shutdown feature allows the radio to automatically turn off after a set duration.
User Guidance Video
For a visual guide on operating your SWDSTP radio, please watch the official user guidance video below. This video demonstrates key functions such as setting the time, automatic and manual station search, recalling channels, adjusting volume, and using the lock function.
Video 1: Official user guidance video for the SWDSTP AM/FM Portable Radio, demonstrating various operational features.
Maintenance
- Keep the radio dry. Avoid exposure to moisture or extreme temperatures.
- Clean the radio with a soft, dry cloth. Do not use abrasive cleaners or solvents.
- Store the radio in a cool, dry place when not in use for extended periods.
- Handle the earphones and USB cable with care to prevent damage.
Troubleshooting
| Problem | Possible Cause | Solution |
|---|---|---|
| Radio does not turn on. | Low battery or locked buttons. | Charge the radio. Ensure the lock button on the bottom is in the unlocked position (slid to the right). |
| Poor reception or static. | Earphones not fully inserted or weak signal. | Ensure earphones are fully inserted into the jack (they act as the antenna). Try moving to an area with better signal. |
| Buttons are unresponsive. | Buttons are locked. | Slide the lock button on the bottom of the radio to the right to unlock the controls. |
| Time display is incorrect. | Time not set or battery drained. | Follow the "Setting the Time" instructions. Ensure the radio is charged. |
Specifications
- Model Number: SWD-601
- Product Dimensions: 3.5 x 1.5 x 0.3 inches (8.9 x 3.8 x 0.8 cm)
- Item Weight: 1.14 ounces (32.3 grams)
- Frequency Range: FM: 60-108MHz; AM: 520-1710KHz
- Battery: Built-in 400mAh Rechargeable Lithium Ion Battery
- Battery Life: Approximately 10 hours (at 10 level volume + FM mode + Full charge)
- Connectivity: USB (for charging)
- Special Features: Digital Tuning, LCD Display, Backlight, Time Display, Detachable Belt Clip, Timing Shutdown, Earphones included.

Figure 7: The radio's compact size, comparable to a credit card, making it highly portable.
Warranty and Support
Your SWDSTP radio comes with a 12-month product exchange policy. If you encounter any issues or have questions regarding your product, please contact SWDSTP customer support. We are committed to assisting you.
For support, please refer to the contact information provided on the product packaging or the official SWDSTP website.
Related Documents - SWD-601
 |
Cisco Stealthwatch Flow Collector NetFlow Update Patch v7.3.1 Release Notes Detailed release notes and installation instructions for the Cisco Stealthwatch Flow Collector NetFlow Update Patch v7.3.1, including a list of resolved defects and download procedures. |
 |
Cisco Stealthwatch Release Notes v7.3.2 This document provides information on new features, improvements, bug fixes, and known issues for the Cisco Stealthwatch v7.3.2 release. It covers updates to the Stealthwatch system, including hardware support, browser compatibility, and new functionalities like Analytics Beta and SecureX Ribbon multi-user support. It also details resolved defects and known issues with their respective workarounds. |
 |
Cisco Secure Network Analytics UDP Director v7.4.1 Update Patch Installation Guide Official installation guide for the Cisco Secure Network Analytics UDP Director v7.4.1 update patch. Details patch description, prerequisites, download steps, and installation procedures, including a comprehensive list of resolved defects. |
 |
Sangean DT-120 AM/FM Stereo Pocket Radio User Manual This user manual provides detailed instructions for operating the Sangean DT-120 AM/FM stereo pocket radio. It covers control descriptions, display indicators, battery installation, time setting, radio tuning methods (scan, manual, memory), special features like Dynamic Bass Boost (DBB) and stereo/mono selection, key lock function, radio reset procedures, technical specifications, and important disposal information. |
 |
FFPTERZ 530MMX7MM LED Backlight Strip: Installation Guide & Specifications Detailed instructions for installing FFPTERZ 530MMX7MM LED backlight strips, including product materials, advantages, and step-by-step installation procedures for LCD monitors. |
 |
Q&Q YP16701 Multi-Function Sport LCD Watch User Guide Comprehensive user guide for the Q&Q YP16701 multi-function sport LCD watch, detailing features like timekeeping, stopwatch, alarm, dual time, EL backlight, and water resistance. |
Ask a question about this manual
Ask about setup, troubleshooting, compatibility, parts, safety, or missing instructions. Manuals+ will review the question and use this page’s manual context to help answer it.