1. Introduction
This manual provides detailed instructions for the installation, operation, and maintenance of your URayCoder Wireless HD HDMI IP Video Live Streaming Broadcast Encoder. This device is designed for converting HDMI video signals into H.264/H.265 IP streams for live broadcasting and remote video transmission. It supports multiple streaming protocols and platforms, offering flexibility for various applications.
Please read this manual thoroughly before using the product to ensure proper setup and optimal performance.
2. Safety Information
- Ensure the device is powered by the correct voltage (DC 12V) as specified.
- Do not expose the device to water, moisture, or extreme temperatures.
- Avoid blocking ventilation openings to prevent overheating.
- Do not attempt to open or repair the device yourself. Refer all servicing to qualified personnel.
- Keep the device away from strong electromagnetic fields.
3. Package Contents
Verify that all items are present in the package:
- URayCoder Wireless HD HDMI IP Video Encoder
- DC 12V Power Adapter
- Wi-Fi Antennas (2x)
- User Manual (this document)
4. Product Overview
4.1 Front/Top View

The top-front view displays the compact design of the encoder with two Wi-Fi antennas for wireless connectivity.
4.2 Rear Panel Connections

The rear panel provides the following connection ports:
- DC 12V: Power input port.
- RESET: Button to restore factory settings.
- HDMI IN: HDMI video input port.
- AUDIO IN: 3.5mm audio input jack for external audio sources.
- LAN: RJ45 Ethernet port for wired network connection.
4.3 Indicator Lights
The device features indicator lights to show its operational status:
- POWER: Indicates power status.
- LAN: Indicates network activity.
- VIDEO: Indicates video input signal status.
5. Setup
5.1 Hardware Connection
- Connect Antennas: Screw the two Wi-Fi antennas onto their respective connectors on the encoder.
- Connect Video Source: Connect your HDMI video source (e.g., camera, set-top box) to the HDMI IN port using an HDMI cable.
- Connect Audio Source (Optional): If using external audio, connect your audio device to the AUDIO IN 3.5mm jack.
- Connect Network:
- Wired: Connect an Ethernet cable from the LAN port to your router or network switch.
- Wireless: Ensure antennas are connected. The device will connect to Wi-Fi after configuration via the web interface.
- Connect Power: Connect the DC 12V power adapter to the DC 12V port and plug it into a power outlet. The POWER indicator should light up.
5.2 Accessing the Web Interface
The encoder is configured via a web-based interface. Follow these steps to access it:
- Ensure your computer is connected to the same network as the encoder (either via Ethernet or Wi-Fi).
- Open a web browser (e.g., Chrome, Firefox).
- Enter the default IP address of the encoder in the address bar. The default IP address is typically 192.168.1.168. Refer to the device label or documentation for the exact default IP.
- Log in using the default username and password (usually admin/admin or similar).

If you cannot access the web interface, ensure your computer's IP address is in the same subnet as the encoder (e.g., 192.168.1.x). You may need to temporarily set a static IP for your computer.
6. Operating Instructions
6.1 System Status
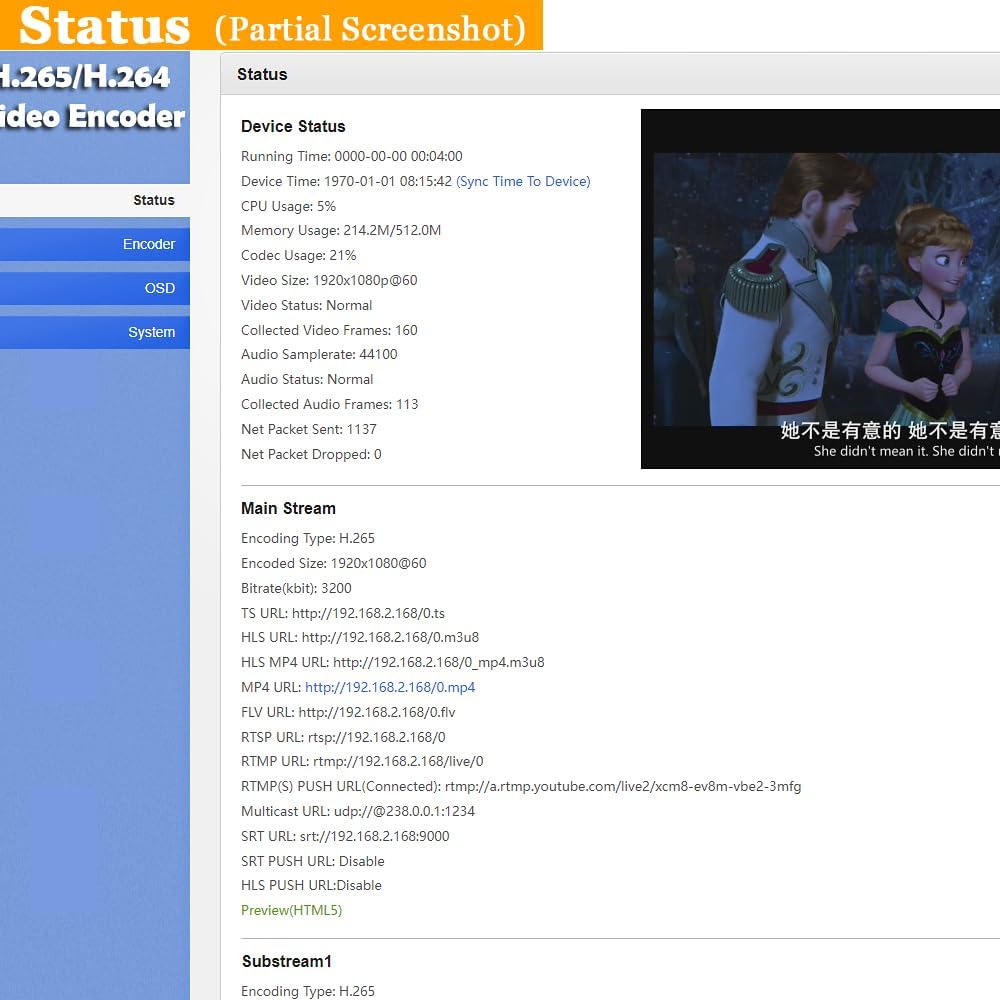
The 'Status' page provides real-time information about the device, including running time, CPU usage, memory usage, video input status, audio input status, and network packet statistics. It also displays the generated streaming URLs for various protocols.
6.2 Video Settings

Navigate to the 'Encoder' > 'Main Stream' or 'Substream' sections to configure video parameters:
- Encoding Type: Select H.264 or H.265.
- Encoded Size: Choose output resolution (e.g., 1920x1080, 1280x720).
- FPS (Frame Rate): Adjust frames per second.
- Bitrate Control: Set Constant Bitrate (CBR) or Variable Bitrate (VBR) and specify the bitrate.
- Image Quality Range: Adjust for desired video quality.
- Streaming Protocols: Enable or disable various protocols like TS, HLS, MP4, FLV, RTSP, RTMP(S), Multicast, SRT. Enter the corresponding URLs for your streaming platforms.
6.3 Audio Settings
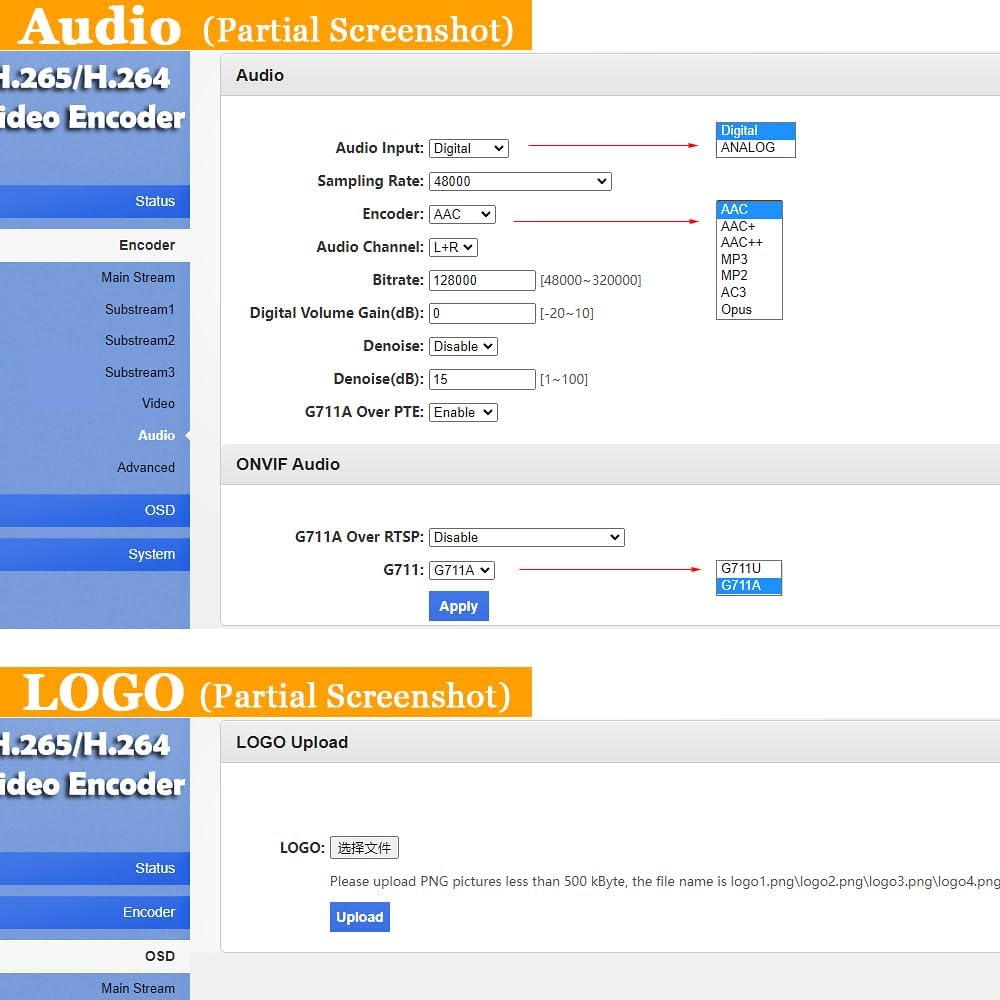
In the 'Audio' section, you can configure audio input and encoding:
- Audio Input: Select between Digital (HDMI embedded audio) or Analog (3.5mm Audio In).
- Sampling Rate: Set the audio sampling rate.
- Encoder: Choose audio encoding format (e.g., AAC, MP3).
- Bitrate: Adjust the audio bitrate.
- Digital Volume Gain: Control the audio volume.
- Denoise: Enable or disable audio noise reduction.

This diagram clarifies the two audio input options: HDMI embedded audio and external line-in audio.
6.4 OSD (On-Screen Display) Settings

The 'OSD' section allows you to customize the output video stream with overlays:
- Text Overlay: Add static text, scrolling text, or time stamps. Configure font size, color, and position.
- Logo Overlay: Upload a PNG image (less than 500 KB) to display as a logo on the video.
6.5 Network Settings
The 'Network' section allows configuration of IP address, DNS, and NTP settings. You can also configure Wi-Fi settings here.
6.6 Live Streaming and Remote Transmission

This diagram shows how to connect various video sources (broadcast camera, CCTV, set-top box) to the encoder, which then streams the content over the internet to multiple online platforms simultaneously (e.g., YouTube, Facebook, Twitch, Vimeo, Ustream).

This diagram illustrates a remote video transmission scenario where the encoder sends video streams over a LAN or WAN to a URayCoder Decoder, which then outputs to various display devices such as phones, set-top boxes (STB), network video recorders (NVR), or display monitors.

This image demonstrates a typical application of the encoder in a live sports broadcasting environment, showing a camera capturing the event, a laptop monitoring the encoded stream, and a mobile device receiving the live feed.
6.7 Supported Protocols and Platforms

The encoder supports a wide range of streaming protocols including HTTP, RTSP, RTMP(S), SRT, HLS(M3U8), UDP, RTP, MP4, ONVIF, Multicast, Unicast, and FLV.

The device is compatible with popular live streaming platforms such as YouTube, Facebook, Ustream, Livestream, Twitch, Vimeo, Streamspot, Dacast, and Tikilive.

The encoder works seamlessly with various software applications for streaming and playback, including OBS, VLC Media Player, Wirecast, XSplit, vMix, and Ffmpeg.
6.8 Mobile App Control

The encoder can also be controlled via a dedicated mobile application, allowing convenient adjustment of settings from a smartphone or tablet.
7. Maintenance
- Cleaning: Use a soft, dry cloth to clean the exterior of the device. Do not use liquid or aerosol cleaners.
- Ventilation: Ensure the device has adequate airflow around it to prevent overheating. Do not cover ventilation slots.
- Firmware Updates: Periodically check the manufacturer's website for firmware updates to ensure optimal performance and access to new features. Instructions for updating firmware will be provided with the update package.
8. Troubleshooting
| Problem | Possible Cause | Solution |
|---|---|---|
| No Power | Power adapter not connected or faulty. | Check power connections. Ensure the power adapter is working. |
| No Video Signal | HDMI cable loose or faulty; video source not active; incorrect resolution. | Check HDMI cable connection. Ensure video source is on and outputting. Verify input resolution is supported. |
| Cannot Access Web Interface | Incorrect IP address; network connectivity issue; firewall blocking. | Verify encoder's IP address. Ensure PC is in the same subnet. Check network cables/Wi-Fi connection. Temporarily disable firewall. |
| Streaming Issues (Buffering, Disconnections) | Insufficient network bandwidth; incorrect streaming settings; server issues. | Check internet speed. Reduce video bitrate/resolution in settings. Verify streaming server URL and credentials. |
| No Audio | Incorrect audio input selected; audio muted; faulty cable. | In web interface, check 'Audio Input' setting. Ensure audio is not muted. Test with different audio cables. |
9. Specifications
| Feature | Detail |
|---|---|
| Model Number | UHE265-1WS |
| Video Codec | HEVC / H.265, H.264 / AVC, MJPEG |
| Resolution | Max 1920x1080@60Hz |
| Connector Type | HDMI |
| Compatible Devices | Devices with HDMI Output |
| Supported Internet Services | YouTube, Facebook, Ustream and other streaming servers |
| Controller Type | WEB or APP Control |
| Form Factor | Video Streaming Encoder |
| Color | Black on top, silver on bottom |
| Item Weight | 1.21 pounds |
| Package Dimensions | 7.68 x 6.46 x 2.09 inches |
10. Warranty and Support
All URayCoder video encoders include free lifetime technical support and warranty. For assistance, please contact URayCoder customer service. We also provide SDK and API as well as CGI control protocol documents for secondary development.
For technical support or warranty claims, please visit the official URayCoder website or contact their support team directly.


