TARARIUM WP-590F
TARARIUM WP-590F Aquarium UV Filter Instruction Manual
Model: WP-590F | For 40-150 Gallon Tanks
1. Introduction
This manual provides detailed instructions for the installation, operation, and maintenance of your TARARIUM WP-590F Aquarium UV Filter. This multi-functional device is designed to maintain clear and healthy aquatic environments for both freshwater and saltwater aquariums ranging from 40 to 150 gallons. It integrates filtration, UV sterilization, aeration, and water circulation into a single submersible unit.

Image 1.1: The TARARIUM WP-590F Aquarium UV Filter operating in an aquarium, showcasing its submersible design and external timer control.
2. Safety Information
Please read and understand all safety instructions before operating this appliance. Failure to follow these instructions may result in product damage, injury, or electric shock.
- Always disconnect the power supply before performing any maintenance, installation, or removal of the filter.
- This appliance is designed for indoor aquarium use only. Do not use it for any other purpose.
- Ensure the voltage rating of the filter matches your local power supply (110V AC).
- Do not operate the filter if the power cord or plug is damaged.
- Keep the power cord away from sharp objects and hot surfaces.
- The UV lamp emits ultraviolet radiation. Avoid direct exposure to eyes and skin. Do not operate the UV lamp outside of its housing.
- Ensure the filter is fully submerged in water during operation to prevent overheating and damage. The lowest water level for safe operation is 3.6 inches.
- Children should be supervised to ensure they do not play with the appliance.
3. Package Contents
Verify that all components are present and in good condition upon unpacking:
- TARARIUM WP-590F Aquarium UV Filter Unit
- Biochemical Filter Sponge
- UV Lamp (pre-installed)
- Air Tube with Adjustable Airflow Valve
- Water Outlet Spout
- Suction Cups for Mounting
- External Timer Control Unit
4. Product Features
The TARARIUM WP-590F filter combines multiple functions to create a comprehensive aquatic environment management system:
- All-in-One Design: Functions as a filter, UV sterilizer, air pump, and wave maker.
- Double Filtration System: Utilizes a biochemical sponge for mechanical and biological filtration, combined with a 254nm UV lamp for sterilization.
- Adjustable Airflow and Water Outlet: Allows customization of aeration levels and water flow direction to suit various tank inhabitants.
- Submersible and Versatile Placement: Can be installed vertically or horizontally, suitable for low water level tanks (minimum 3.6 inches).
- Integrated Timer: Scientific timer for the UV lamp, allowing scheduled operation (3/6/12/24 hours) with daily cycle repetition.
- IPX8 Waterproof Rating: Ensures safe and reliable operation of the UV light housing underwater.

Image 4.1: Overview of the filter's four primary functions: filtration, sterilization, oxygenation, and water movement.
4.1 Double Filtration System
The filter employs a two-stage process for water purification:
- Biochemical Filter Sponge: This sponge mechanically removes debris, fish waste, and fine particles. It also provides a large surface area for beneficial bacteria to colonize, aiding in biological filtration and ammonia/nitrite reduction.
- UV Sterilizer: The built-in 254nm UV lamp targets free-floating algae, bacteria, and other harmful microorganisms, effectively reducing green water, odors, and improving overall water clarity.
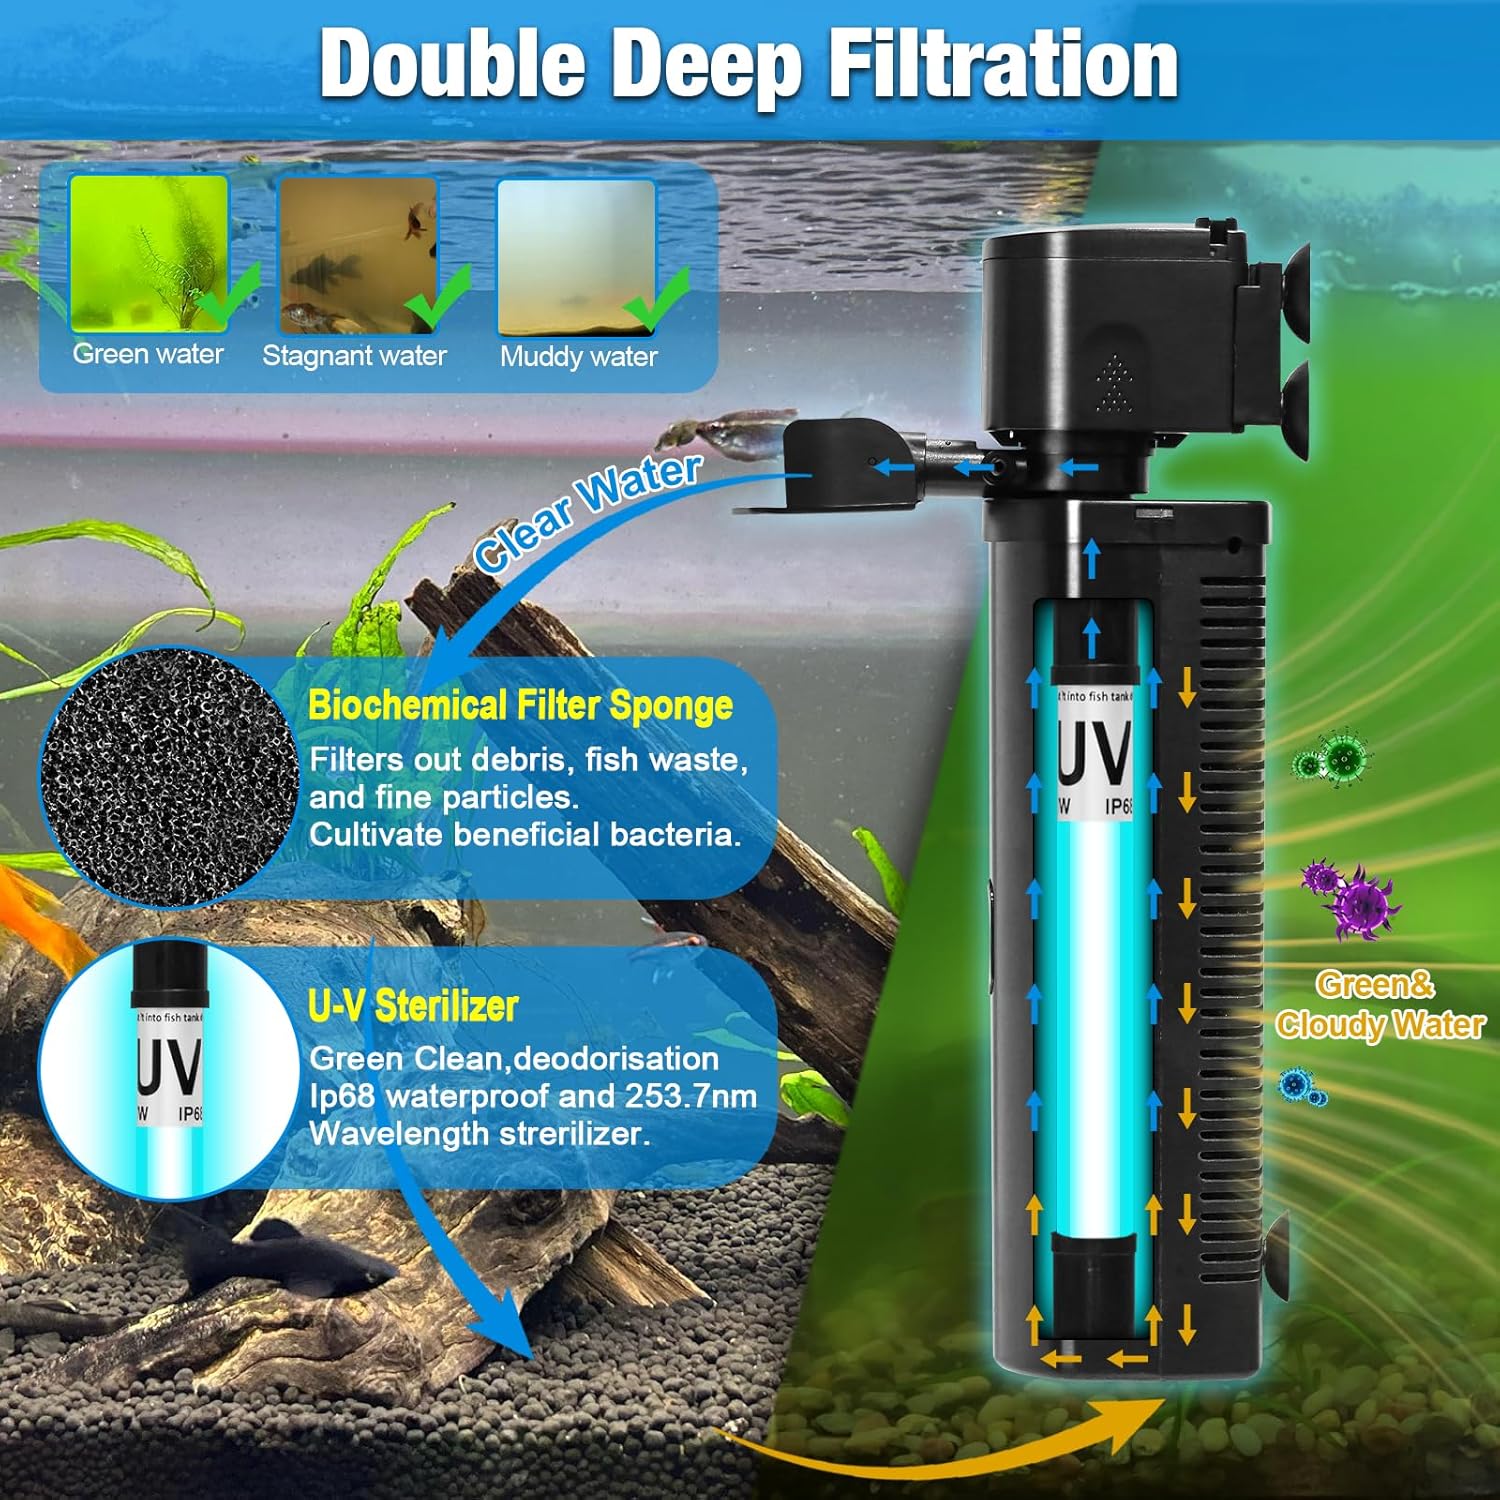
Image 4.2: Visual representation of the double filtration process, from cloudy water to clear water.
5. Setup and Installation
Follow these steps to properly install your TARARIUM WP-590F filter:
- Unpack Components: Carefully remove all items from the packaging and inspect for any damage.
- Assemble Filter: The UV lamp and biochemical sponge are typically pre-installed. Ensure they are securely in place within the filter housing.
- Attach Air Tube (Optional): If aeration is desired, connect the air tube to the designated inlet on the filter head. Attach the adjustable airflow valve to the end of the air tube.
- Attach Water Outlet Spout: Secure the water outlet spout to the filter head. The direction of the spout can be adjusted later.
- Mount in Aquarium: Use the provided suction cups to securely attach the filter to the inside wall of your aquarium. The filter can be positioned vertically or horizontally. Ensure the filter is fully submerged, with the water level at least 3.6 inches above the bottom of the unit.
- Position Power Cord: Route the power cord safely, creating a drip loop to prevent water from traveling along the cord to the electrical outlet.
- Connect to Power: Plug the filter's power cord into a suitable 110V AC electrical outlet.
6. Operation
6.1 Initial Start-up
Once installed and plugged in, the pump will begin circulating water. The UV lamp operation is controlled by the external timer.
6.2 UV Intelligent Timing
The external timer allows you to set the operating duration for the UV lamp. The pump operates continuously when plugged in, while the UV lamp operates according to the timer setting.

Image 6.1: The external timer control unit with options for setting UV lamp operation duration.
- Setting the Timer: Press the 'Cycle' button on the external timer control unit to select the desired operating duration for the UV lamp: 3 hours, 6 hours, 12 hours, or 24 hours.
- Automatic Daily Cycle: Once a duration is selected, the UV lamp will operate for that period and then turn off. It will automatically repeat this cycle daily at the same time without further manual adjustment. For example, if you set it to '3H' at 2:00 PM, it will run until 5:00 PM and then repeat this 3-hour cycle daily starting at 2:00 PM.
- UV Indicator: A small indicator light on the filter housing will illuminate when the UV lamp is active, confirming its operational status.

Image 6.2: The UV indicator light, which confirms the UV lamp is active.
6.3 Adjusting Airflow and Water Outlet
- Adjustable Airflow: If the air tube is connected, rotate the airflow valve to increase or decrease the amount of air bubbles produced.
- Adjustable Water Outlet: The water outlet spout can be rotated to direct the water flow as desired, creating gentle currents or wave effects.
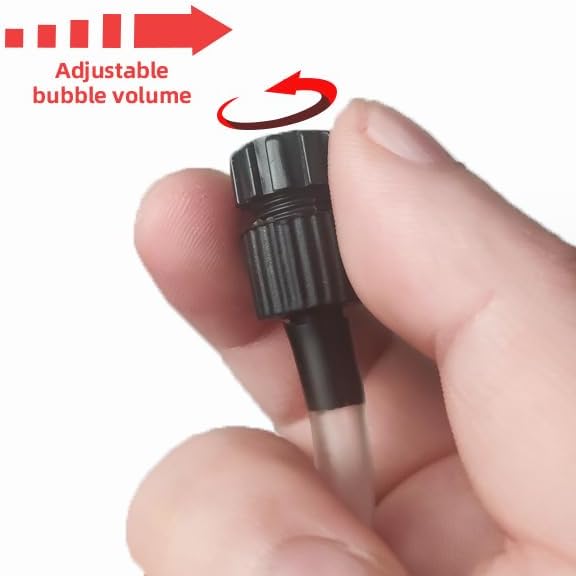
Image 6.3: Adjusting the airflow valve.

Image 6.4: Adjustable water outlet spout.
7. Maintenance
Regular maintenance is crucial for the optimal performance and longevity of your filter. Always unplug the filter before performing any maintenance.
7.1 Cleaning the Filter Sponge
The biochemical filter sponge should be cleaned regularly, typically every 2-4 weeks, depending on tank bioload and water conditions.
- Disconnect Power: Unplug the filter from the electrical outlet.
- Remove Filter: Carefully remove the filter unit from the aquarium.
- Disassemble: Gently separate the filter housing components to access the biochemical sponge. The pump, UV lamp, and sponge are designed for easy disassembly.
- Clean Sponge: Rinse the biochemical sponge thoroughly in old aquarium water (water removed during a water change) to preserve beneficial bacteria. Avoid using tap water, as chlorine can kill these bacteria.
- Reassemble: Place the cleaned sponge back into the filter housing. Ensure all components are correctly aligned and securely reassembled.
- Reinstall: Place the filter back into the aquarium and reconnect the power.

Image 7.1: Disassembled filter components including the UV lamp, baffle, and filter sponge.
7.2 UV Lamp Replacement
The UV lamp has a limited lifespan and its effectiveness diminishes over time. Replace the UV lamp every 6-12 months or when the UV indicator light no longer illuminates.
- Disconnect Power: Unplug the filter.
- Remove Filter: Take the filter unit out of the aquarium.
- Access UV Lamp: Disassemble the filter housing to expose the UV lamp.
- Replace Lamp: Carefully remove the old UV lamp and insert a new, compatible TARARIUM UV lamp. Avoid touching the glass part of the new lamp with bare hands; use a cloth or gloves.
- Reassemble and Test: Reassemble the filter, reinstall it in the aquarium, and plug it in to test the new UV lamp.
8. Troubleshooting
| Problem | Possible Cause | Solution |
|---|---|---|
| Filter pump not running | No power; Impeller jammed; Air in pump. | Check power connection; Clean impeller; Submerge filter completely and shake gently to release air. |
| UV lamp not lighting up | UV lamp expired or damaged; Timer not set; Power issue. | Check timer setting; Replace UV lamp; Ensure proper power connection. |
| Water remains cloudy/green | Filter sponge clogged; UV lamp ineffective; Tank overstocked; Insufficient UV run time. | Clean filter sponge; Replace UV lamp; Reduce fish load; Increase UV timer duration (e.g., 24 hours for initial clearing). |
| Reduced water flow/aeration | Filter intake clogged; Air tube kinked or clogged; Impeller dirty. | Clean filter intake; Clear air tube; Clean impeller. |
9. Specifications
| Feature | Specification |
|---|---|
| Brand | TARARIUM |
| Model Number | WP-590F |
| Recommended Tank Size | 40-150 Gallons |
| Power Source | Corded Electric |
| Voltage | 110 Volts (AC) |
| Material | Glass, Plastic |
| Style | Submersible |
| Item Dimensions (LxWxH) | 5 x 3 x 13 inches |
| Item Weight | 1.85 pounds |
| UV Wavelength | 254nm |
| Waterproof Rating | IPX8 |

Image 9.1: Size and dimension comparison for TARARIUM filter models, highlighting the WP-590F.
10. Warranty and Support
TARARIUM provides 6-month after-sales support for this product. If you encounter any questions or problems with your TARARIUM WP-590F Aquarium UV Filter, please contact customer support for assistance. Refer to your purchase documentation for specific contact details.
Related Documents - WP-590F
 |
Guangzhou Chengcheng Aquarium Products Comprehensive Instruction Manual Comprehensive instruction manual for Guangzhou Chengcheng Aquarium Products, covering aquarium tanks, LED lighting, water treatment, fish food, filtration systems, and troubleshooting. Includes safety precautions and installation guides. |
 |
SuperFish Quadro Aquarium Setup Guide: Quadro 40 & 70 Multi Colour Complete setup and maintenance guide for SuperFish Quadro 40 and 70 Multi Colour aquariums. Learn about safety, warranty, installation steps, and care for your aquatic environment. |
 |
Interpet CPF Corner Power Filter: Installation, Maintenance, and Troubleshooting Guide A comprehensive guide for Interpet CPF1, CPF2, and CPF3 Corner Power Filters, covering installation options, maintenance schedules, troubleshooting common issues, and tips for a healthy aquarium environment. |
 |
SuperFish Start 150 Tropical Kit: 146 Litre Aquarium for Tropical Fish The SuperFish Start 150 Tropical Kit is an attractive and easy-to-install 146-litre aquarium for tropical fish, ideal for beginners. It includes LED lighting, filter, heater, food, water conditioner, and more. |
 |
Interpet CPF 1/2/3 Internal Corner Power Filter User Guide and Maintenance Comprehensive guide to installing, maintaining, and troubleshooting the Interpet CPF 1/2/3 Internal Corner Power Filter for aquariums. Learn about its five-stage filtration, technical specifications, and tips for a healthy aquarium. |
 |
SuperFish Quadro Multi Colour Aquarium Setup and Maintenance Guide A comprehensive guide for setting up and maintaining SuperFish Quadro 40 and 70 Multi Colour aquariums, covering safety, installation steps, water care, feeding, and filter maintenance. |
Ask a question about this manual
Ask about setup, troubleshooting, compatibility, parts, safety, or missing instructions. Manuals+ will review the question and use this page’s manual context to help answer it.