1. Introduction
This instruction manual provides detailed information on the installation, operation, and maintenance of your Tuya Smart WiFi Wireless Lights Switch Kit. This innovative system allows you to control your lighting fixtures wirelessly, via voice commands, or through a smartphone application, offering enhanced convenience and energy management for your home or office.
The kit includes a wireless switch (transmitter) and a compact WiFi Smart Receiver, designed for seamless integration with existing electrical systems. Please read this manual thoroughly before installation and use to ensure proper functionality and safety.
2. Key Features
- Certified Safety: CE/RoHS/FCC certified, with overload and overheating prevention. Made from fire-resistant PC material (V0 fireproof level) and IP66 waterproof rating.
- Easy Installation: Create or move lamp switches without complex wiring. Neutral wire required for receiver.
- Voice Control: Compatible with Amazon Alexa and Google Home for hands-free operation.
- App Remote Control: Control lights from anywhere using the free 'Tuya Smart' app on your smartphone or tablet.
- Timer Function: Schedule automatic on/off times for connected devices to save energy.
- Compact Design: Mini wireless switch (7.5x4.8x1.5 cm) and small receiver (3.9x2.3x2.2 cm) for easy placement and concealment.
- Versatile Compatibility: Works with most fixtures including pull-chain lights, cupboard lighting, ceiling lights, and electric fans.
- High Capacity: Handles up to 1000W integrated power and 10A current.
- Durable & Secure Connection: Encrypted wireless signals with no interference, reaching up to 330ft indoors and 1300ft outdoors. Switch button lifespan up to 600,000 times, receiver up to 400,000 times.
- Long Battery Life: CR2032 button lithium battery in the switch can last 6-8 years.
3. Package Contents
Upon opening the package, please verify that all components are present and undamaged:
- 1x Wireless Transmitter (Switch Button)
- 1x WiFi Smart Receiver
 Figure 3.1: Tuya Smart WiFi Wireless Switch Kit Components
This image displays the two main components of the kit: the rectangular wireless switch on the left and the smaller, rectangular WiFi Smart Receiver on the right, both in white casing.
4. Specifications
| Attribute | Value |
|---|---|
| Product Dimensions | 4.06 x 3.11 x 1.73 inches; 3.53 ounces |
| Batteries | 1 CR2032 batteries required (included) |
| Manufacturer | EVERSECU |
| ASIN | B0CLRDRYM3 |
| Country of Origin | China |
| Operation Mode | ON-OFF |
| Current Rating | 10 Amps |
| Operating Voltage | 120 Volts |
| Contact Type | Normally Open |
| Connector Type | Crimp |
| Terminal | Solder |
| Item dimensions L x W x H | 4.06 x 3.11 x 1.73 inches |
| Circuit Type | 1-way |
| Actuator Type | Electronic Push Button |
5. Safety Information
Please observe the following safety precautions to prevent injury or damage to the device:
- Power Off Before Installation: Always ensure the main power supply to the circuit is turned off at the circuit breaker before attempting any installation or wiring.
- Professional Installation Recommended: If you are unsure about electrical wiring, consult a qualified electrician.
- Neutral Wire Required: The receiver unit requires a neutral wire for proper operation. Verify your electrical box has a neutral wire before installation.
- Indoor Use: While the product has an IP66 waterproof rating, ensure proper protection from direct water exposure if used in damp environments.
- Avoid Overloading: Do not exceed the maximum rated load of 1000W (LED) or 10A.
- Keep Away from Children: Store the device and its components out of reach of children.
- Proper Disposal: Dispose of batteries and electronic components according to local regulations.
6. Setup & Installation
The Tuya Smart WiFi Wireless Lights Switch Kit is designed for straightforward installation. Follow these steps carefully:
6.1. Receiver Installation
- Turn Off Power: Locate the circuit breaker controlling the light fixture you intend to connect and turn off the power. Verify power is off using a voltage tester.
- Access Wiring: Open the electrical box, light canopy, or junction box where the light fixture is wired.
- Connect Receiver: The receiver has input (IN) and output (OUT) terminals. Connect the Live (L) and Neutral (N) wires from your power source to the 'IN' terminals of the receiver. Connect the Live (L) and Neutral (N) wires leading to your light fixture to the 'OUT' terminals of the receiver. Ensure all connections are secure.
 Figure 6.1: Receiver Wiring Diagram
This diagram shows the WiFi Smart Receiver with clearly labeled input (AC80-275V City power source) and output connections to an integrated load, such as a fan or LED light, illustrating the Live and Neutral wire connections.
6.2. Wireless Switch Placement
The wireless switch does not require wiring and can be placed anywhere within range of the receiver. It can be mounted on a wall using adhesive or screws (not included) or simply used as a portable remote.
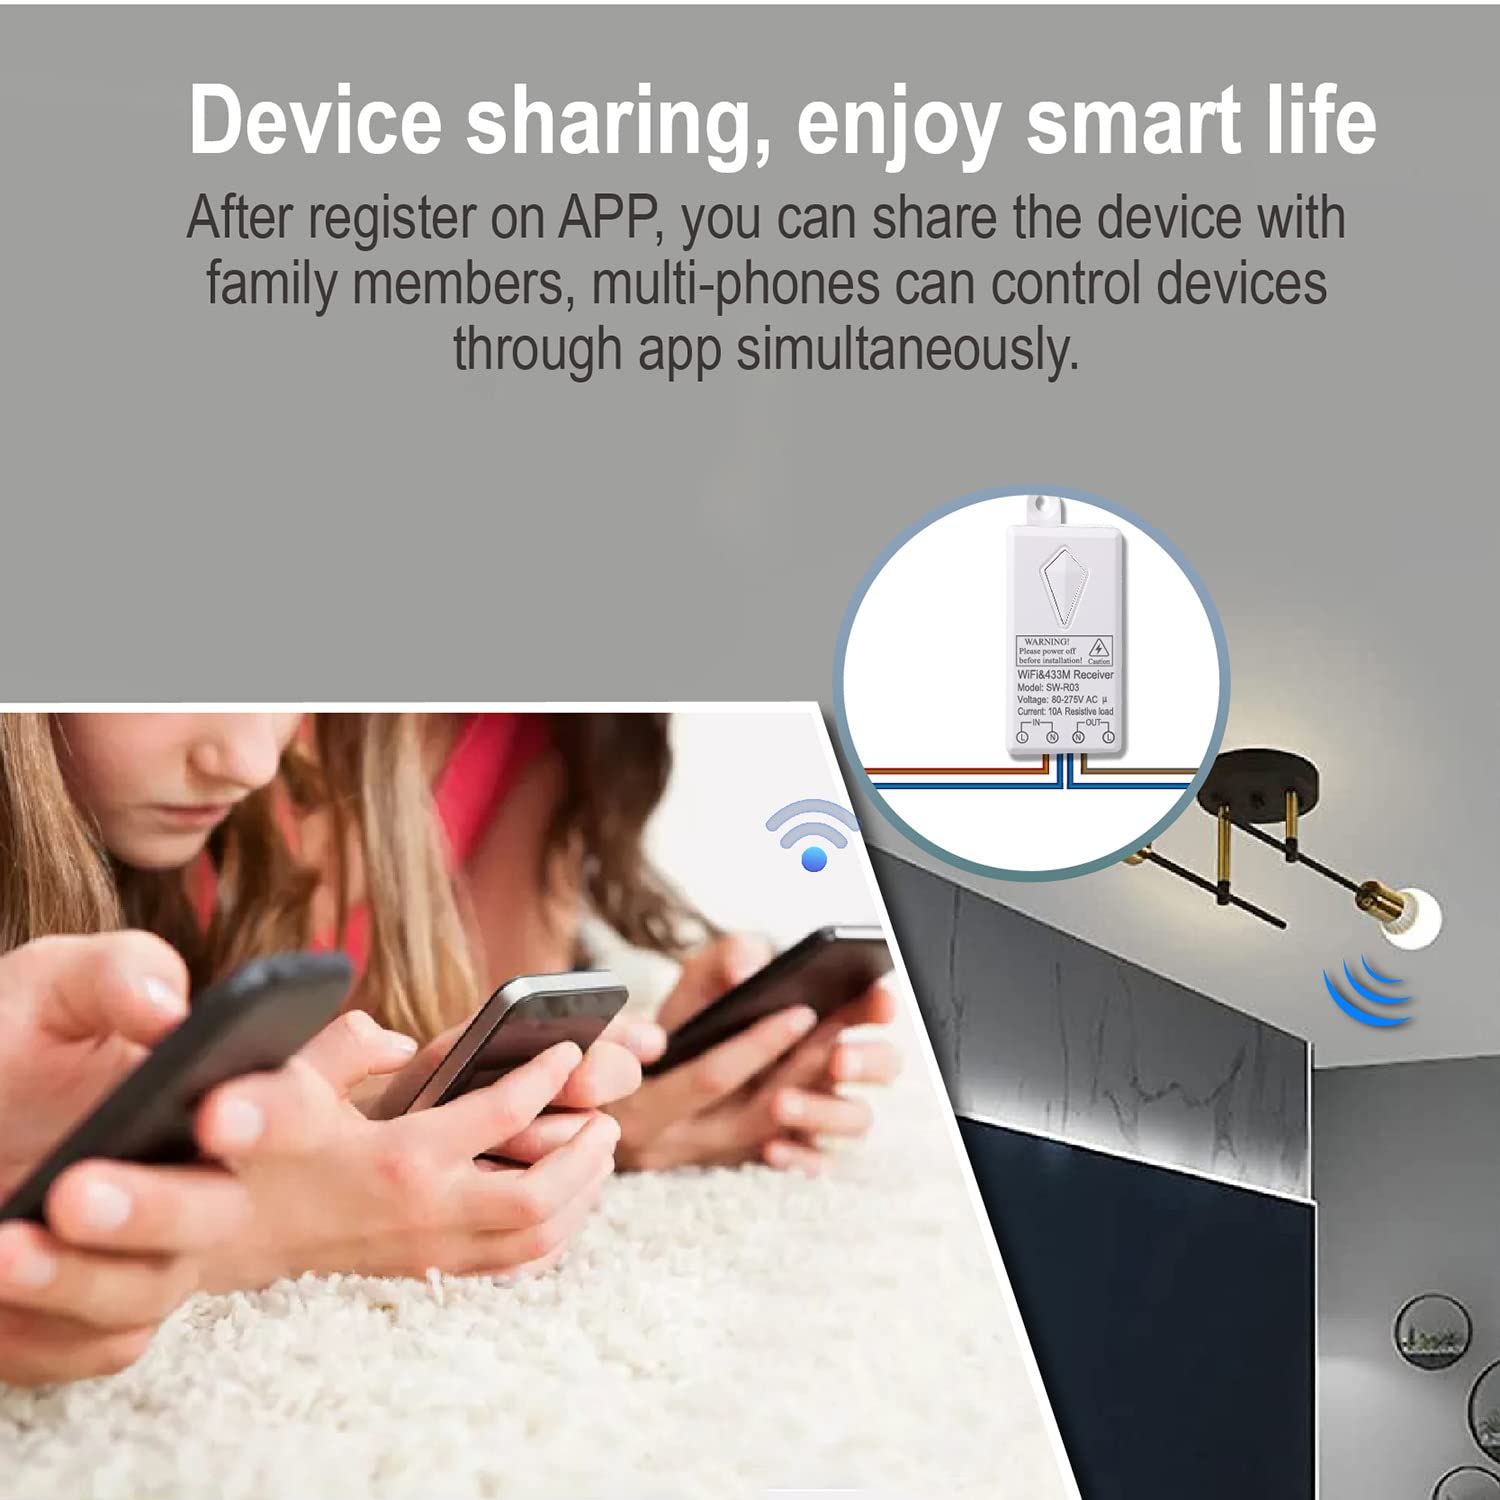 Figure 6.2: Wireless Switch Range
This image demonstrates the effective wireless range of the switch, showing a user activating the switch and the signal extending to multiple light fixtures within a large indoor space, indicating a range of 100-600 feet.
6.3. Pairing the Switch and Receiver
The switch and receiver are typically pre-paired. If re-pairing is needed or if you have multiple switches/receivers, follow the instructions provided with the product for pairing mode (usually involves pressing a button on the receiver until an indicator light flashes, then pressing the wireless switch button).
6.4. App Setup (Tuya Smart)
- Download App: Download the 'Tuya Smart' app from your smartphone's app store (iOS App Store or Google Play Store).
- Register/Login: Open the app and register for a new account or log in if you already have one.
- Add Device: In the app, tap '+' to add a new device. Follow the on-screen instructions to connect the WiFi Smart Receiver to your home Wi-Fi network (2.4GHz only).
- Rename Device: Once connected, you can rename the device for easier identification (e.g., 'Living Room Light').
7. Operation
7.1. Wireless Switch Control
Simply press the wireless switch button to turn the connected light fixture ON or OFF. The switch provides instant control without the need for an app or voice commands.
7.2. App Remote Control
With the 'Tuya Smart' app, you can control your lights from anywhere with an internet connection:
- Open the 'Tuya Smart' app.
- Select the light switch device you wish to control.
- Tap the ON/OFF button within the app to toggle the light.
 Figure 7.1: App Remote Control
This image shows a smartphone displaying the Tuya Smart app interface, with a light bulb icon and a toggle switch, indicating remote control functionality for a connected light fixture.
7.3. Voice Control (Alexa & Google Home)
Integrate your smart switch with Amazon Alexa or Google Home for convenient voice control:
- Link Accounts: In your Alexa or Google Home app, enable the 'Tuya Smart' skill/action and link your Tuya Smart account.
- Discover Devices: Ask Alexa or Google Home to discover new devices.
- Voice Commands: Use commands such as:
- "Alexa, turn on [Light Name]."
- "Hey Google, turn off [Light Name]."
 Figure 7.2: Voice Control Compatibility
This image depicts a user speaking to an Amazon Echo device, with a thought bubble showing 'Alexa, turn on the Living room lights.', and an 'ok' response, illustrating the seamless voice control integration with Alexa and Google Home.
7.4. Timer Function
Set schedules for your lights to turn on or off automatically:
- In the 'Tuya Smart' app, select your device.
- Look for the 'Timer' or 'Schedule' option.
- Set desired times for the light to turn ON or OFF, and select the days of the week for the schedule to repeat.
 Figure 7.3: Timer Function Setup
This image illustrates the timer function, showing a clock face with 'AM 06.30 ON' and 'PM 20.45 OFF' indicators, alongside a smartphone screen displaying the 'Add Schedule' interface within the Tuya Smart app, allowing users to schedule device operation.
7.5. Device Sharing
Share control of your smart switch with family members:
- In the 'Tuya Smart' app, go to the device settings.
- Select 'Share Device' or 'Device Sharing'.
- Add family members by their Tuya Smart account or phone number. They will then be able to control the device from their own app.
 Figure 7.4: Device Sharing
This image shows multiple individuals simultaneously using their smartphones to control a single light fixture, illustrating the device sharing capability of the smart switch system.
8. Maintenance
The Tuya Smart WiFi Wireless Lights Switch Kit is designed for low maintenance. Consider the following:
- Cleaning: Wipe the wireless switch and receiver with a dry, soft cloth. Do not use harsh chemicals or abrasive cleaners.
- Battery Replacement: The wireless switch is powered by a CR2032 button lithium battery, which has a lifespan of 6-8 years. When the switch's performance degrades, replace the battery by opening the battery compartment (refer to product diagram for location).
- Durability: The switch button is rated for 600,000 operations, and the receiver for 400,000 operations, ensuring long-term reliability.
9. Troubleshooting
If you encounter issues with your smart switch kit, refer to the following common problems and solutions:
- Light Not Responding to Wireless Switch:
- Ensure the receiver has power and is correctly wired.
- Check the battery in the wireless switch. Replace if necessary.
- Verify the switch and receiver are paired. If not, re-pair them according to the pairing instructions.
- Ensure the switch is within the effective wireless range of the receiver.
- Light Not Responding to App/Voice Control:
- Check your home Wi-Fi network connection. The receiver requires a stable 2.4GHz Wi-Fi signal.
- Ensure the receiver is connected to your Wi-Fi network and is online in the Tuya Smart app.
- Verify your smartphone has an internet connection.
- For voice control, ensure your Tuya Smart account is correctly linked to Alexa or Google Home, and devices are discovered.
- Intermittent Connectivity:
- Relocate your Wi-Fi router closer to the receiver or consider a Wi-Fi extender to improve signal strength.
- Ensure there are no major obstructions or sources of strong interference between the receiver and your Wi-Fi router.
- Anti-Surge Protection: The receiver includes 3000V anti-surge protection to resist lightning strikes and power fluctuations.
 Figure 9.1: Anti-Surge Protection
This image visually represents the 3000V anti-surge capability of the receiver, showing a lightning bolt graphic on one side and the receiver connected to a ceiling light on the other, emphasizing its resistance to electrical surges.
10. Warranty & Support
Specific warranty information for this product is not provided in the available data. For warranty claims, technical support, or further assistance, please contact the manufacturer, EVERSECU, directly through their official website or the retailer from whom the product was purchased.


