
1. Introduction
This manual provides essential instructions for the safe and efficient use of your Fafeicy Solar Panel Kit. This kit includes a 300W solar panel and a 50A solar charger controller, designed for various outdoor environments. Please read this manual thoroughly before installation and operation to ensure optimal performance and longevity of the product.
2. Product Overview
2.1. Components Included
- 1 x Solar Panel (300W)
- 1 x Solar Charger Controller (DC 12/24V 50A)
- 4 x Accessories (likely mounting hardware or connectors)
2.2. Key Features
- High Efficiency Solar Panel: Utilizes solar energy for charging without emissions or noise, offering an environmentally friendly solution.
- All-Weather Charging: Designed for outdoor use, capable of charging in various conditions as long as sunlight is present.
- Efficient and Stable Controller: Equipped with a 50A controller for voltage, current, overcharging, over-discharge, and short-circuit protection, ensuring safe charging and extended equipment life.
- Powerful Output: 300W output suitable for charging mobile phones, tablets, laptops, and energy storage devices.
- Durable Design: IP67 rating for the solar panel, suitable for harsh outdoor environments including rainy days, sandstorms, and dust.
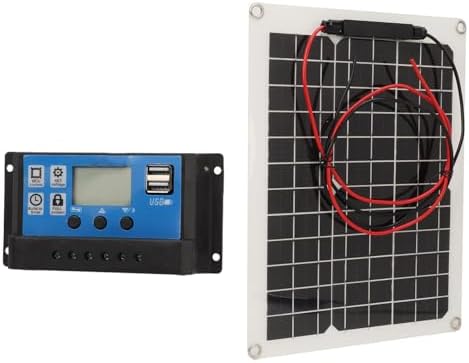
Image 2.1: The Fafeicy 300W Solar Panel Kit, showing the solar panel and the 50A charge controller.
3. Specifications
| Feature | Specification |
|---|---|
| Brand | Fafeicy |
| Model Number | Fafeicy62emrqdvgy |
| Material | Acrylonitrile Butadiene Styrene (ABS) |
| Solar Panel Size | Approx. 28x38cm / 11.0x15.0in |
| Solar Panel Power | 300W |
| Controller Voltage | DC 12V/24V (Auto-sensing) |
| Controller Current | 50A |
| Efficiency | High Efficiency |
| Item Weight | Approx. 1.62 pounds (657g) |
| Package Dimensions | Approx. 18.11 x 11.81 x 1.57 inches |
4. Safety Information
Adhering to safety guidelines is crucial for preventing injury and damage to equipment. Please observe the following:
- Always disconnect power before making or breaking electrical connections.
- Ensure all wiring is correctly polarized and securely connected to prevent short circuits.
- Do not attempt to disassemble or repair the solar panel or controller yourself. Refer to qualified personnel.
- Keep the solar panel and controller away from flammable materials and sources of heat.
- Avoid touching the solar panel surface with sharp objects.
- Ensure proper ventilation around the controller to prevent overheating.
- Wear appropriate personal protective equipment (PPE) such as gloves and eye protection during installation.
- The solar panel generates electricity when exposed to light. Treat it as a live electrical component.
5. Setup and Installation
This section outlines the general steps for setting up your solar panel kit. Specific mounting details may vary based on your application (e.g., RV, shed, cabin).
5.1. Site Selection
- Choose a location for the solar panel that receives maximum direct sunlight throughout the day, free from shadows.
- Ensure the mounting surface is sturdy enough to support the panel and withstand wind.
- The controller should be installed in a dry, well-ventilated area, protected from direct sunlight and moisture.
5.2. Mounting the Solar Panel
Securely mount the solar panel using appropriate hardware (not explicitly detailed in the provided data, but implied by "4 x Accessories"). The panel has pre-drilled holes for mounting.
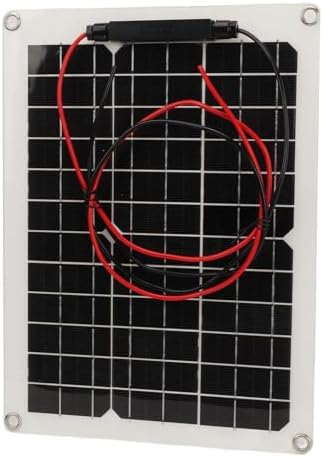
Image 5.1: The 300W solar panel, showing its design and pre-drilled mounting holes.
5.3. Wiring Connections
- Connect the Battery to the Controller: First, connect the battery to the solar charge controller. Ensure correct polarity (positive to positive, negative to negative). The controller will detect 12V or 24V automatically.
- Connect the Solar Panel to the Controller: Next, connect the solar panel to the solar charge controller. Again, observe correct polarity. The controller will begin charging the battery.
- Connect the Load to the Controller (Optional): If you are powering DC loads directly from the controller, connect them last. Refer to the controller's specific manual for load connection details and settings.
Important: Always connect the battery first and disconnect it last. Incorrect connection order can damage the controller.

Image 5.2: Example of MC4 connectors, commonly used for secure and waterproof solar panel connections.
6. Operating Instructions
Once installed, the solar panel kit operates largely automatically. The controller manages the charging process to protect your battery.
6.1. Controller Display and Settings
The 50A controller features a display and buttons for monitoring and adjusting settings. Common display indicators include battery voltage, charging current, and load status. Consult the specific controller manual for detailed instructions on navigating its menu and adjusting parameters like battery type, charge voltage, and load timer settings.

Image 6.1: Close-up of the solar charge controller, showing its display screen and control buttons.
6.2. Charging Devices
The 300W solar panel and 50A controller can provide power for various devices. The controller typically includes USB ports for direct charging of smaller electronics like mobile phones and tablets. For higher power devices or AC appliances, an inverter (not included) connected to the battery bank is required.
7. Maintenance
Regular maintenance ensures the longevity and efficiency of your solar panel kit.
- Solar Panel Cleaning: Periodically clean the surface of the solar panel with a soft, damp cloth to remove dust, dirt, and debris. A clean panel ensures maximum sunlight absorption.
- Connection Inspection: Regularly check all electrical connections for tightness and corrosion. Loose or corroded connections can reduce performance and pose a safety risk.
- Controller Environment: Ensure the controller remains in a dry, well-ventilated area. Check for any signs of moisture or dust accumulation.
- Battery Health: Monitor your battery's health according to its manufacturer's guidelines.
8. Troubleshooting
This section addresses common issues you might encounter.
8.1. No Power Output from Solar Panel
- Check Sunlight: Ensure the panel is receiving direct sunlight and is not shaded.
- Clean Panel: Clean any dirt or debris from the panel surface.
- Inspect Connections: Verify that the solar panel is correctly and securely connected to the controller, observing polarity.
- Controller Status: Check the controller's display for any error codes or indicators.
8.2. Battery Not Charging
- Verify Battery Connection: Ensure the battery is correctly connected to the controller with proper polarity.
- Check Battery Voltage: If the battery voltage is too low, the controller might not initiate charging.
- Controller Settings: Confirm that the controller settings match your battery type (e.g., lead-acid, lithium).
- Solar Input: Ensure the solar panel is generating power (see "No Power Output from Solar Panel" above).
8.3. Controller Display Not Working
- Check Battery Connection: The controller is typically powered by the battery. Ensure the battery is connected and has sufficient charge.
- Inspect Wiring: Look for loose or damaged wires between the battery and the controller.
9. Warranty and Support
Fafeicy products are designed for quality and reliability. For specific warranty details, please refer to the documentation provided with your purchase or contact Fafeicy customer support.
9.1. Protection Plans
Optional protection plans may be available for extended coverage:
- 3-Year Protection Plan
- 4-Year Protection Plan
- Complete Protect (monthly plan covering eligible purchases)
For details on these plans, please consult the retailer or your purchase documentation.
9.2. Customer Support
For further assistance, technical support, or inquiries regarding your Fafeicy Solar Panel Kit, please visit the official Fafeicy store or contact their customer service department. You can find more information and contact details on the Fafeicy Brand Store on Amazon.