
VC1133
SilverCrest SHAZ 22.2 D5 Cordless 2-in-1 Vacuum Cleaner User Manual
Model: VC1133 | Brand: Generic
1. Important Safety Instructions
Please read all instructions carefully before using the appliance and retain them for future reference. Failure to follow these instructions may result in electric shock, fire, or serious injury.
- This appliance is intended for domestic use only. Do not use outdoors or on wet surfaces.
- Do not allow children to operate the vacuum cleaner. Close supervision is necessary when used near children.
- Use only as described in this manual. Use only manufacturer's recommended attachments.
- Do not pick up flammable or combustible liquids, such as gasoline, or use in areas where they may be present.
- Do not pick up anything that is burning or smoking, such as cigarettes, matches, or hot ashes.
- Do not use without the dust cup and/or filters in place.
- Turn off the appliance before connecting or disconnecting the battery pack, or before cleaning or performing maintenance.
- Use only the charger supplied by the manufacturer to recharge.
- Do not handle the charger or appliance with wet hands.
- Store the appliance indoors. Put it away after use to prevent tripping accidents.
2. Product Overview
The SilverCrest SHAZ 22.2 D5 is a versatile 2-in-1 cordless vacuum cleaner designed for efficient cleaning of various surfaces. It can be used as a full-size stick vacuum or a detachable handheld unit.

Figure 2.1: Full assembly of the SilverCrest SHAZ 22.2 D5 Cordless Vacuum Cleaner, showing its upright stick configuration.

Figure 2.2: The vacuum cleaner demonstrating its 2-in-1 capability, with the handheld unit detached and the wall mount for accessories visible.

Figure 2.3: Included accessories: the main floor brush, a crevice tool for narrow spaces, and a brush tool for delicate surfaces.
Components:
- Main Unit: Contains the motor, dustbin, and battery.
- Extension Tube: Connects the main unit to the floor brush for upright cleaning.
- Floor Brush: Equipped with a rotating brush roll for effective cleaning on various floor types.
- Dustbin: Transparent, bagless container for collecting dust and debris.
- HEPA Filter: High-efficiency particulate air filter for trapping fine dust and allergens.
- Charging Adapter: For recharging the vacuum's battery.
- Wall Mount: For convenient storage and charging.
- Crevice Tool: For cleaning tight corners and narrow gaps.
- Brush Tool: For cleaning upholstery, curtains, and other delicate surfaces.
3. Setup and Initial Use
3.1 Assembly
- Attach the Extension Tube: Insert the top end of the extension tube into the main unit until it clicks securely into place.
- Attach the Floor Brush: Insert the bottom end of the extension tube into the floor brush until it clicks securely into place.
- Ensure Dustbin is Attached: Verify that the transparent dustbin is correctly installed on the main unit.
3.2 Initial Charging
Before first use, fully charge the vacuum cleaner's battery. This ensures optimal performance and battery longevity.

Figure 3.1: The vacuum cleaner mounted on its wall charging station, connected to the power adapter for charging.
- Connect the charging adapter to a power outlet.
- Connect the other end of the charging adapter to the charging port on the main unit or the wall mount.
- The charging indicator light will illuminate. Allow approximately 2 hours for a full charge.
- Once fully charged, the indicator light may change or turn off, depending on the model. Disconnect the charger.
Note: For best battery life, avoid completely draining the battery before recharging.
4. Operating Instructions
4.1 Power On/Off
- To turn on the vacuum cleaner, press the power button located on the main unit.
- To turn off, press the power button again.
- Some models may have multiple power modes (e.g., Eco, Max). Press the mode button to switch between them.
4.2 Using as a Stick Vacuum
For general floor cleaning, use the vacuum in its stick configuration with the extension tube and floor brush attached.
Figure 4.1: The vacuum cleaner in its full stick configuration, ready for floor cleaning.
- Ensure the floor brush is securely attached.
- Select the appropriate power mode for your cleaning task (e.g., higher power for carpets, lower for hard floors).
- Move the vacuum cleaner slowly and steadily over the surface to be cleaned.
4.3 Using as a Handheld Vacuum
For quick clean-ups, upholstery, or car interiors, detach the main unit to use it as a handheld vacuum.
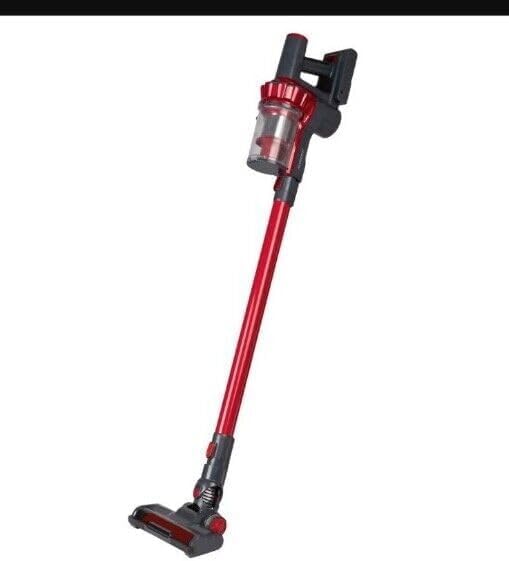
Figure 4.2: The main unit detached for handheld use, shown with the crevice tool attached for reaching tight spaces.
- Press the release button to detach the main unit from the extension tube.
- Attach the desired accessory (crevice tool or brush tool) directly to the main unit's nozzle.
- Turn on the vacuum and begin cleaning.
5. Maintenance
Regular maintenance ensures optimal performance and extends the life of your vacuum cleaner.
5.1 Emptying the Dustbin
Empty the dustbin after each use or when the MAX fill line is reached.

Figure 5.1: Disassembled dustbin and filter components, including the transparent dust cup, metal mesh filter, and HEPA filter.
- Ensure the vacuum cleaner is turned off.
- Press the dustbin release button and remove the dustbin from the main unit.
- Hold the dustbin over a trash can and open the bottom flap to empty the contents.
- Close the flap and reattach the dustbin to the main unit until it clicks.
5.2 Cleaning the HEPA Filter
The HEPA filter should be cleaned regularly, ideally after every few uses, and replaced every 3-6 months depending on usage.
- Remove the dustbin as described above.
- Twist and pull out the HEPA filter assembly from the dustbin.
- Tap the filter gently over a trash can to remove loose dust.
- If necessary, rinse the HEPA filter under cold running water. Do not use detergent.
- Allow the filter to air dry completely for at least 24 hours before reinserting. Do not use the vacuum with a wet filter.
- Reassemble the filter and dustbin, then reattach to the main unit.
5.3 Cleaning the Brush Roll
Periodically check the brush roll in the floor brush for tangled hair or debris.
- Turn off the vacuum and detach the floor brush.
- Locate the brush roll access cover (usually on the side or bottom of the floor brush) and open it.
- Remove the brush roll. Use scissors to cut away any tangled hair or threads.
- Clean any debris from the brush roll housing.
- Reinsert the brush roll and close the access cover securely.
6. Troubleshooting
If you encounter issues with your vacuum cleaner, refer to the following table for common problems and solutions.
| Problem | Possible Cause | Solution |
|---|---|---|
| Vacuum does not turn on. | Battery is not charged. | Charge the battery fully. |
| Battery not properly inserted. | Ensure battery pack is securely clicked into place. | |
| Low suction power. | Dustbin is full. | Empty the dustbin. |
| Filter is clogged. | Clean or replace the HEPA filter. Ensure it is completely dry before reinserting. | |
| Nozzle or extension tube is blocked. | Check for and remove any blockages in the nozzle, extension tube, or main unit intake. | |
| Brush roll not spinning. | Hair or debris tangled in brush roll. | Clean the brush roll as described in the Maintenance section. |
| Brush roll access cover not closed properly. | Ensure the brush roll cover is securely latched. |
If the problem persists after trying these solutions, please contact customer support.
7. Specifications
| Feature | Detail |
|---|---|
| Brand | Generic |
| Model Number | VC1133 |
| Color | White |
| Power / Wattage | 130 watts |
| Voltage | 22.2 Volts |
| Dustbin Capacity | 500 Grams |
| Runtime | Up to 2 hours (Note: Actual runtime varies based on power mode and surface type.) |
| Item Weight | 2 Kilograms |
| Material | Plastic |
| Filter Type | HEPA |
| Surface Recommendation | Hard Floor, Carpet |
| Special Features | Cordless, Pet Hair, Cyclonic, Compact, Bagless, Portable, Lightweight |
8. Warranty and Support
This SilverCrest SHAZ 22.2 D5 Cordless 2-in-1 Vacuum Cleaner comes with a 2-Year Warranty from the date of purchase, covering manufacturing defects under normal household use.
For warranty claims, technical support, or any inquiries not covered in this manual, please contact the retailer or the manufacturer's customer service department. Please have your model number (VC1133) and proof of purchase ready when contacting support.
Ask a question about this manual
Ask about setup, troubleshooting, compatibility, parts, safety, or missing instructions. Manuals+ will review the question and use this page’s manual context to help answer it.