1. Introduction
Thank you for choosing the Irfora 9892B2 Head Magnifier. This device is designed to provide hands-free magnification with integrated LED lighting, making it ideal for various tasks such as reading, crafting, jewelry inspection, and detailed work. It features five interchangeable lenses to suit different magnification needs and can be worn with either traditional eyeglass legs or an elastic headband for comfort.

Figure 1: Irfora 9892B2 Head Magnifier with included accessories.
2. Safety Information
- Do not expose the device to direct sunlight or high temperatures, as this may cause fire or damage.
- Avoid looking directly at the LED lights for extended periods to prevent eye strain.
- Keep the device out of reach of children to prevent accidental ingestion of small parts or batteries.
- Do not attempt to disassemble or modify the device, as this will void the warranty and may cause damage or injury.
- Use only the specified battery type (AAA) and ensure correct polarity during installation.
- Remove batteries if the device will not be used for an extended period to prevent leakage.
3. Package Contents
Please check the package to ensure all items are present:
- 1 x Head-mounted Bracket (Main Magnifier Unit)
- 1 x Lens Storage Box
- 5 x Interchangeable Lenses (1.0X, 1.5X, 2.0X, 2.5X, 3.5X)
- 1 x Cleaning Cloth
- 1 x Elastic Headband

Figure 2: All components included in the package.
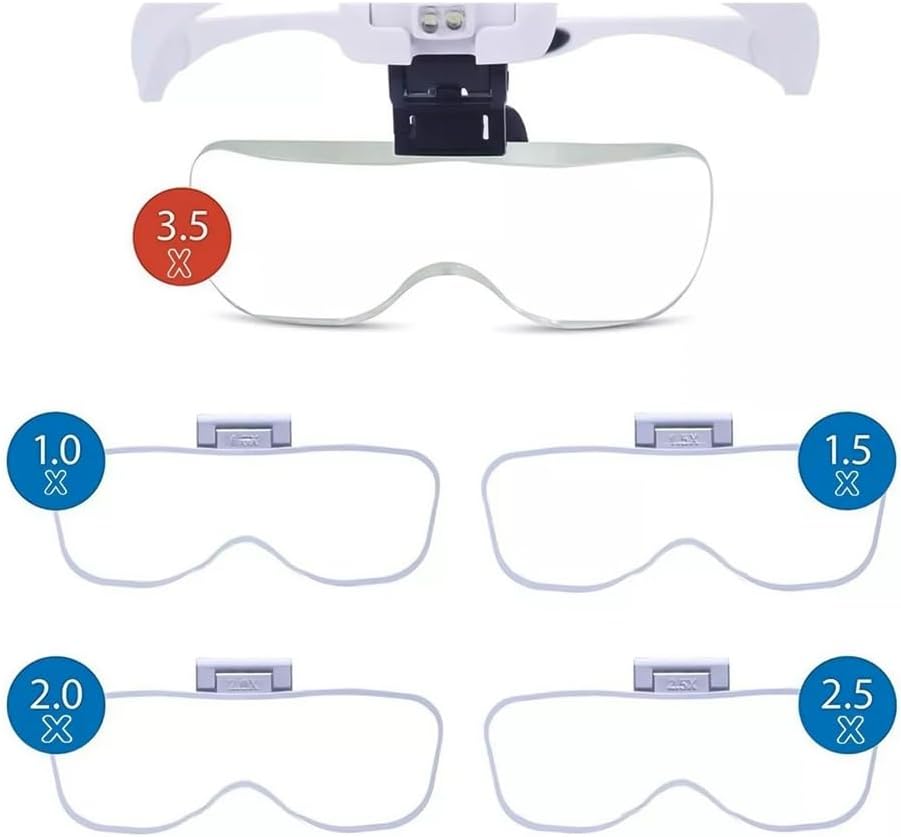
Figure 3: The five interchangeable lenses (1.0X, 1.5X, 2.0X, 2.5X, 3.5X).
4. Product Overview
Familiarize yourself with the main components of the Irfora 9892B2 Head Magnifier:
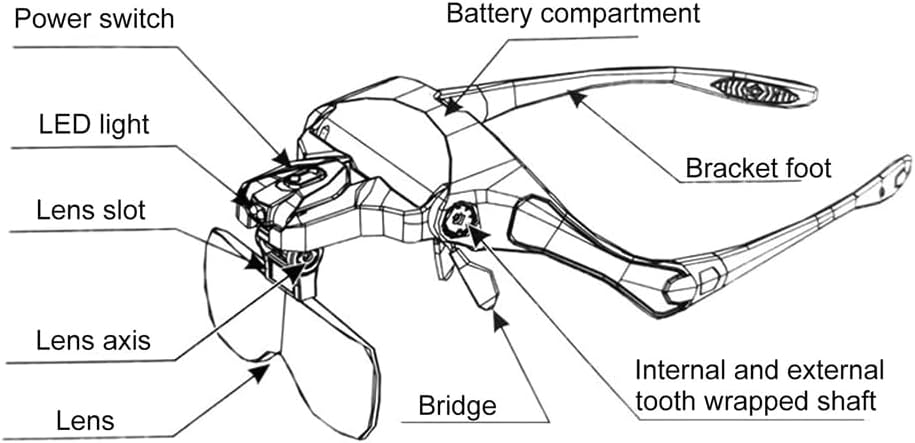
Figure 4: Labeled diagram of the head magnifier components.
- Power Switch: Controls the LED lights.
- LED Light: Provides illumination for magnified viewing.
- Lens Slot: Where the interchangeable lenses are inserted.
- Lens Axis: Allows adjustment of the lens angle.
- Bridge: Connects the lens assembly to the frame.
- Battery Compartment: Houses the AAA batteries for the LED lights.
- Bracket Foot: The traditional eyeglass arms.
- Internal and External Tooth Wrapped Shaft: Mechanism for adjusting the angle of the magnifier.
5. Setup
5.1 Battery Installation
- Locate the battery compartment on the top of the head-mounted bracket (refer to Figure 4).
- Open the battery compartment cover.
- Insert 3 AAA batteries (not included) into the compartment, ensuring correct polarity (+/-) as indicated inside.
- Close the battery compartment cover securely.
5.2 Attaching Lenses
- Select the desired magnification lens from the lens storage box.
- Align the lens with the lens slot on the magnifier unit.
- Gently slide the lens into the slot until it clicks securely into place. Ensure it is firmly seated to prevent it from falling out during use.

Figure 5: Inserting and removing lenses.
5.3 Wearing Options
The magnifier can be worn in two ways:
- Eyeglass Legs: Use the pre-attached eyeglass legs for a traditional glasses-like fit.
- Elastic Headband: For extended use or a more secure fit, you can replace the eyeglass legs with the included elastic headband. To do this, gently pull the eyeglass legs outwards from their pivot points until they detach. Then, attach the elastic headband by sliding its ends into the same pivot points until they click into place. Adjust the headband for a comfortable and secure fit around your head.

Figure 6: Two ways to wear the magnifier: with eyeglass legs or elastic headband.
6. Operating Instructions
6.1 Turning On/Off LED Lights
Locate the power switch on the side of the magnifier unit (refer to Figure 4). Slide the switch to turn the LED lights on or off. The lights are adjustable in angle to direct illumination where needed.
6.2 Adjusting Magnifier Angle and Distance
The magnifier unit features an adjustable slot and pivot points that allow you to adjust the distance between your eyes and the lens, as well as the angle of the lens. This helps in finding the optimal viewing position for different tasks and individual comfort.
6.3 Magnification and Working Distance
Each lens provides a different magnification level and corresponding optimal working distance (the distance between the lens and the object being viewed). Refer to the table below for details:

Figure 7: Magnification levels and optimal working distances.
| Magnification | Working Distance |
|---|---|
| 1.0X | 555mm (approx. 21.85 inches) |
| 1.5X | 381mm (approx. 15.00 inches) |
| 2.0X | 278mm (approx. 10.94 inches) |
| 2.5X | 183mm (approx. 7.20 inches) |
| 3.5X | 156mm (approx. 6.14 inches) |
7. Maintenance
- Cleaning Lenses: Use the provided cleaning cloth to gently wipe the lenses. For stubborn smudges, a small amount of lens cleaning solution can be applied to the cloth, not directly to the lens. Avoid abrasive materials or harsh chemicals.
- Cleaning Frame: Wipe the frame with a soft, damp cloth. Do not immerse the device in water.
- Battery Replacement: Replace batteries when the LED lights dim or stop working. Always replace all 3 AAA batteries at the same time.
- Storage: Store the magnifier and lenses in a clean, dry place, away from direct sunlight and extreme temperatures. Use the lens storage box to protect the lenses when not in use.
8. Troubleshooting
| Problem | Possible Cause | Solution |
|---|---|---|
| LED lights do not turn on. | Batteries are dead or incorrectly installed. | Check battery polarity. Replace with new AAA batteries. |
| Image is blurry or unclear. | Lens is dirty; incorrect working distance; wrong lens for task. | Clean the lens with the provided cloth. Adjust the distance between the magnifier and the object. Try a different magnification lens. |
| Magnifier feels loose on head. | Headband/eyeglass legs not adjusted properly. | Adjust the elastic headband for a tighter fit, or ensure eyeglass legs are fully extended and positioned correctly. |
9. Specifications
| Feature | Detail |
|---|---|
| Brand | Irfora |
| Model | 9892B2 |
| Material | Plastic, Metal, Acrylic |
| Color | White |
| Magnification Lenses | 1.0X, 1.5X, 2.0X, 2.5X, 3.5X |
| Light Source | 2 x LED Lights |
| Battery Type | 3 x AAA batteries (not included) |
| Product Dimensions (L x W x H) | Approx. 7.68 x 6.1 x 2.56 inches (220 x 145 x 80mm) |
| Package Weight | Approx. 342g |
10. Warranty and Support
This product comes with a limited manufacturer's warranty. Please refer to the original purchase documentation or contact your retailer for specific warranty terms and conditions. For technical support or inquiries, please contact the manufacturer or your point of purchase.
Manufacturer: Irfora
For further assistance, please visit the official Irfora website or contact their customer service department.