1. Introduction
This manual provides detailed instructions for the installation, operation, and maintenance of your FITCAMX 4K Dual Cam Dash Camera, Model 6275 No Screw. This dash camera is designed to seamlessly integrate with specific Ford F-Series trucks, offering high-resolution video recording for enhanced driving safety and evidence capture.
1.1 Compatibility
- Ford F-150: 2013, 2014, 2015, 2016, 2017, 2018, 2019, 2020, 2021, 2022, 2023
- Ford F-150 Raptor: 2013, 2014, 2015, 2016, 2017, 2018, 2019, 2020, 2021, 2022, 2023
- Ford F-250: 2011, 2012, 2013, 2014, 2015, 2016, 2017, 2018, 2019, 2020, 2021, 2022
- Ford F-350: 2011, 2012, 2013, 2014, 2015, 2016, 2017, 2018, 2019, 2020, 2021, 2022
Ensure your vehicle matches the specified models and years for proper fitment and functionality. This specific model (6275 No Screw) is designed for vehicles where the original rearview mirror cover does not require screw removal for access.
2. Package Contents
Verify that all items are present in the package:
- 1 × FITCAMX Dash Cam (Front Camera)
- 1 × Memory Card (128GB pre-installed)
- 1 × Front Cam Cable (for power connection)
- 1 × Removal Pry Tool
- 1 × User Manual (this document)
- 1 × Rear Camera (for Dual Cam models)
- 1 × Rear Camera Cable (for Dual Cam models)
3. Product Overview and Features
The FITCAMX 4K Dual Cam Dash Camera is engineered for discreet integration and high-performance recording. Key features include:
- 4K UHD High Resolution: Records clear videos up to 2160P using an advanced Novatek chip and f/1.6 large aperture lens.
- Superior Night Vision: Equipped with Wide Dynamic Range (WDR) technology for clear video capture in low-light conditions, including license plates and road signs.
- Seamless Loop Recording: Automatically overwrites the oldest footage when the memory card is full, ensuring continuous recording.
- G-Sensor: Detects sudden collisions and automatically saves and locks relevant footage to prevent overwriting.
- Wi-Fi & APP Control: Connects to a smartphone app for live view, video download, editing, and sharing.
- Perfect Fit Design: Designed to match the original car rearview mirror cover for a factory-integrated appearance.
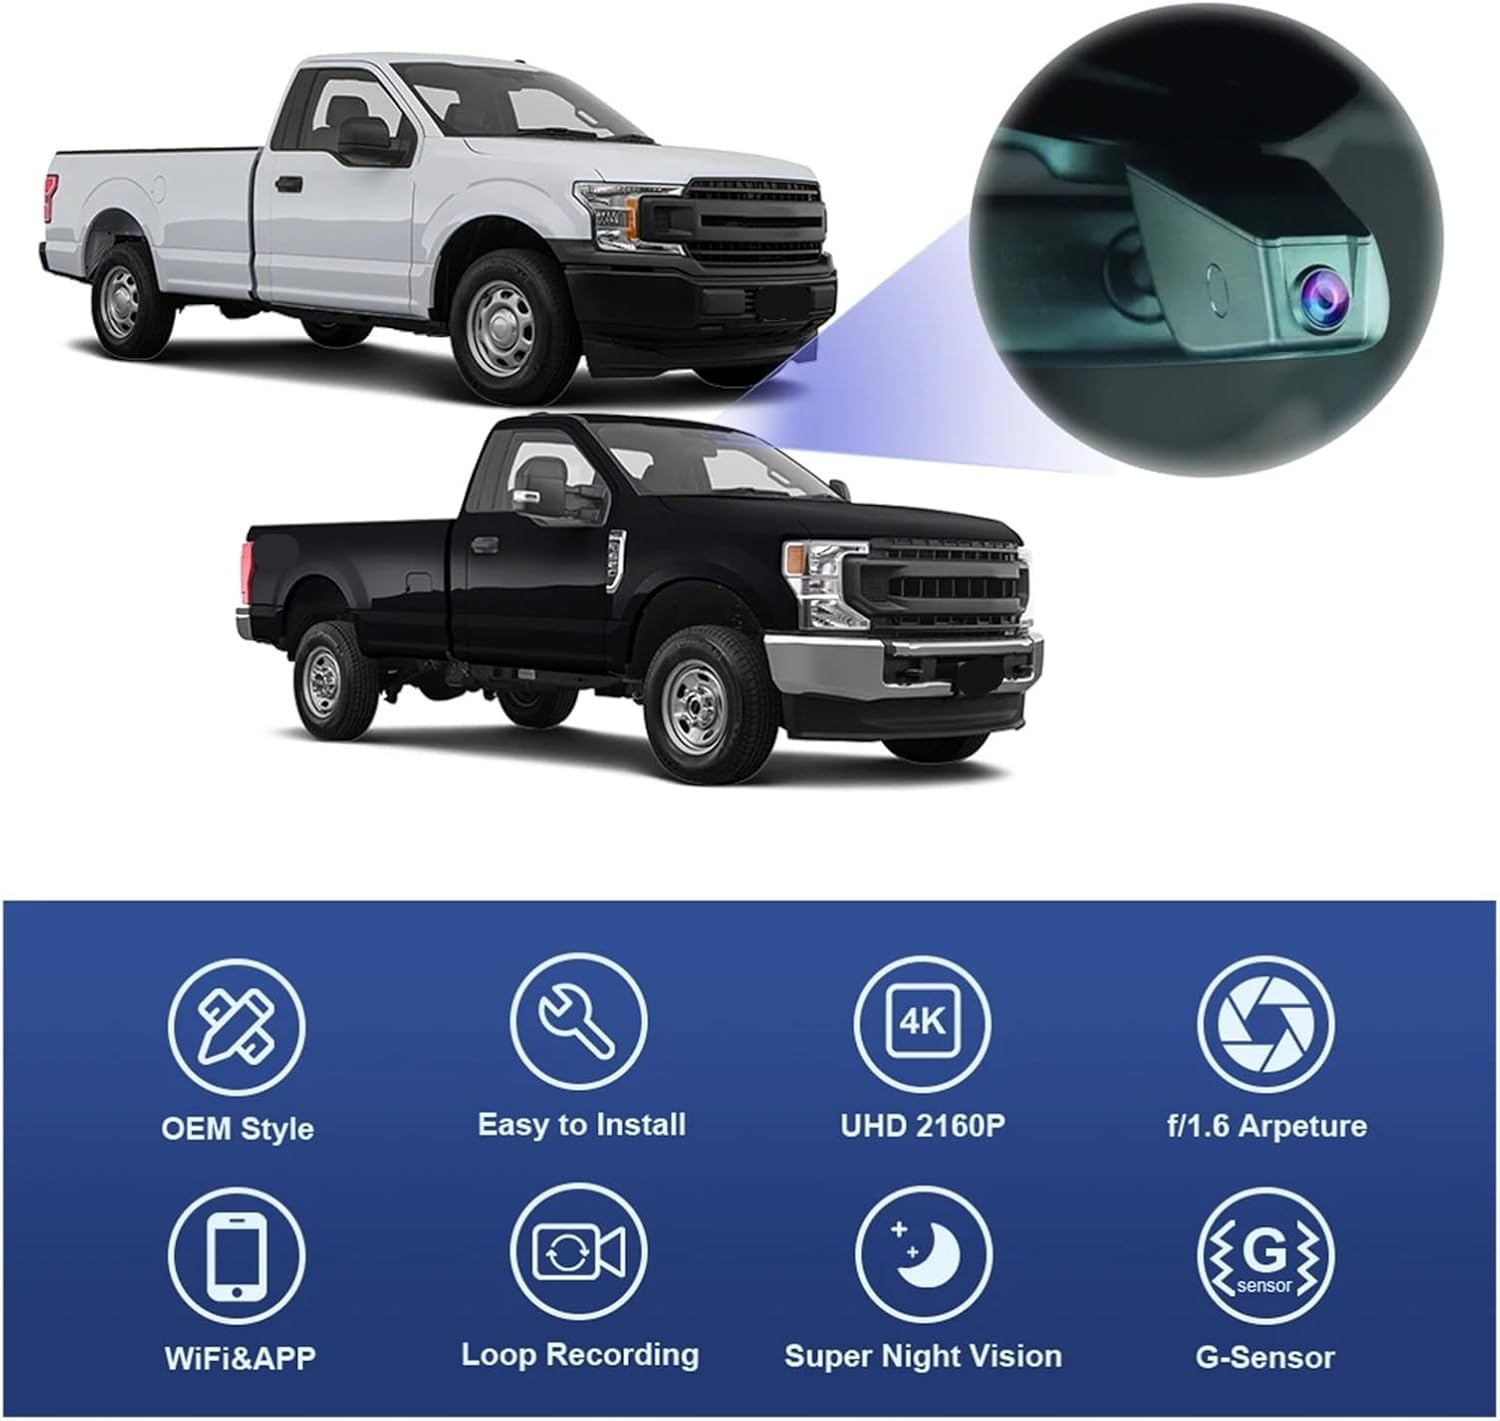
Image: Overview of FITCAMX dash cam features including OEM style, easy installation, UHD 2160P, f/1.6 aperture, WiFi & APP, loop recording, super night vision, and G-Sensor.
4. Installation Guide
The FITCAMX dash camera is designed for a plug-and-play installation without damaging your vehicle's original wiring. This model (6275 No Screw) takes power directly from the rearview mirror connector.
4.1 Identifying Your Dash Cam Model and Power Connection

Image: Diagram showing different dash cam models (HD2-6275 with screw, HD2-6275 with 3M tape, DZ-00455) and their respective power connection methods (rearview mirror plug, rain sensor). This manual focuses on Model 6275 No Screw (fixed by 3M tape, power from rearview mirror).
Your specific model, 6275 No Screw, is designed to be fixed using 3M tape and draws power from the rearview mirror plug. Ensure you have the correct model before proceeding with installation.
4.2 Step-by-Step Installation
- Prepare the Area: Ensure the vehicle is turned off. Use the provided pry tool to carefully remove the original rearview mirror cover.
- Mount the Bracket: For the "No Screw" model, the dash cam unit will replace the original cover. No separate bracket with screws is typically used for this specific model. The dash cam itself integrates into the existing housing.
- Connect Power: Locate the rearview mirror power connector. Use the provided front cam cable (Y-cable) to connect the dash cam to this power source. Ensure a secure connection.
- Install Dash Cam: Align the FITCAMX dash cam unit with the rearview mirror housing and firmly press it into place until it clicks, ensuring it is securely mounted.
- Install Rear Camera (if applicable): If you have a dual cam model, route the rear camera cable to the desired rear window location and mount the rear camera. Connect the rear camera cable to the main dash cam unit.
- Test Functionality: Turn on your vehicle's ignition to verify the dash cam powers on and begins recording.

Image: Four-step installation guide showing: 1. Removing the original screw (note: for "no screw" model, this step might involve removing the cover without screws), 2. Mounting the bracket with screw (note: for "no screw" model, the dash cam unit replaces the cover directly), 3. Connecting the rearview mirror with Y-cable, and 4. Mounting the dash cam.

Image: Visual comparison of "Before" and "After" for different power connection methods. The middle image shows the HD2-6275 (With 3M tape) model, which corresponds to the "No Screw" variant, drawing power from the rearview mirror.
5. Operating Instructions
Once installed, the FITCAMX dash cam operates automatically. For advanced features and video management, use the dedicated smartphone application.
5.1 Automatic Recording
The dash cam will automatically power on and begin recording when your vehicle's ignition is turned on. It will automatically save footage in segments (loop recording) and protect emergency recordings via the G-Sensor.
5.2 Wi-Fi Connection and App Usage
To access live view, download videos, or adjust settings, connect your smartphone to the dash cam via Wi-Fi.
- Download App: Search for the "FITCAMX" app on your smartphone's app store (iOS or Android).
- Connect to Wi-Fi: On your smartphone, go to Wi-Fi settings and connect to the dash cam's Wi-Fi network. The network name and password can typically be found in the dash cam's settings (if accessible via a small screen) or in the quick start guide.
- Open App: Launch the FITCAMX app. You should see a live view from the dash cam.
- Manage Videos:
- Download Video: Browse recorded footage and select clips to download directly to your phone.
- Edit Video: The app may offer basic editing functions.
- Share Video: Share downloaded clips through various platforms.
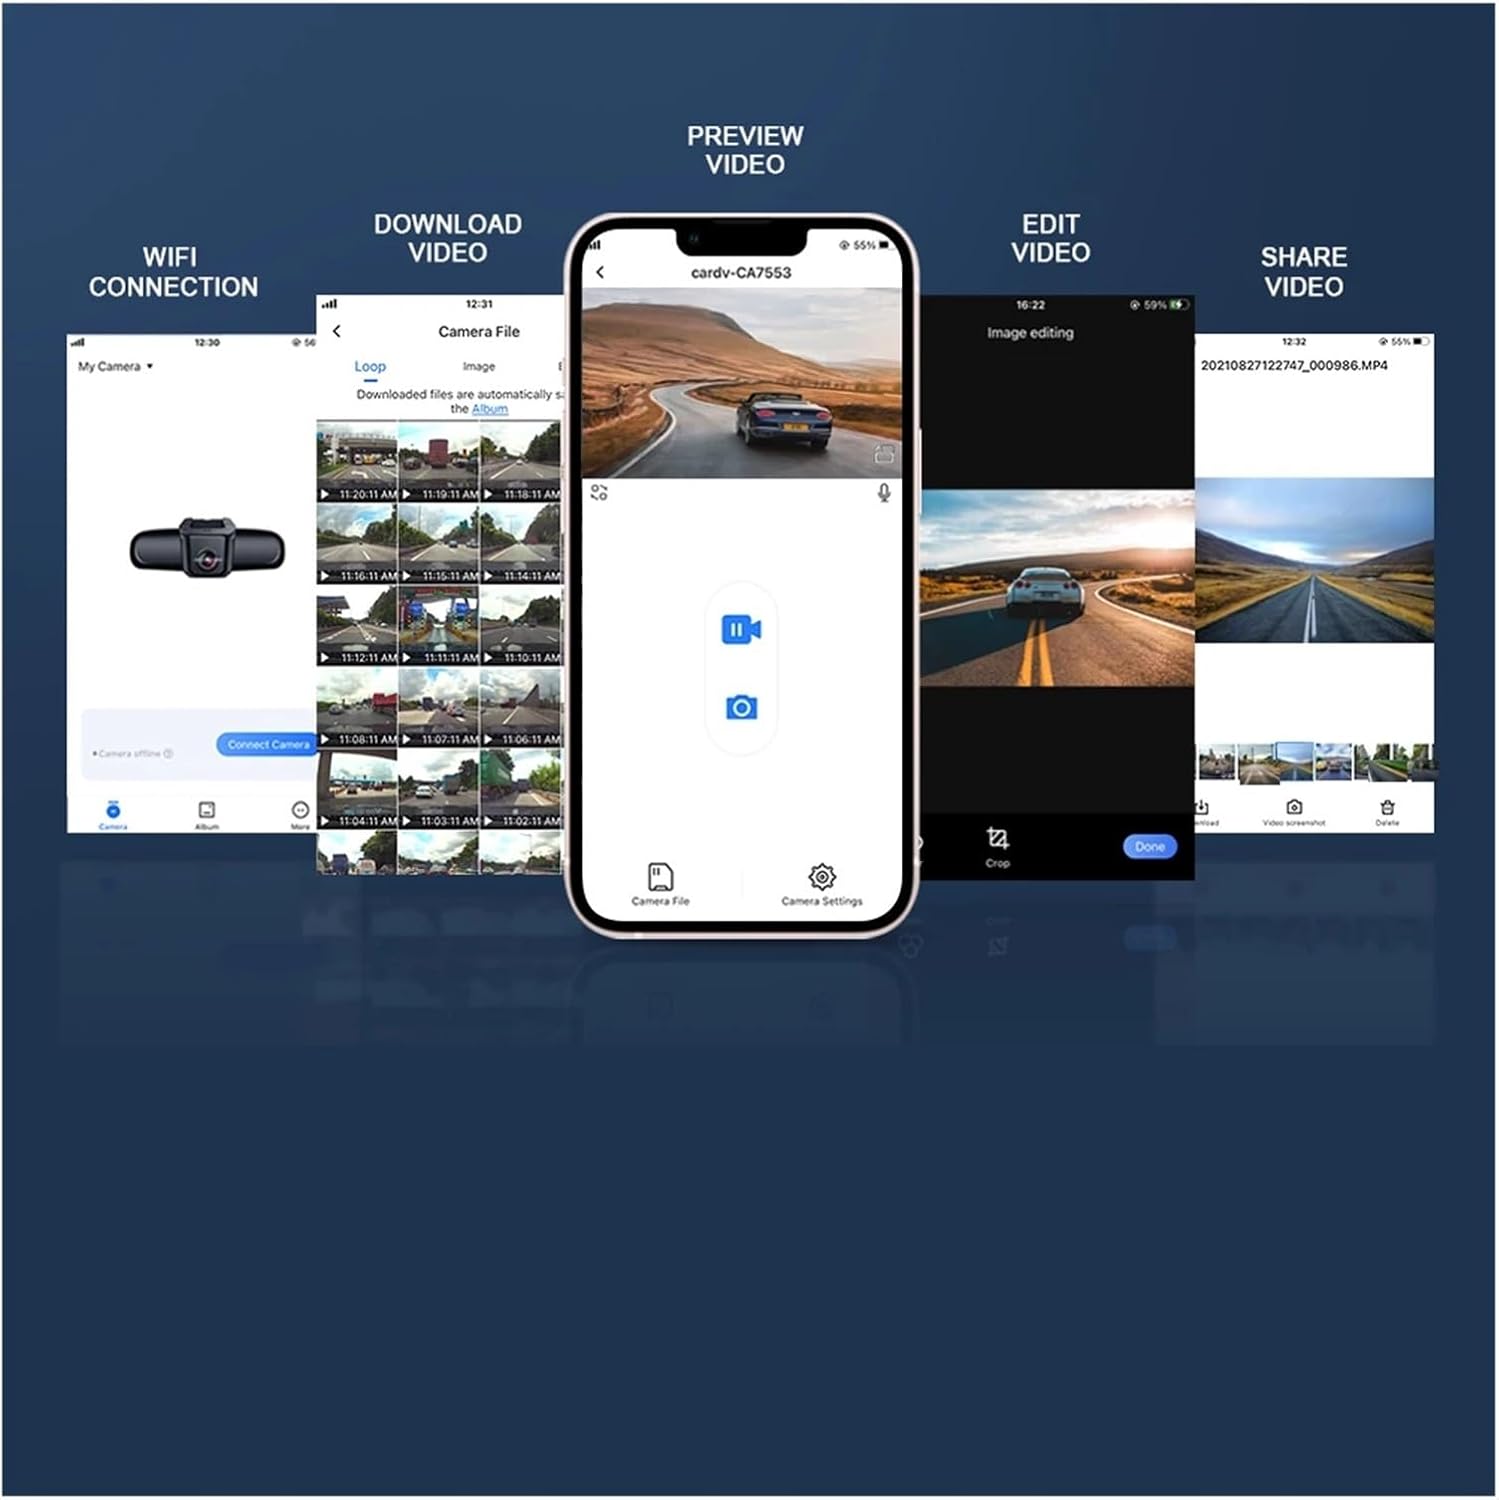
Image: Screenshots of the FITCAMX smartphone application, illustrating steps for WiFi connection, downloading videos, previewing, editing, and sharing recorded footage.
6. Maintenance
Proper maintenance ensures the longevity and optimal performance of your dash camera.
- Clean Lens: Regularly clean the camera lens with a soft, dry cloth to ensure clear recordings. Avoid abrasive materials.
- Memory Card Management:
- Format the memory card periodically (e.g., once a month) through the app settings to prevent data corruption and maintain optimal recording performance.
- Replace the memory card if you experience frequent recording errors or data loss.
- Firmware Updates: Check the FITCAMX app or official website for any available firmware updates to improve performance and add new features.
- Temperature: Avoid exposing the dash cam to extreme temperatures for extended periods, as this can affect battery life and component integrity.
7. Troubleshooting
If you encounter issues with your FITCAMX dash camera, refer to the following common problems and solutions:
| Problem | Possible Cause | Solution |
|---|---|---|
| Dash cam does not power on. | No power supply; loose cable connection; vehicle ignition off. | Ensure vehicle ignition is on. Check all cable connections, especially the rearview mirror power cable. |
| Recording stops or footage is missing. | Memory card full; memory card error; faulty memory card. | Format the memory card via the app. Replace the memory card if issues persist. Ensure loop recording is enabled. |
| Wi-Fi connection issues. | Incorrect Wi-Fi password; too far from dash cam; app not updated. | Verify Wi-Fi password. Ensure your phone is close to the dash cam. Update the FITCAMX app to the latest version. |
| Video quality is poor. | Dirty lens; low light conditions; incorrect resolution settings. | Clean the camera lens. Ensure optimal lighting. Check app settings for video resolution and adjust to 4K if not already set. |
| G-Sensor is too sensitive or not sensitive enough. | G-Sensor sensitivity setting is incorrect. | Adjust G-Sensor sensitivity in the FITCAMX app settings. |
8. Specifications
| Feature | Detail |
|---|---|
| Model | 6275 No Screw (4K Dual Cam 128GB) |
| Video Capture Resolution | 4K (Front Camera), 1080P (Rear Camera) |
| Optical Sensor Technology | CMOS |
| Connectivity Technology | Wi-Fi |
| Control Method | App |
| Item Weight | 50 Grams (1.76 ounces) |
| Package Dimensions | 1.18 x 0.79 x 0.39 inches |
| Included Components | Dash Cam, Memory Card, Front Cam Cable, Removal Pry Tool, User Manual (Rear Cam and cable for Dual Cam models) |
9. Warranty and Support
For warranty information, technical support, or service inquiries, please contact the manufacturer or your point of purchase. Retain your proof of purchase for warranty claims.
For the latest information, FAQs, and support resources, please visit the official FITCAMX website.