1. Introduction
This manual provides instructions for the safe and efficient operation, maintenance, and troubleshooting of your Bewinner HCR-01A Window Cleaning Robot. Please read this manual thoroughly before using the device and retain it for future reference.
2. Safety Information
Adhere to all safety warnings and instructions to prevent injury or damage to the device. Failure to do so may result in electric shock, fire, or serious injury.
- Ensure the safety rope is securely attached before each use, especially when cleaning high windows.
- Do not use the robot on cracked or damaged glass surfaces.
- Keep the robot away from children and pets during operation.
- Use only the provided power adapter and accessories.
- Do not operate the robot in rainy or extremely humid conditions.
- The built-in UPS system provides temporary power in case of power failure. The robot will remain on the window for 20-40 minutes and emit an alert. Retrieve the robot promptly during a power outage.

Image: The robot features a built-in UPS for approximately 20 minutes of backup power during an outage, allowing safe retrieval.
3. Product Overview
3.1 Package Contents
Upon unpacking, verify that all items are present:

Image: The complete package includes the HCR-01A robot, power supply, remote control, safety rope, spray bottle, and several cleaning pads.
3.2 Robot Components
Familiarize yourself with the various parts of your window cleaning robot:
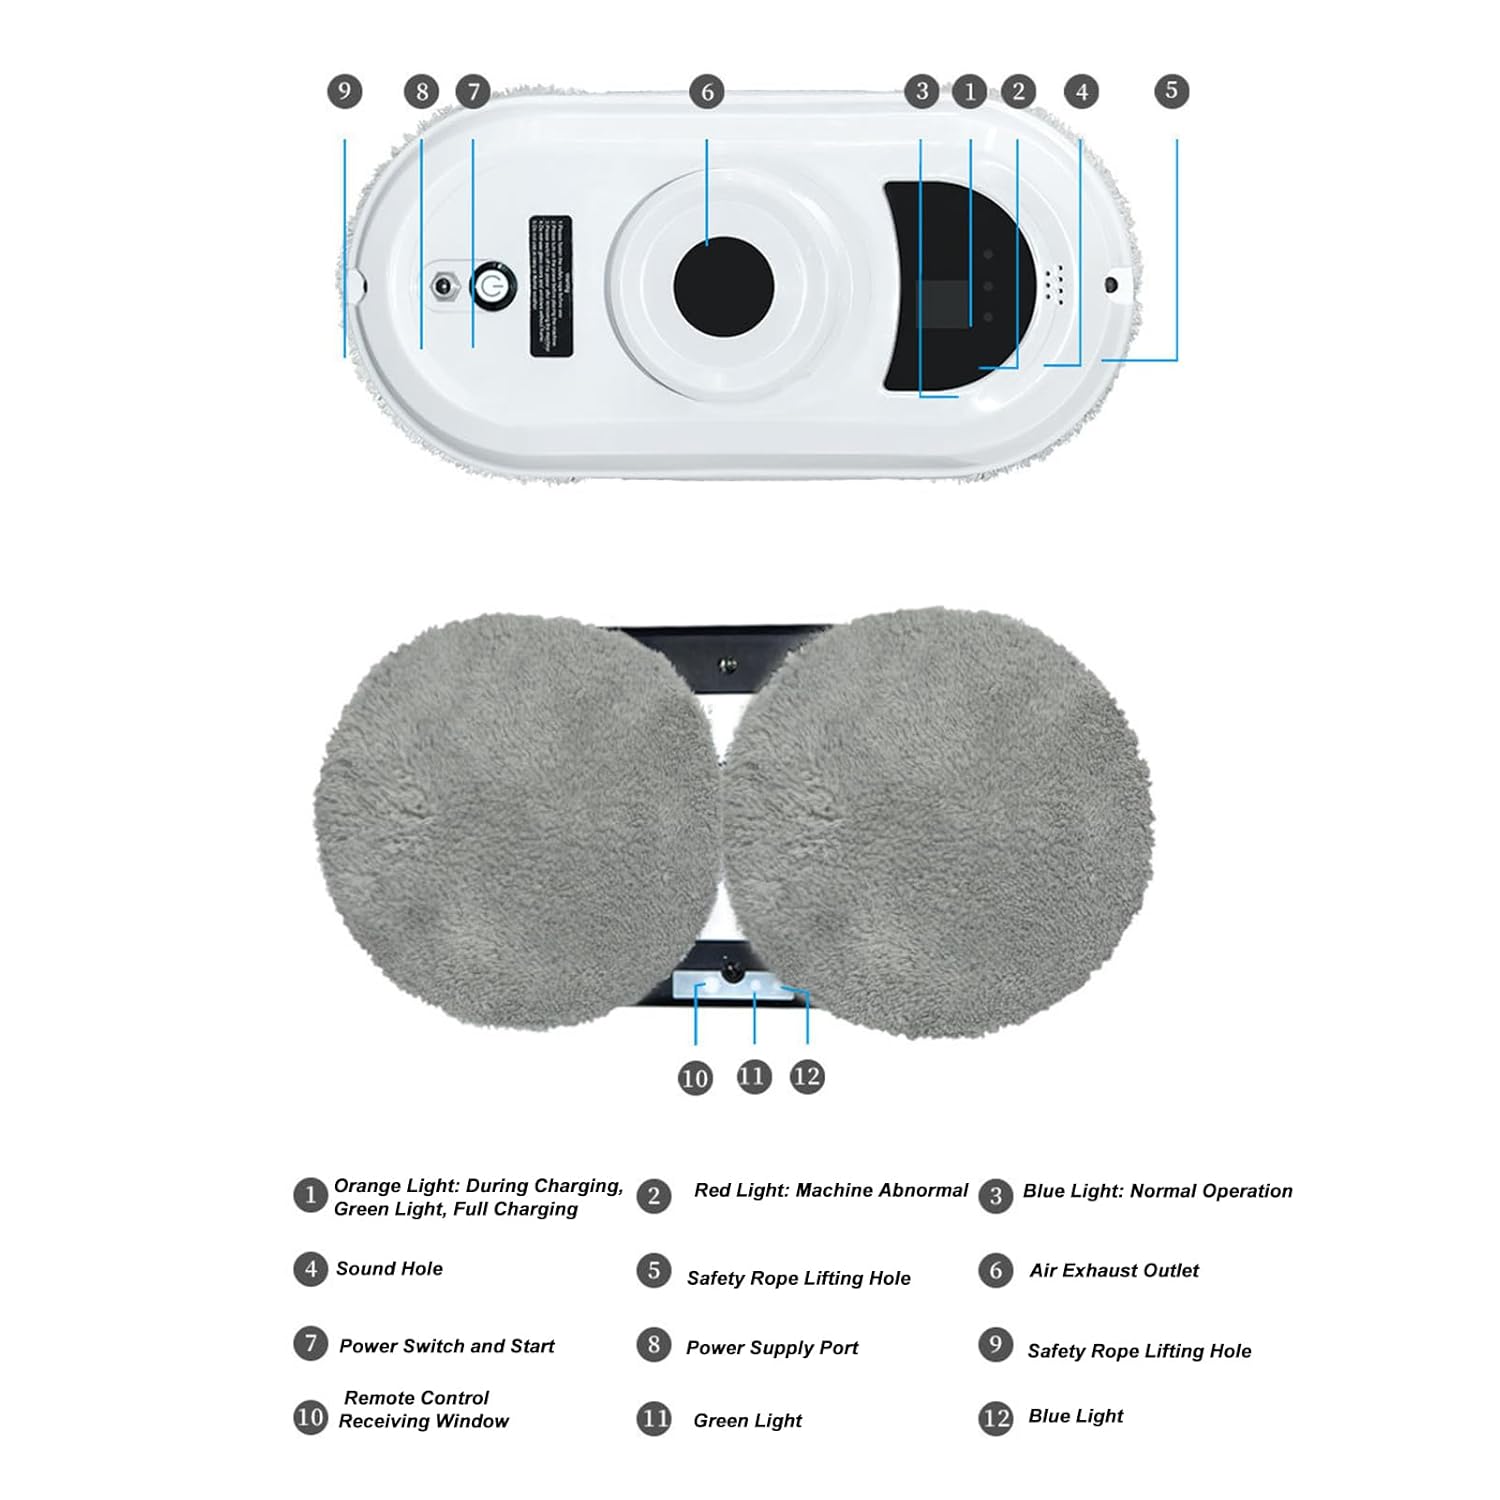
Image: Labeled diagram of the robot's top and bottom, indicating power ports, indicator lights, safety rope attachment points, and cleaning pad locations.
- Orange Light: Indicates charging (during) or full charge (green).
- Red Light: Indicates abnormal machine operation.
- Blue Light: Indicates normal operation.
- Sound Hole: For audible alerts.
- Safety Rope Lifting Hole: Attachment point for the safety rope.
- Air Exhaust Outlet: Where air is expelled from the vacuum motor.
- Power Switch and Start: Button to power on/off and start cleaning.
- Power Supply Port: Connects to the power adapter.
- Safety Rope Lifting Hole: Another attachment point for the safety rope.
- Remote Control Receiving Window: Infrared receiver for the remote control.
- Green Light: (Specific function not detailed, likely part of charging/operation indicators).
- Blue Light: (Specific function not detailed, likely part of charging/operation indicators).
4. Setup
4.1 Charging the Robot
Before first use, fully charge the robot. Connect the power adapter to the robot's power supply port (8) and plug it into a wall outlet. The orange light (1) will indicate charging. It will turn green when fully charged.
4.2 Attaching Cleaning Pads
Attach the microfiber cleaning pads to the two rotating discs on the bottom of the robot. Ensure they are securely fastened.
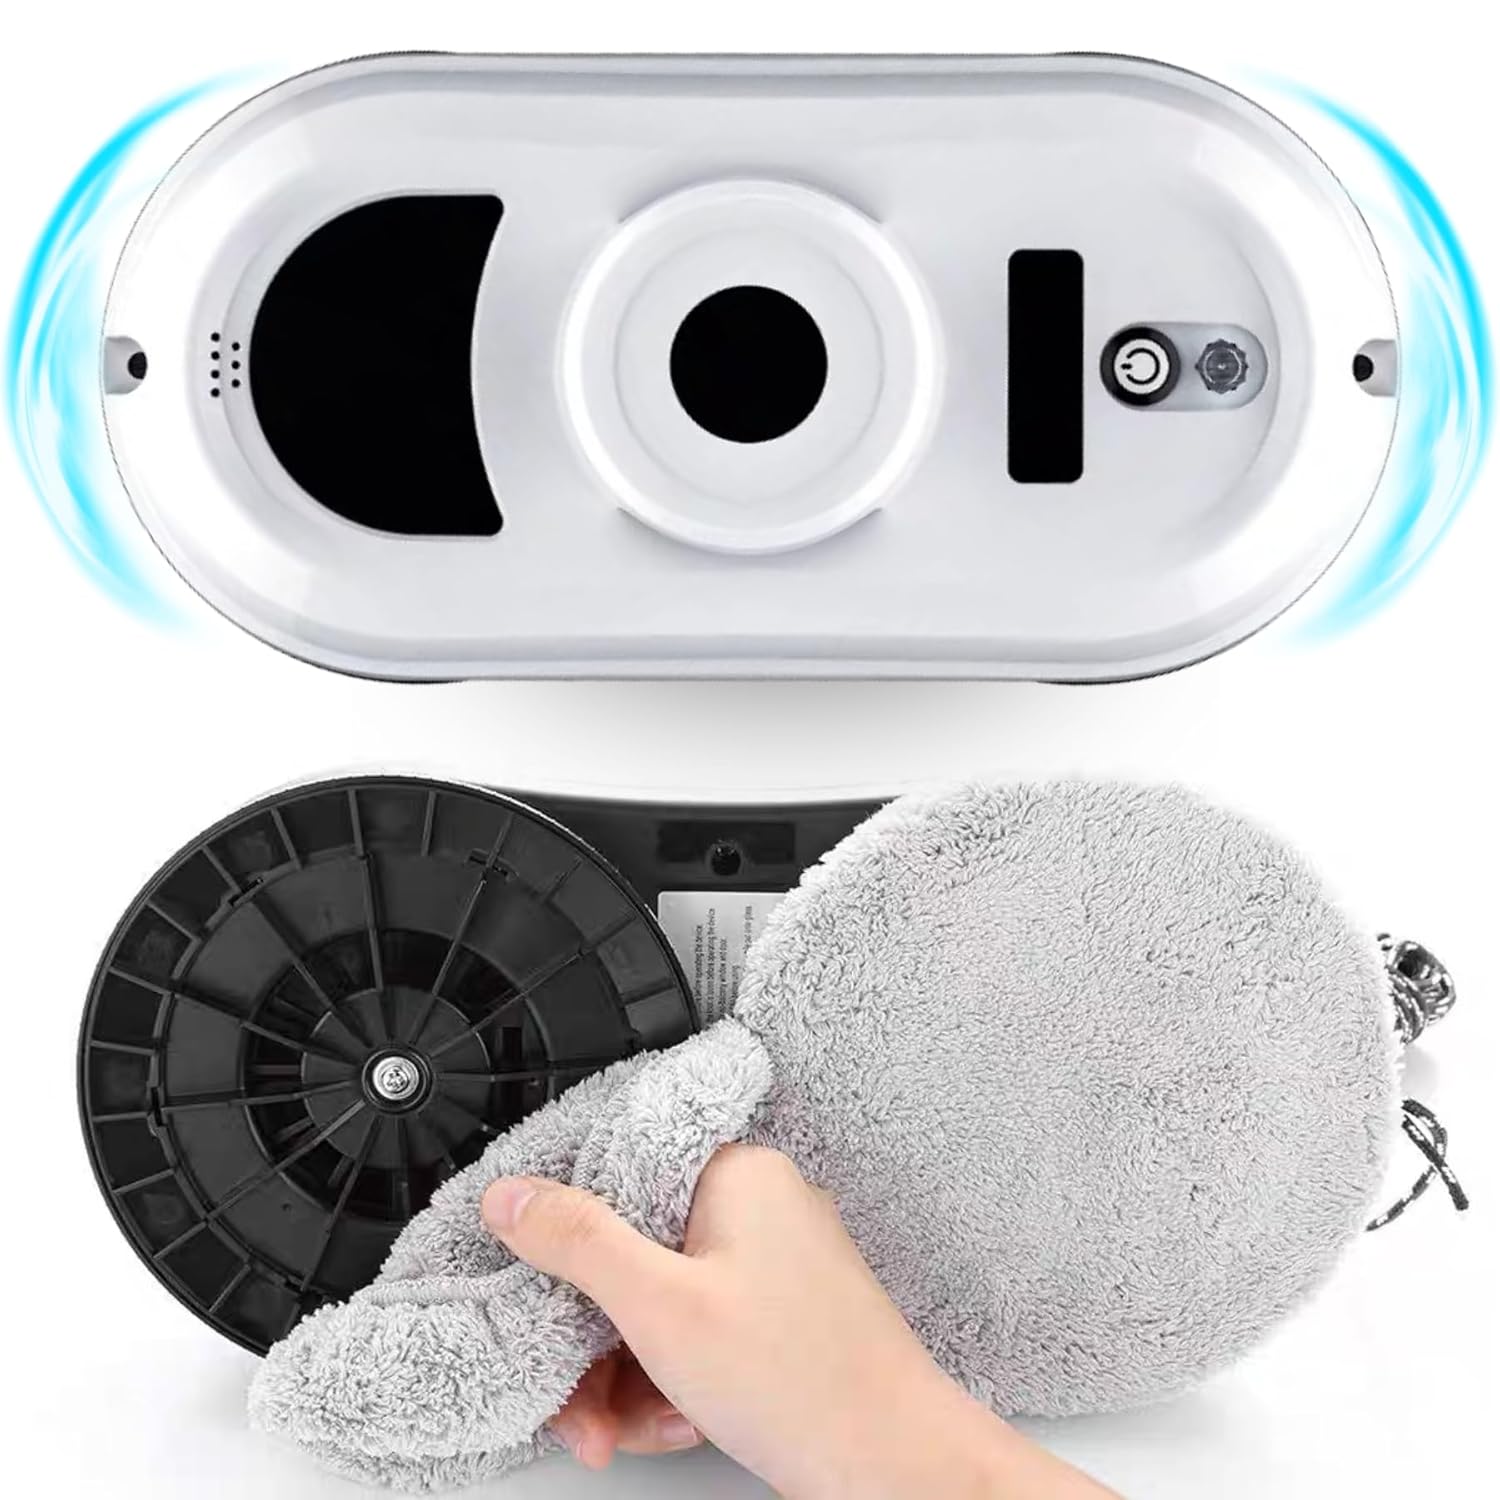
Image: The bottom of the robot showing a hand attaching a microfiber cleaning pad to one of the rotating discs.
4.3 Attaching the Safety Rope
For safety, always attach the safety rope to a secure anchor point, especially when cleaning exterior windows or high surfaces. Connect the carabiner end of the safety rope to a sturdy object (e.g., a window frame, heavy furniture) and the other end to one of the safety rope lifting holes (5 or 9) on the robot.

Image: The safety rope securely fastened to the robot and an external anchor point, demonstrating a crucial safety measure.
5. Operating Instructions
5.1 Powering On and Placement
- Ensure the robot is fully charged and the safety rope is attached.
- Connect the robot to its power adapter and plug it into an electrical outlet. The robot requires continuous power during operation.
- Press the Power Switch and Start button (7) on the robot to turn it on. The blue light (3) will illuminate.
- Place the robot firmly on the glass surface. The vacuum motor will engage, creating suction to hold the robot in place.

Image: The robot securely adhered to a window surface, illustrating its powerful 2800Pa suction for stable cleaning.
5.2 Cleaning Modes
The robot offers three intelligent route planning modes to maximize cleaning efficiency:

Image: Visual representation of the three intelligent cleaning path modes: starting from the top and moving down in a Z-pattern, starting left and moving down, and starting right and moving down.
- Automatic Z-shape Cleaning: Starts at the top and moves down in a Z-pattern.
- Left-to-Right Cleaning: Starts from the left and moves across, then down.
- Right-to-Left Cleaning: Starts from the right and moves across, then down.
The robot automatically detects window frames to prevent falling.

Image: The robot's edge detection system, showing it automatically reversing direction upon reaching the window's boundary.

Image: The robot's smart turning and obstacle identification feature, adjusting its path in real-time to prevent collisions.
5.3 Using the Remote Control
The remote control allows you to select cleaning modes and manually control the robot's movement.

Image: The remote control unit with its various buttons and their corresponding functions for operating the robot.
- Stop and Start: Initiates or pauses cleaning.
- First up and then down automatic cleaning: Activates the Z-shape cleaning mode.
- First to the left and then down automatic cleaning: Activates the left-to-right cleaning mode.
- First to the right and then down automatic cleaning: Activates the right-to-left cleaning mode.
- Directional Arrows: Manually move the robot up, down, left, or right.
- STOP / OK: Press to stop the machine.
5.4 Applicable Surfaces
The robot is designed for cleaning various smooth surfaces, including:
- Windows (interior and exterior)
- Tile walls
- Mirrors
- Ordinary glass surfaces

Image: The robot demonstrating its versatility by cleaning different smooth surfaces such as tile walls, mirrors, and standard glass.
6. Maintenance
Regular maintenance ensures optimal performance and extends the lifespan of your robot.
6.1 Cleaning Pads
After each use, remove the microfiber cleaning pads and wash them. They can be hand-washed or machine-washed with mild detergent. Allow them to air dry completely before reattaching or storing.

Image: The robot's microfiber cleaning cloths, highlighting their role in the dual-disc cleaning system.
6.2 Robot Body
Wipe the robot's body with a soft, dry cloth. Do not use abrasive cleaners or immerse the robot in water.
6.3 Sensors
Periodically clean the sensors on the robot's edges to ensure accurate frame detection and obstacle avoidance. Use a soft, dry cloth or cotton swab.
7. Troubleshooting
If you encounter issues with your robot, refer to the following common problems and solutions:
| Problem | Possible Cause | Solution |
|---|---|---|
| Robot does not power on. | Not plugged in; power adapter faulty; battery depleted. | Ensure power adapter is securely connected and plugged in. Charge the robot fully. |
| Robot falls off the window. | Insufficient suction; dirty glass; safety rope not attached. | Ensure glass is clean and dry. Verify strong suction upon placement. Always attach the safety rope. |
| Robot stops mid-cycle. | Power outage; obstacle detected; dirty sensors. | Check power connection. Clean sensors. Retrieve robot if power outage occurs. |
| Poor cleaning performance. | Dirty cleaning pads; insufficient cleaning solution; heavily soiled glass. | Replace or wash cleaning pads. Pre-clean heavily soiled areas. Use appropriate cleaning solution. |
| Remote control not working. | Dead batteries; obstruction between remote and robot. | Replace remote control batteries. Ensure clear line of sight to the robot's receiving window. |
8. Specifications
| Feature | Detail |
|---|---|
| Model Number | HCR-01A |
| Brand | Bewinner |
| Suction Power | 2800 Pa |
| Cleaning Modes | 3 intelligent route planning modes (Z-shape, Left-to-Right, Right-to-Left) |
| UPS Backup Time | 20-40 minutes (in case of power failure) |
| Cleaning Speed | 70 rotations per minute (for cleaning discs) |
| Dimensions (approx.) | 295mm (11.6in) length, 108mm (4.3in) height |
| Package Dimensions | 30 x 23 x 14 cm |
| Package Weight | 2.15 kilograms |

Image: Diagram illustrating the physical dimensions of the Bewinner HCR-01A robot.
9. Warranty and Support
For warranty information or technical support, please refer to the contact details provided with your purchase or visit the official Bewinner website. Keep your proof of purchase for warranty claims.