1. Introduction
The SYMIK PSC Pro is an advanced two-way charger and portable power station designed for use with all Ryobi 18V Lithium-Ion batteries. It functions as both a 100W super-fast charger for your Ryobi batteries and a 145W portable power source with multiple USB output ports. Equipped with an OLED screen for real-time data display and an integrated LED task light, the PSC Pro offers versatile power solutions for various applications.
Key Features:
- Intelligent Charging Power Source: Input & Output device for Ryobi 18V Lithium-Ion batteries.
- Multiple USB Ports: Features 2 USB-C ports and 1 USB-A port for convenient charging and discharging.
- 100W Super-Fast Charging: USB-C1 port supports up to 100W charging for compatible batteries.
- 145W Power Source Discharger: Maximum output power up to 145W for laptops, tablets, smartphones, and other small electronics.
- OLED Screen: Displays charging/discharging data and LED light status.
- LED Task Light: External LED light with adjustable brightness and multiple modes for enhanced visibility.
- Ergonomic Design: Comfortable to hold and compatible with Ryobi 18V batteries.
- Lightweight & Portable: Compact design for easy transport and storage.
2. Package Contents
Please verify that all items are present in your package:
- SYMIK PSC Pro Power Source Charger
- User Manual (this document)
3. Product Overview

Figure 3.1: SYMIK PSC Pro Main Unit
3.1 Component Identification

Figure 3.2: SYMIK PSC Pro Component Diagram
- OLED Screen: Displays real-time charging/discharging data, battery status, and LED light information.
- Power Button: Turns the unit on/off.
- LED Light Button: Controls the integrated LED task light.
- USB-C1 Port: Functions as both an input (for charging the attached Ryobi battery) and an output (for powering external devices). Supports up to 100W.
- LED Light: Integrated task light.
- USB-C2 Port: Output only port for powering external devices. Supports up to 45W.
- USB-A Port: Output only port for powering external devices. Supports up to 18W.
- 60W/100W Mode Selection Switch: Allows selection of charging power for USB-C1.
- 3D Menu Switch: Used to navigate and select options in the advanced settings menu. Press, push left, or push right.
- Lanyard Attaching Pole: Point for attaching a lanyard (lanyard not included).
4. Setup
4.1 Attaching a Ryobi 18V Lithium-Ion Battery
- Ensure the SYMIK PSC Pro is powered off.
- Align the Ryobi 18V Lithium-Ion battery with the battery slot on the bottom of the PSC Pro.
- Slide the battery firmly into place until it clicks, indicating a secure connection.
- To remove the battery, press the release tabs on the battery and slide it out.
Note: This device is compatible ONLY with Ryobi 18V Lithium-Ion batteries. Do NOT attempt to use Ni-Cd / Ni-MH batteries.
4.2 Initial Power On
Press and hold the Power Button for a few seconds until the OLED screen illuminates. The screen will display the current battery status and default operating information.
5. Operation
5.1 Charging Ryobi 18V Batteries (100W Input)
The PSC Pro can charge an attached Ryobi 18V Lithium-Ion battery at up to 100W via its USB-C1 port.
- Attach a Ryobi 18V Lithium-Ion battery to the PSC Pro as described in Section 4.1.
- Connect a compatible 100W+ PD 3.0/3.1 power adapter (not included) to the USB-C1 port of the PSC Pro using a USB-C cable that supports 100W power (not included).
- The OLED screen will display charging status, including input voltage, current, and wattage.
- By default, the charger limits charging power to 65W for battery longevity. To enable 100W charging, navigate to the settings menu (Section 5.4) and adjust the C1 Input Power Limit.
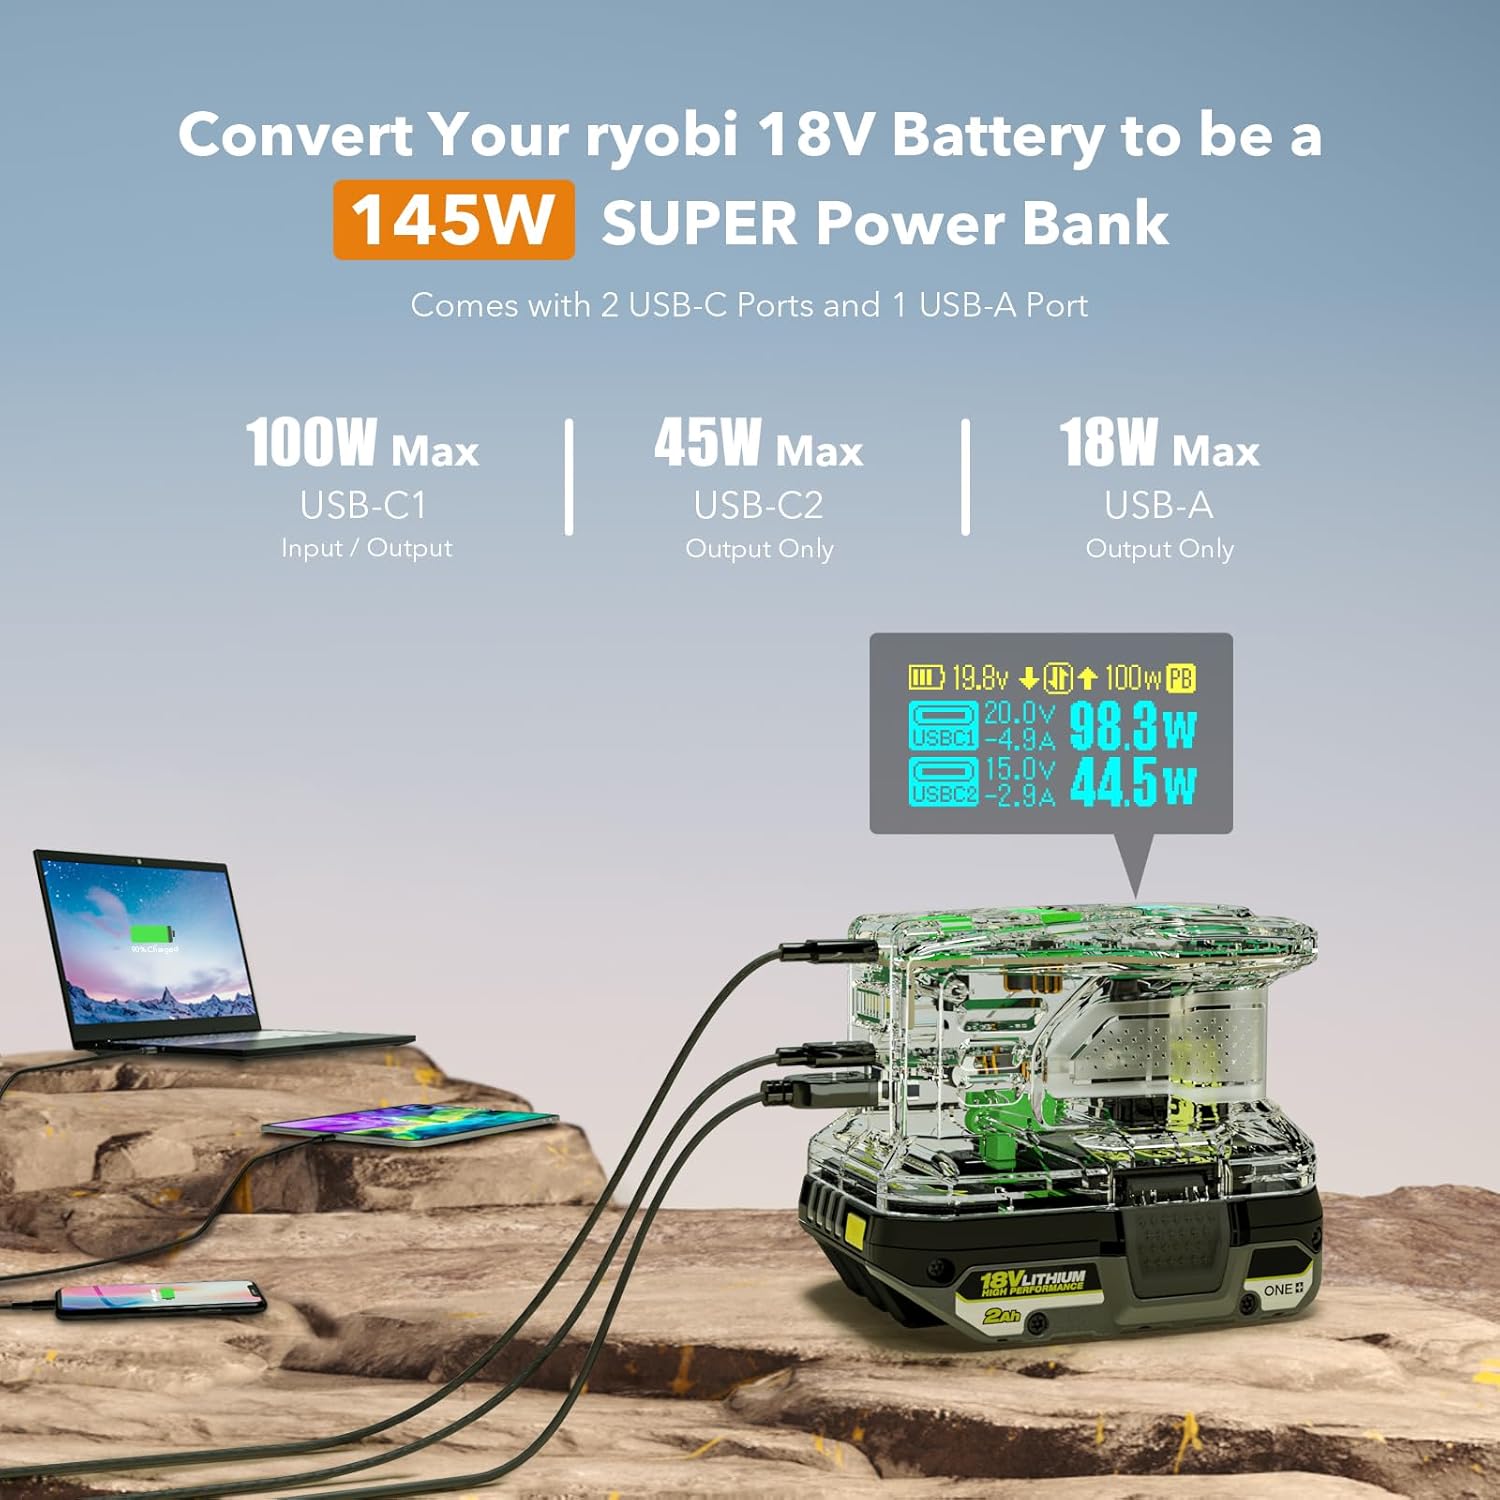
Figure 5.1: Charging a Ryobi Battery
5.2 Using as a Portable Power Source (145W Output)
The PSC Pro can convert your Ryobi 18V battery into a portable power bank, providing up to 145W of total output power across its three ports.
- Ensure a charged Ryobi 18V Lithium-Ion battery is attached to the PSC Pro.
- Connect your devices (laptops, tablets, smartphones, etc.) to the available output ports:
- USB-C1: Up to 100W Max output.
- USB-C2: Up to 45W Max output.
- USB-A: Up to 18W Max output.
- The OLED screen will display the output voltage, current, and wattage for each active port.

Figure 5.2: Powering Multiple Devices
5.3 OLED Screen Display
The crisp OLED screen provides comprehensive information about the unit's operation. It typically displays:
- Attached battery voltage and charge status.
- Input/Output voltage, current, and wattage for each USB port.
- LED light mode and brightness.
- Current operating mode (charging, discharging, or idle).

Figure 5.3: OLED Screen Information
5.4 Advanced Settings Menu
The 3D Menu Switch allows access to and navigation of the advanced settings. Press the switch to enter the menu, then push left or right to scroll through options. Press again to select an option.

Figure 5.4: Advanced Settings Menu Navigation
Available settings include:
- C1 Input Power Limit: Adjust the maximum charging wattage for USB-C1 (e.g., 65W, 100W).
- C2 Output Pwr Limit: Set the maximum output wattage for USB-C2.
- Screen Off After: Configure the idle time before the OLED screen turns off.
- Power Off After: Set the idle time before the unit automatically powers off.
- PwrOff Current Limit: Define the minimum current draw to prevent auto power-off.
- Strobe Modes Ctrl: Control the various strobe light patterns for the LED task light.
5.5 USB-C1 Role Change
The default role of the USB-C1 port is "Auto," meaning it intelligently switches between input and output based on the connected device. You can manually change its role to "Input Only" or "Output Only" through the advanced settings menu.
- Auto: Automatically detects if it should charge the Ryobi battery or power an external device.
- Input Only: Forces the USB-C1 port to only accept power to charge the Ryobi battery.
- Output Only: Forces the USB-C1 port to only provide power to external devices.
5.6 LED Task Light
The integrated LED task light provides illumination for various situations. Press the LED Light Button to cycle through modes.

Figure 5.5: LED Task Light Modes
- Constant Mode: Provides continuous light. Brightness is adjustable from 1% to 100% via the advanced settings menu.
- Strobe Light Modes: Multiple strobe patterns are available, including an SOS distress mode for emergencies. These can be selected and configured in the advanced settings menu.
6. Safety Information
WARNING: Read all safety warnings and instructions before using this product. Failure to follow the warnings and instructions may result in electric shock, fire, and/or serious injury.
- Use only with Ryobi 18V Lithium-Ion batteries. Do not use with Ni-Cd or Ni-MH batteries.
- Do not expose the unit to rain or wet conditions. Water entering the product will increase the risk of electric shock.
- Do not operate the product in explosive atmospheres, such as in the presence of flammable liquids, gases, or dust.
- Do not modify or attempt to repair the product. Refer all servicing to qualified service personnel.
- Avoid extreme temperatures. Do not store or use the product in direct sunlight or in areas where the temperature may exceed 104°F (40°C).
- Keep children away from the product. This is not a toy.
- Ensure proper ventilation when charging or discharging to prevent overheating.
- Always disconnect the power source and battery when not in use or before cleaning.
7. Maintenance
7.1 Cleaning
To maintain the performance and appearance of your PSC Pro:
- Ensure the unit is powered off and disconnected from any power sources or batteries.
- Wipe the exterior with a soft, dry cloth.
- Do not use abrasive cleaners, solvents, or harsh chemicals.
- Avoid getting moisture into any openings.
7.2 Storage
When storing the PSC Pro for extended periods:
- Remove the Ryobi battery from the unit.
- Store in a cool, dry place away from direct sunlight and extreme temperatures.
- Keep out of reach of children.
8. Troubleshooting
If you encounter issues with your SYMIK PSC Pro, please refer to the following common problems and solutions:
- Unit does not power on:
Ensure the Ryobi battery is securely attached and charged. Press and hold the Power Button firmly. If the battery is depleted, charge it using the PSC Pro or a standard Ryobi charger. - Ryobi battery is not charging:
Verify that a 100W+ PD power adapter and a 100W compatible USB-C cable are connected to the USB-C1 port. Check the C1 Input Power Limit in the advanced settings menu. Ensure the Ryobi battery is a Lithium-Ion type. - No power output from USB ports:
Confirm the PSC Pro is powered on and has a charged Ryobi battery attached. Check the USB-C1 role setting in the advanced menu to ensure it is not set to "Input Only." Ensure connected devices are compatible with the output specifications. - OLED screen is blank or unresponsive:
Try powering the unit off and on again. Check the "Screen Off After" setting in the advanced menu if the screen is turning off prematurely. - LED task light is not working:
Press the LED Light Button to cycle through modes. Check the "Strobe Modes Ctrl" setting in the advanced menu.
If the problem persists after attempting these solutions, please contact SYMIK customer support for further assistance.
9. Specifications

Figure 9.1: SYMIK PSC Pro Product Specifications
| Feature | Detail |
|---|---|
| Model Name | PSC Pro |
| Product Dimensions | 3 x 2.5 x 5 inches (7.6 x 6.35 x 12.7 cm) |
| Item Weight | 8.5 ounces (0.53 lbs) |
| Enclosure Material | Fire Resistant PC Shell |
| Operating Ambient Temperature | 5° to 40° C (41° to 104° F) |
| Applicable Battery Type | Lithium-Ion Battery ONLY; Not for Ni-Cd / Ni-MH Batteries |
| LED Light | 1W with 1-100% brightness adjustable in constant mode |
9.1 Input/Output Specifications

Figure 9.2: Input/Output Voltage and Current Specifications
- USB-C1 Input/Output (65W Mode): 5V 3A, 9V 3A, 12V 3A, 15V 3A, 20V 3.25A (65W Max)
- USB-C1 Input/Output (100W Mode): 5V 3A, 9V 3A, 12V 3A, 15V 3A, 20V 5A (100W Max)
- USB-C2 Output: 5V 3A, 9V 3A, 12V 3A, 15V 3A (45W Max)
- USB-A Output: 5V 3A, 9V 2A, 12V 1.5A (18W Max)
- Maximum Total Output Power: 145W (USB-C1 and USB-C2 combined)
*When used together with a 100W+ PD 3.0/3.1 Power Adapter (NOT included) and a USB-C cable which supports 100W power (NOT included). Also requires the user to set it to 100W mode and 100W charging power in the settings menu; the charger by default is limited to 65W for longevity of your batteries.
10. Warranty and Support
For warranty information or technical support, please refer to the documentation provided at the time of purchase or contact SYMIK customer service directly. Keep your purchase receipt as proof of purchase.


