
joystar 5 Cup Clover Shape Plastic Blender Jar Assembly (white lid+ blade set)
User Manual for Joystar Replacement Blender Jar Assembly
Brand: joystar
Model: 5 Cup Clover Shape Plastic Blender Jar Assembly (white lid+ blade set)
Product Overview
This manual provides instructions for the Joystar Replacement 5 Cup Clover Shape Plastic Blender Jar Assembly. This assembly is designed to be compatible with various Oster Classic Series Blender and Osterizer blender models. It includes the jar, blade, gasket, base, and lid, providing a complete replacement solution.
Included Components:
- 5 Cup Clover Shape Plastic Blender Jar
- Blender Blade Assembly
- Gasket (Sealing Ring)
- Blender Base (Collar)
- Lid with Filler Cap

Image: The complete 5-cup clover shape plastic blender jar assembly, including the clear jar, white lid, and the black blade and base components shown separately.

Image: A side view of the clear 5-cup clover shape plastic blender jar, showing measurement markings on its side.
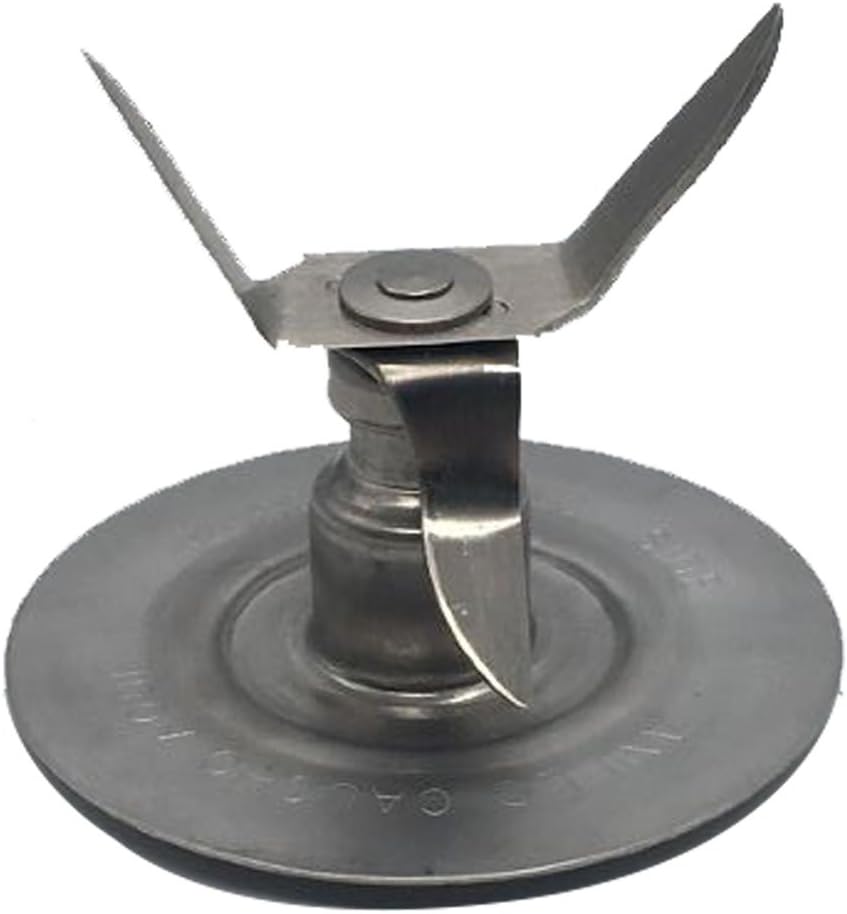
Image: A close-up of the stainless steel blender blade assembly, featuring four sharp blades mounted on a circular base.

Image: The black plastic blender base or collar, designed to screw onto the bottom of the jar and hold the blade assembly.

Image: A gray rubber gasket, a circular sealing ring used to prevent leaks between the blade assembly and the blender jar.
Setup and Assembly
Proper assembly of the blender jar components is crucial for safe and effective operation. Follow these steps to assemble your replacement jar:
- Prepare Components: Ensure all components (jar, blade, gasket, base, lid) are clean and dry before assembly.
- Place Gasket: Position the rubber gasket securely onto the blade assembly. The gasket should sit flat against the metal base of the blade.
- Insert Blade Assembly: Invert the blender jar. Insert the blade assembly with the gasket into the opening at the bottom of the jar. The blades should point towards the inside of the jar.
- Attach Base: Screw the black plastic blender base (collar) onto the bottom of the jar, over the blade assembly. Turn clockwise until it is hand-tight. Do not overtighten, but ensure it is snug to prevent leaks.
- Attach Lid: Place the white lid onto the top of the assembled jar. Ensure the lid is seated firmly to prevent spills during operation. The filler cap can be removed for adding ingredients while blending.
This replacement jar assembly is compatible with Oster Classic Series Blender and Osterizer blender models including: 6647, 6750, 6804, 6805, 6806, 6809, 6811, 6814, 6854, 6864, 6870, 6873, 6881, 6891, BLST6812. It also works with jar cover models 083820-000-805, 110403-000-090, 083820-000-090.
Operating Instructions
Once the jar assembly is complete, it is ready for use with your compatible blender base.
- Fill Jar: Add your desired ingredients to the blender jar. Do not exceed the maximum fill line indicated on the jar.
- Secure Lid: Ensure the lid is securely placed on the jar before placing it on the blender motor base.
- Place on Blender Base: Carefully place the assembled jar onto your Oster or Osterizer blender motor base, aligning the bottom of the jar with the drive coupling on the motor base. Twist slightly if necessary to ensure a secure fit.
- Operate Blender: Follow the operating instructions for your specific blender model. Always ensure the jar is properly seated before starting the blender.
- Remove Jar: After blending, turn off the blender and wait for the blades to stop completely before removing the jar from the motor base.
Caution: Always ensure the blender is unplugged before assembling, disassembling, or cleaning the jar components. Never operate the blender without the lid securely in place.
Maintenance and Cleaning
Regular cleaning and proper maintenance will extend the life of your replacement blender jar assembly.
- Disassembly for Cleaning: For thorough cleaning, disassemble the jar by unscrewing the base, removing the blade assembly, and then the gasket.
- Washing: Wash all components (jar, lid, blade assembly, gasket, base) with warm, soapy water immediately after use. Use a brush to clean around the blades carefully.
- Rinsing: Rinse all parts thoroughly with clean water.
- Drying: Allow all components to air dry completely before reassembling or storing. This helps prevent odors and bacterial growth.
- Storage: Store the clean and dry components in a safe place, away from direct sunlight or extreme temperatures.
Warning: The blades are sharp. Handle the blade assembly with extreme care during cleaning to avoid injury.
Troubleshooting
If you encounter issues with your replacement blender jar assembly, refer to the following common problems and solutions:
| Problem | Possible Cause | Solution |
|---|---|---|
| Leaking from bottom of jar | Gasket not seated correctly or damaged; Base not tightened sufficiently. | Disassemble, check gasket for proper placement and condition. Reassemble and ensure base is hand-tightened securely. Replace gasket if damaged. |
| Jar does not fit on blender base | Incorrect blender model; Jar not aligned properly. | Verify your blender model is listed as compatible. Ensure the jar is correctly aligned with the drive coupling on the motor base before twisting to lock. |
| Blades not spinning | Jar not properly seated on motor base; Blade assembly not correctly installed in jar. | Ensure the jar is fully seated and locked onto the blender motor base. Check that the blade assembly is correctly inserted and the base is securely screwed on. |
Specifications
- Product Type: Replacement Blender Jar Assembly
- Capacity: 5 Cups
- Material: Plastic (Jar), Stainless Steel (Blade), Rubber (Gasket)
- Compatible Blender Brands: Oster, Osterizer
- Compatible Oster Models: 6647, 6750, 6804, 6805, 6806, 6809, 6811, 6814, 6854, 6864, 6870, 6873, 6881, 6891, BLST6812
- Package Dimensions: 9.65 x 6.77 x 6.18 inches
- Item Weight: 1.21 pounds
- ASIN: B0CLJCLYTR
- Date First Available: October 21, 2023
Warranty and Support
For specific warranty information regarding your Joystar Replacement Blender Jar Assembly, please refer to the product packaging or contact the seller directly. Warranty terms may vary.
If you require further assistance or have questions not covered in this manual, please contact the seller, JOYPARTS, through the platform where the purchase was made. You may also visit the official Joystar brand store for additional product information and support resources.
Seller: JOYPARTS (Seller Profile)
Brand Store: Joystar (Visit Store)
no relevant documents
Ask a question about this manual
Ask about setup, troubleshooting, compatibility, parts, safety, or missing instructions. Manuals+ will review the question and use this page’s manual context to help answer it.