1. Introduction
Thank you for choosing the Bewinner 35mm Concealed Hinge Jig. This tool is designed to assist in accurately drilling hinge cup holes and pilot screw holes for concealed hinges on doors, cabinets, and other furniture. Constructed from durable aluminum alloy and equipped with a high-efficiency 35mm carbon steel drill bit, this jig ensures precise and consistent results for your woodworking projects. Please read this manual thoroughly before use to ensure safe and effective operation.
2. Safety Information
Always prioritize safety when working with tools. Failure to follow these safety guidelines may result in injury or damage to the product.
- Always wear appropriate personal protective equipment, including safety glasses, during operation.
- Ensure your workpiece is securely clamped before drilling to prevent movement.
- Keep hands and fingers clear of the drill bit during operation.
- Use the correct drill bit size (35mm for hinge cups) and ensure it is sharp and free from damage.
- Keep the work area clean and well-lit.
- Do not operate the jig if you are fatigued or under the influence of drugs or alcohol.
- Store the jig and accessories in a dry, secure location away from children.
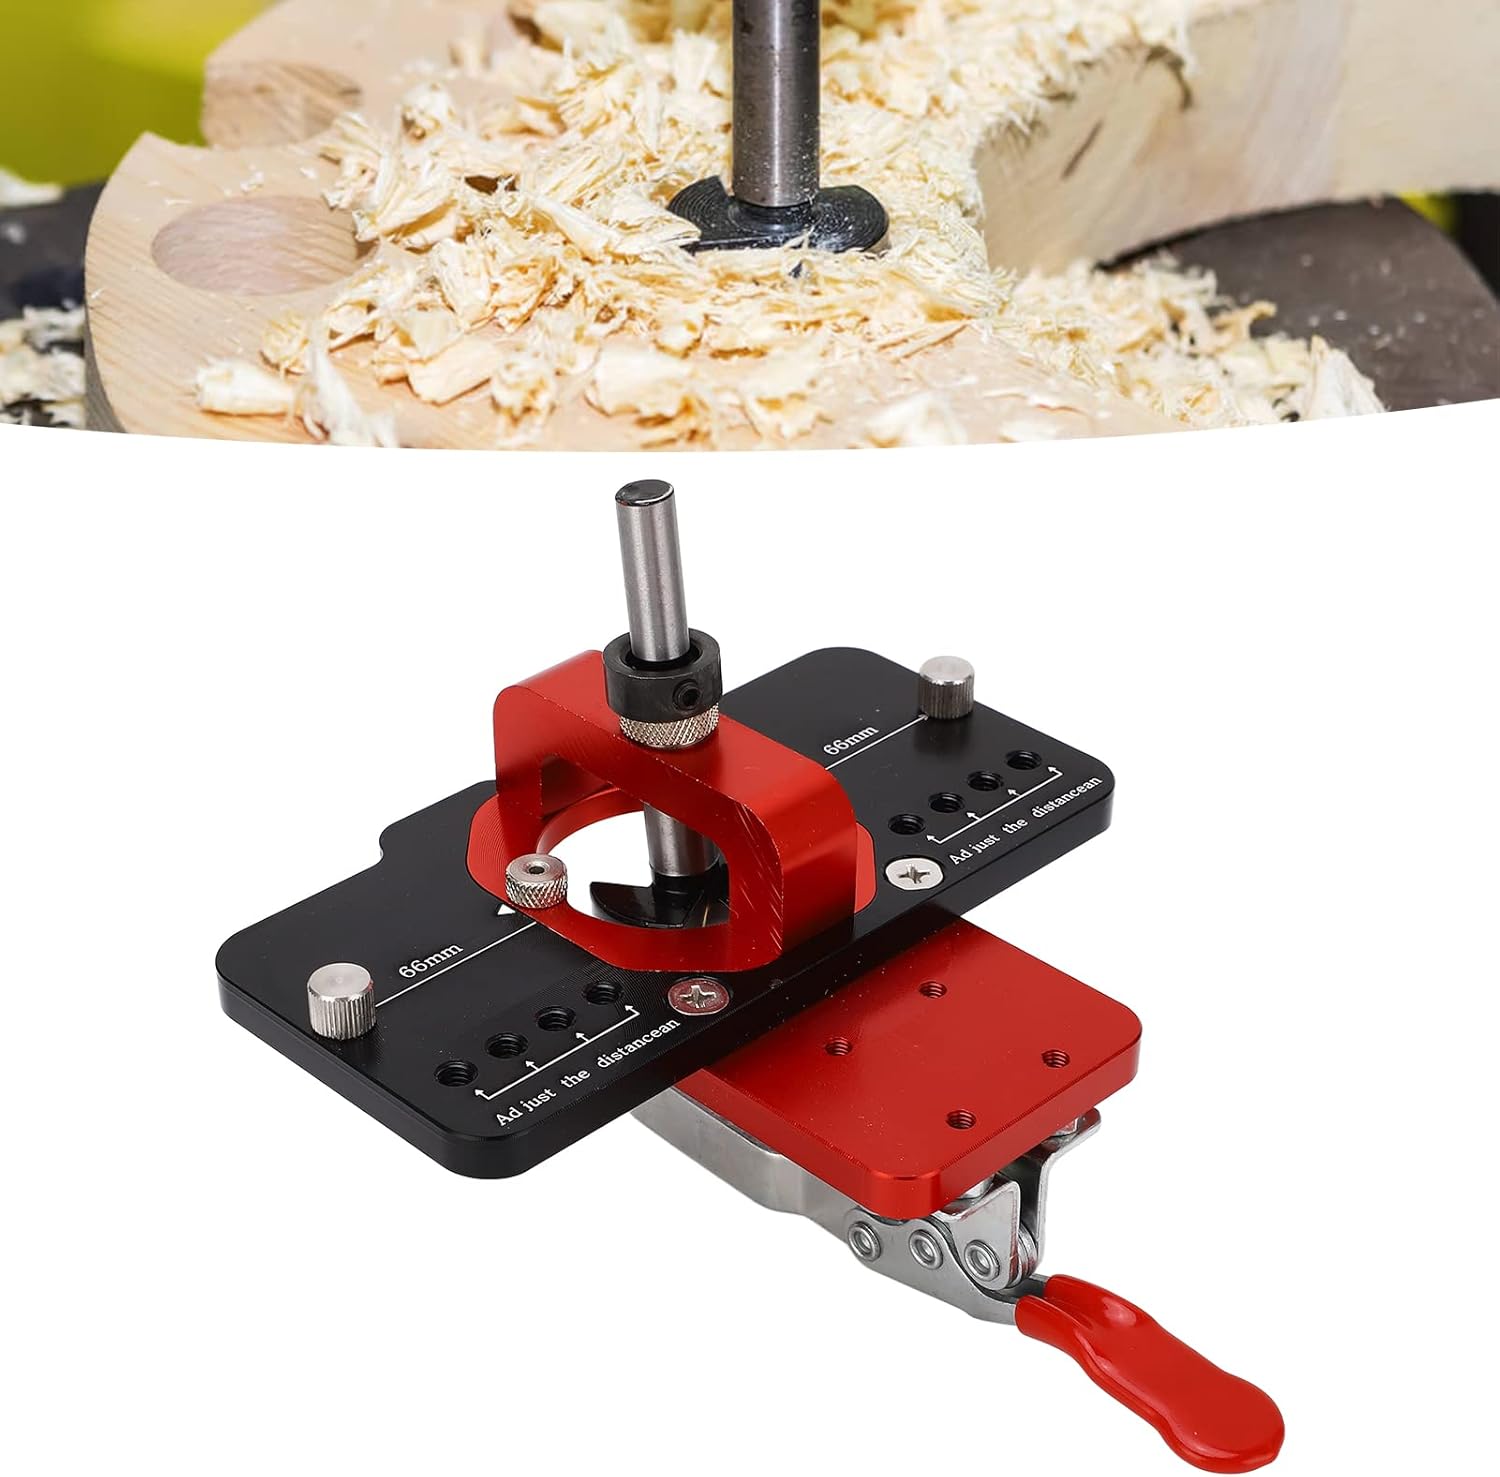
3. Product Overview
The Bewinner 35mm Concealed Hinge Jig is a robust tool crafted from high-quality aluminum alloy, designed for precision and durability. It simplifies the process of installing concealed hinges by providing accurate guidance for drilling.
Components
- Hinge Jig Body (Aluminum Alloy)
- 35mm Carbon Steel Hinge Cup Drill Bit
- Adjustable Press Plate
- Quick-Release Clamp
- Hex Wrenches for Adjustment

4. Setup
Proper setup is crucial for accurate hinge installation.
4.1 Adjusting Clamping Thickness
The jig is designed to securely clamp workpieces with a thickness ranging from 15mm to 25mm (approximately 0.59 to 0.98 inches). Use the adjustable press plate and quick-release clamp to firmly secure the jig to your material.

4.2 Setting Hinge Offset
The jig allows for precise adjustment of the hinge cup's distance from the edge of the workpiece. Use the markings on the jig to set the desired offset. Available offsets are approximately 3mm (0.12in), 4mm (0.16in), 5mm (0.2in), and 6mm (0.24in).
5. Operating Instructions
Follow these steps for accurate hinge installation:
5.1 Prepare the Workpiece
Mark the desired locations for your concealed hinges on the door or cabinet panel. Ensure these marks are accurate and consistent.
5.2 Secure the Jig
Align the jig with your marked hinge location. Adjust the hinge offset as required (refer to Section 4.2). Once positioned, use the quick-release clamp to firmly secure the jig to the workpiece. Ensure there is no movement.

5.3 Drill the Hinge Cup Hole
Insert the 35mm carbon steel drill bit into your drill. Place the drill bit into the main guide hole of the jig. Apply steady, even pressure and drill down until the desired depth for the hinge cup is reached. The jig will guide the bit for a clean, precise hole.

5.4 Drill Pilot Holes for Screws
After drilling the hinge cup, use a smaller drill bit (approximately 2mm, not included unless specified) to drill pilot holes for the hinge mounting screws. The jig provides smaller guide holes for this purpose, ensuring accurate screw placement.

5.5 Install the Hinge
Once all holes are drilled, remove the jig. Insert the concealed hinge into the drilled cup hole and secure it with screws into the pilot holes. Repeat the process for all hinge locations.
6. Maintenance
To ensure the longevity and continued accuracy of your Bewinner Hinge Jig, follow these maintenance guidelines:
- Cleaning: After each use, wipe down the jig to remove sawdust and debris. A soft brush or compressed air can be used for hard-to-reach areas.
- Storage: Store the jig and its accessories in a dry environment to prevent corrosion. Keep it in its original packaging or a dedicated tool case to protect it from damage.
- Drill Bit Inspection: Regularly inspect the 35mm drill bit for sharpness and damage. A dull or damaged bit can lead to inaccurate holes and increased effort. Replace the drill bit if necessary.
- Lubrication: Periodically apply a light coat of machine oil to any moving parts or threaded components to ensure smooth operation.
7. Troubleshooting
If you encounter issues while using the Bewinner Hinge Jig, refer to the following common problems and solutions:
- Inaccurate Hinge Cup Holes:
- Ensure the jig is securely clamped to the workpiece and does not move during drilling.
- Verify that the hinge offset is correctly set according to your hinge specifications.
- Check if the 35mm drill bit is sharp and properly seated in your drill chuck.
- Drill Bit Getting Stuck or Overheating:
- Reduce drilling speed and apply less pressure.
- Clear wood chips frequently from the hole to prevent buildup.
- Ensure the drill bit is sharp. A dull bit generates more heat and friction.
- Difficulty Clamping the Workpiece:
- Confirm that the workpiece thickness is within the jig's specified range (15mm to 25mm).
- Adjust the press plate to accommodate the material thickness before engaging the quick-release clamp.
8. Specifications
| Brand | Bewinner |
| Model Number | Bewinnerned2bqg5si |
| Material | Aluminum Alloy |
| Hinge Cup Drill Bit Size | 35mm (1.38in) |
| Pilot Drill Bit Size | Approx. 2mm (0.08in) |
| Clamping Thickness Range | Approx. 15mm ~ 25mm (0.59in ~ 0.98in) |
| Hinge Offset Options | Approx. 3mm (0.12in), 4mm (0.16in), 5mm (0.2in), 6mm (0.24in) |
9. Warranty and Support
For warranty information or technical support regarding your Bewinner 35mm Concealed Hinge Jig, please refer to the purchase documentation or contact the seller directly. Ensure you have your product model number (Bewinnerned2bqg5si) and purchase details available when seeking assistance.
