1. Introduction
Thank you for choosing the Anwick Portable Foldable Mini Trampoline with Safety Enclosure. This manual provides essential information for the safe assembly, operation, and maintenance of your trampoline. Please read all instructions carefully before assembly and use to ensure proper function and safety.
This trampoline is designed to provide a fun and active experience for children, promoting coordination and physical activity. It features a sturdy frame, a durable jumping mat, and a protective safety enclosure.
2. Safety Information
WARNING: Failure to follow these safety instructions may result in serious injury.
- Adult Supervision Required: Always ensure children are supervised by a responsible adult while using the trampoline.
- Weight Limit: The maximum user weight is 250 pounds (113 kg). Do not exceed this limit.
- One User at a Time: Only one person should use the trampoline at any given time to prevent collisions.
- Clearance Area: Ensure there is adequate overhead clearance and a minimum of 8 feet (2.4 meters) of clear space around the trampoline.
- Inspect Before Use: Before each use, check the trampoline for damaged, worn, or missing parts. Do not use if any components are compromised.
- Proper Attire: Users should wear appropriate clothing, free of hooks, buckles, or anything that could snag on the safety net or mat. Remove shoes before jumping.
- No Somersaults or Flips: Avoid somersaults or flips, as these can lead to serious head or neck injuries.
- Secure Enclosure: Always ensure the safety enclosure net is properly zipped and secured before use.
- Padded Components: The trampoline features foam-padded poles and a protective pad covering the springs to minimize injury risks.

Image: Details of the upper safety enclosure net and lower mesh net, designed to protect users and prevent climbing.

Image: A child holding the soft grab bar, illustrating the padded design to prevent pinching.
3. Package Contents
Before beginning assembly, please ensure all parts listed below are present and undamaged. If any parts are missing or damaged, do not proceed with assembly and contact customer support.
- Trampoline Frame Components (various tubes and connectors)
- Jumping Mat
- Safety Enclosure Net
- Padded Poles for Enclosure
- Springs
- Spring Cover Pad
- Assembly Tools (e.g., spring tool, wrench)
- Instruction Manual
- Optional: Ball Pit Balls (if included with your model)
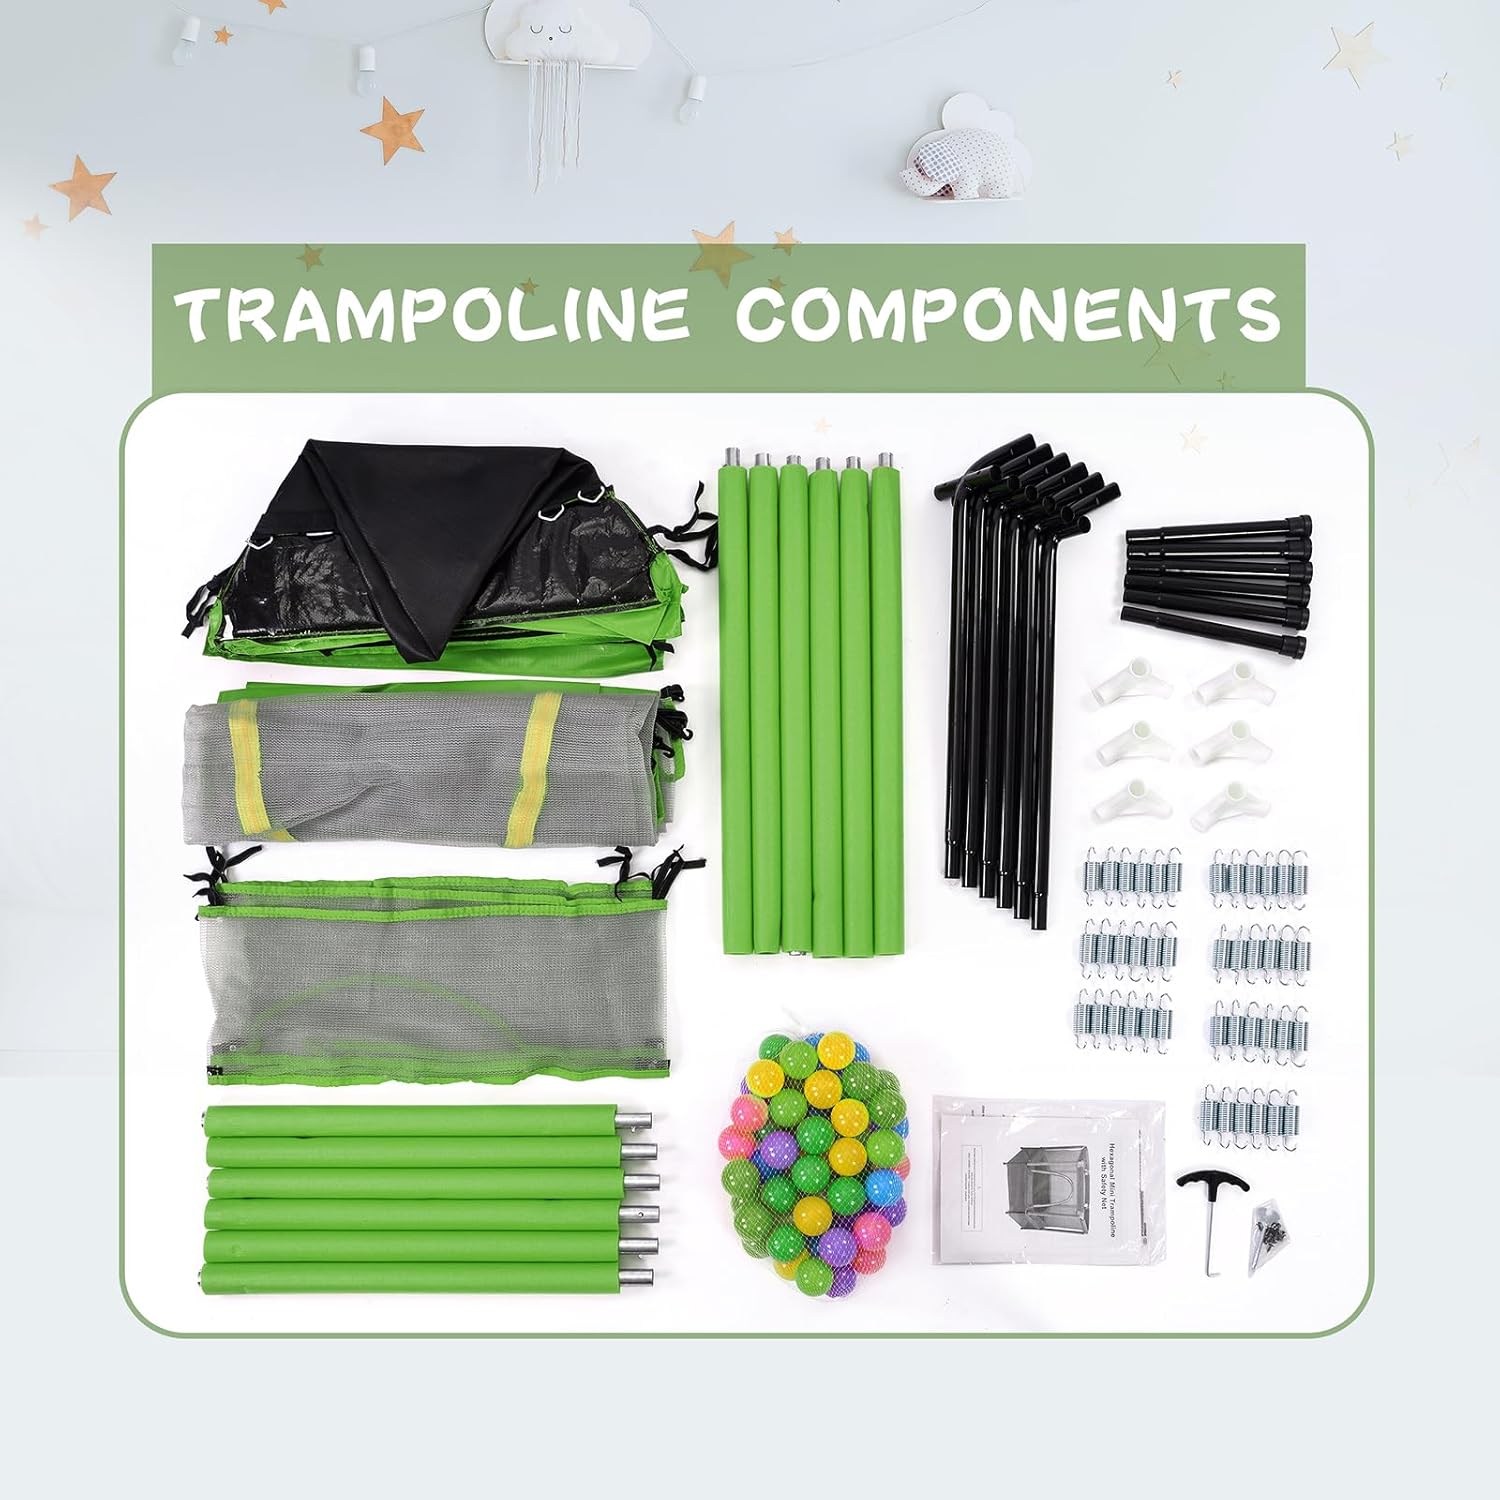
Image: All components of the trampoline laid out, including the frame, mat, springs, safety net, and tools.
4. Setup and Assembly
Follow these steps carefully for proper assembly. It is recommended that two adults assemble the trampoline.
- Unpack Components: Lay out all components on a clean, flat surface and verify against the package contents list.
- Assemble Base Frame: Connect the frame tubes according to the diagrams in the separate assembly guide (if provided) or by matching corresponding numbers/shapes. Ensure all connections are secure.
- Attach Legs: Securely attach the trampoline legs to the assembled base frame.
- Install Jumping Mat and Springs: Carefully attach the springs to the jumping mat and the frame. Use the provided spring tool to stretch and hook the springs. Attach springs evenly around the frame to ensure proper tension.
- Install Safety Enclosure Poles: Insert the padded poles into the designated slots on the frame.
- Attach Safety Enclosure Net: Drape the safety net over the poles and secure it to the jumping mat or frame as per the design. Ensure the zipper opening is accessible.
- Install Spring Cover Pad: Place the spring cover pad over the springs and frame to protect users from direct contact with the springs. Secure it in place.
- Final Check: Double-check all connections, bolts, and zippers to ensure they are tight and secure before first use.
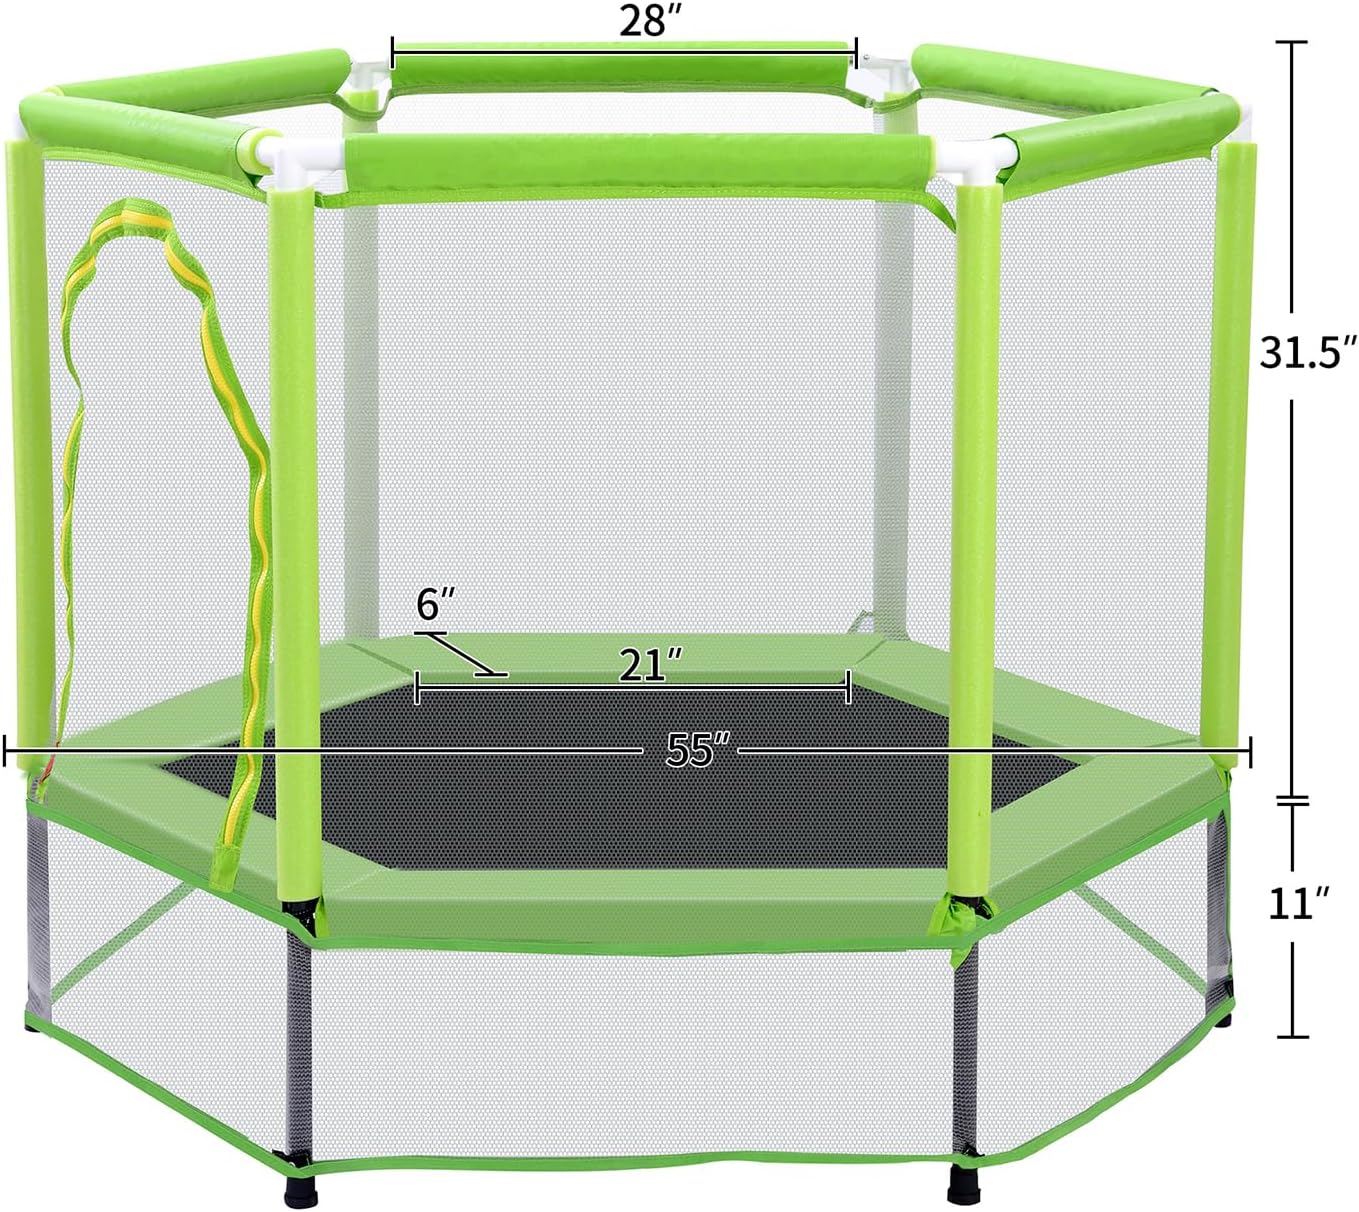
Image: Assembled trampoline with key dimensions: 39.3"L x 27.1"W x 46.9"H.
5. Operating Instructions
To ensure a safe and enjoyable experience, follow these guidelines when using the trampoline:
- Entry and Exit: Always enter and exit the trampoline through the zippered opening. Ensure the zipper is closed during use.
- Jumping Technique: Encourage users to jump in the center of the mat. Maintain control while jumping.
- Supervision: Constant adult supervision is crucial.
- No Hard Objects: Do not bring hard or sharp objects onto the trampoline.
- Weather Conditions: Avoid using the trampoline in strong winds, rain, or other adverse weather conditions.

Image: A child safely jumping inside the trampoline, which is also filled with colorful ball pit balls.
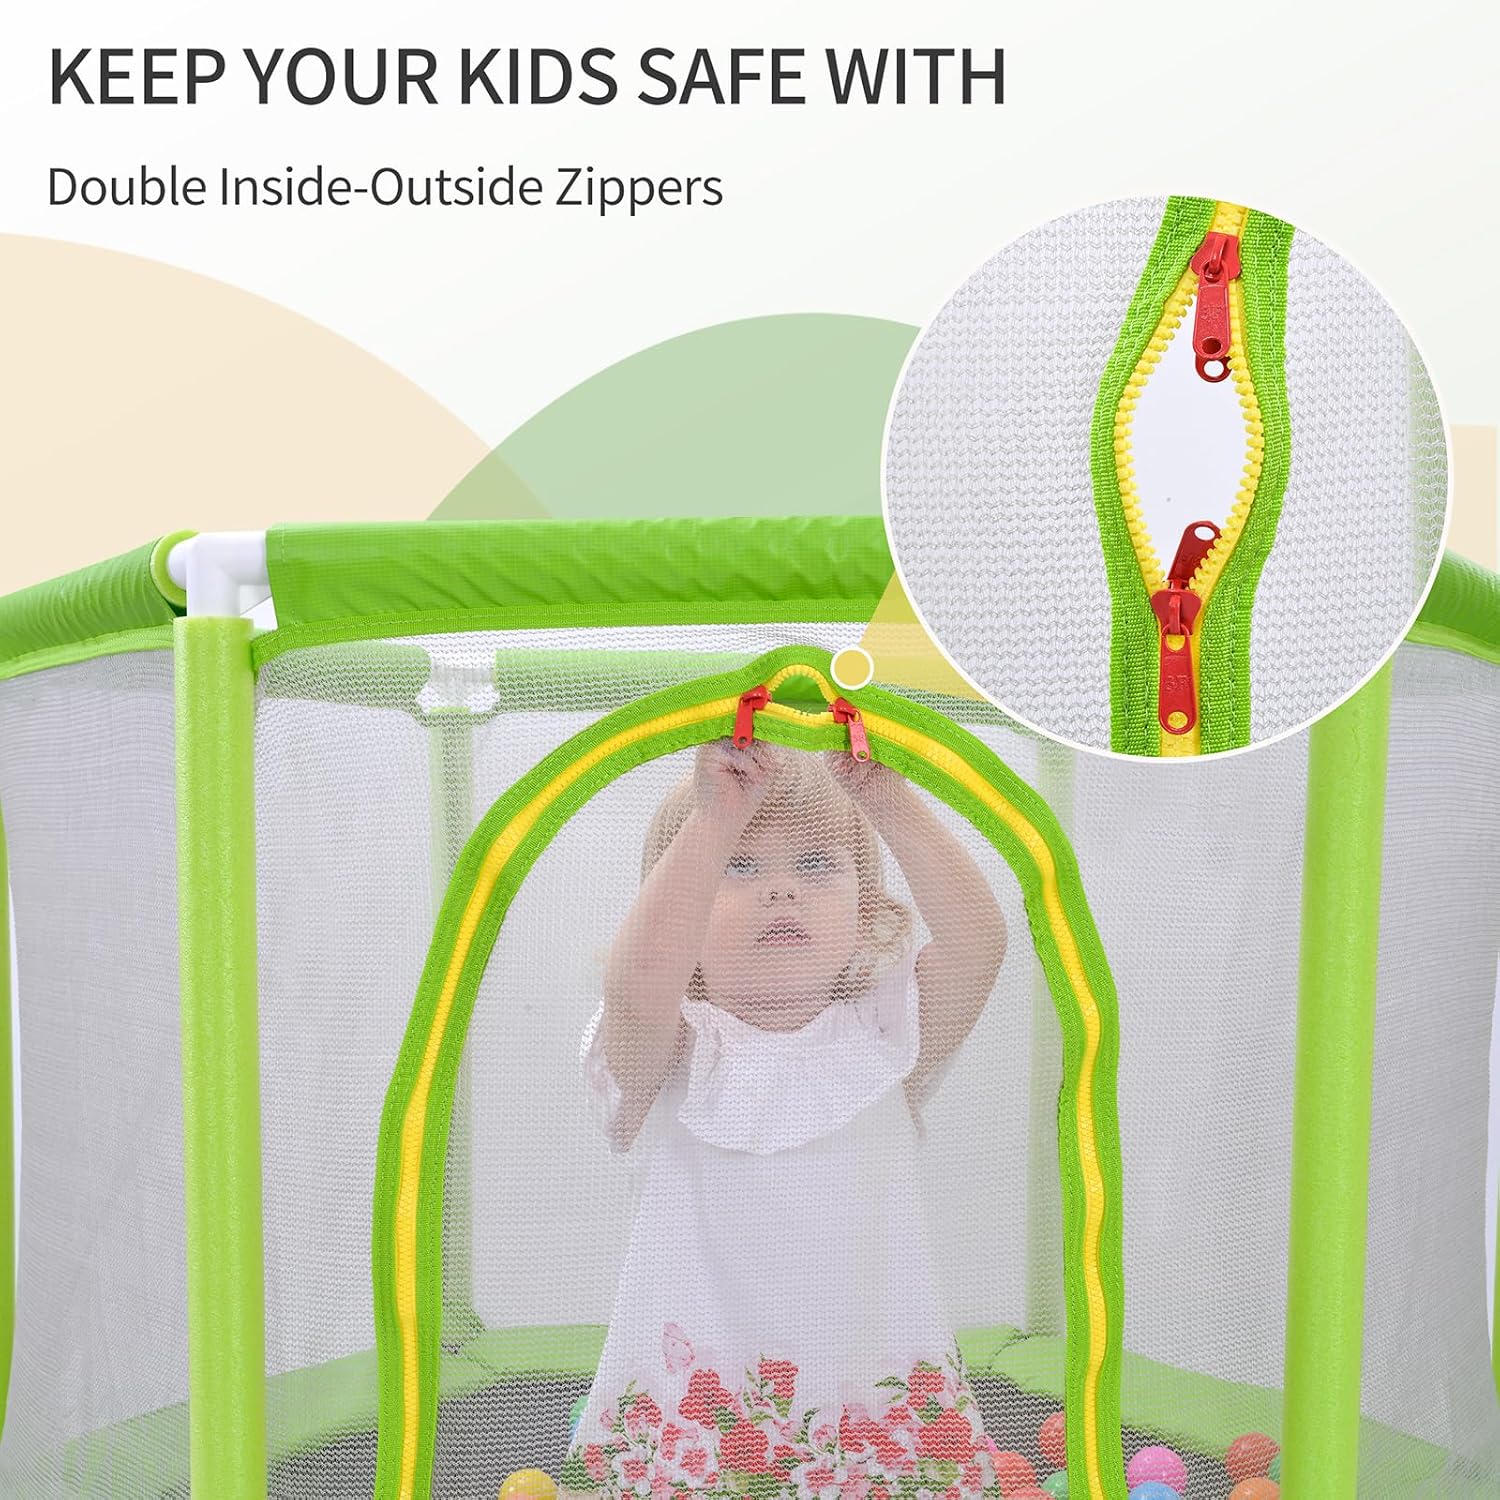
Image: Detail of the double inside-outside zippers on the safety enclosure, ensuring secure closure.
Video: A demonstration of the trampoline's features and usage, highlighting its design and safety aspects.
6. Maintenance
Regular maintenance will extend the life of your trampoline and ensure continued safety.
- Cleaning: Clean the jumping mat and frame with a damp cloth and mild soap. Avoid harsh chemicals.
- Inspection: Periodically check all nuts, bolts, and connections for tightness. Ensure springs are securely attached and not stretched or damaged. Inspect the jumping mat for tears or holes and the safety net for rips.
- Storage: If storing the trampoline for an extended period, especially during harsh weather, disassemble it and store components in a dry, protected area.
- Rust Prevention: The frame is made of stainless steel, but regular inspection for any signs of rust and prompt cleaning can help maintain its condition.
7. Troubleshooting
Here are some common issues and their potential solutions:
- Unstable Frame: Ensure all frame connections and leg attachments are securely tightened. Check that the trampoline is on a flat, level surface.
- Poor Bounce: Verify that all springs are correctly installed and not damaged or overly stretched. The jumping mat should be taut.
- Zipper Malfunction: If the safety net zipper is stuck, try applying a small amount of silicone lubricant. Do not force it.
- Noise During Use: Check for loose connections or parts rubbing against each other. Tighten any loose bolts.
8. Specifications
| Brand | Anwick |
| Model Name | Trampolines (W2850) |
| Color | Green |
| Material | Polypropylene (PP) Mat, Stainless Steel Frame |
| Shape | Round |
| Product Dimensions (LxWxH) | 39.3"L x 27.1"W x 46.9"H |
| Item Weight | 17.8 Pounds |
| Maximum Weight Recommendation | 250 Pounds |
| Number Of Springs | 24 |
| Suggested Users | Girls |
| UPC | 746433826519 |
9. Warranty and Support
This Anwick trampoline comes with a 1-year limited warranty against manufacturing defects. Please retain your proof of purchase for warranty claims.
For technical support, missing parts, or warranty inquiries, please contact Anwick customer service through the retailer's platform or the official Anwick website. Provide your model number (W2850) and purchase date for faster service.