
1. Important Safety Information
Please read all instructions carefully before installation and use. Keep this manual for future reference.
- Ensure proper mounting to avoid tipping.
- Do not exceed the weight limit of 83 pounds (37.65 kg) for the cabinet's contents.
- Installation should be performed by a qualified professional if you are unsure about electrical wiring or structural mounting.
- Always disconnect power before performing any installation or maintenance.
- Avoid using abrasive cleaners or sharp objects on the mirror surface.
2. Product Overview
The MIRPLUS 36x30 inch LED Medicine Cabinet is designed for bathroom storage and illumination. It features an all-aluminum alloy construction for durability and corrosion resistance, making it suitable for humid environments. The cabinet offers both recessed and wall-mounted installation options to suit various bathroom designs.
Key features include:
- All-Aluminum Material: Lightweight, corrosion-resistant, and durable construction.
- 3 Color Lights & Brightness Adjustment: Advanced tri-color infinitely dimmable lighting system (3000K, 4500K, 6000K) with adjustable brightness via touch control.
- LED Mirror with Anti-Fog: Built-in high-efficiency defogging system to keep the mirror clear.
- Recessed and Wall Mounted Options: Flexible installation to integrate seamlessly into your bathroom.
- Inner Mirror and Storage: Mirrored interior enhances space perception and provides additional storage.
- Adjustable Glass Shelves: Three adjustable glass shelves for customized storage of toiletries, medicine, and cosmetics.

Image: Overview of the MIRPLUS LED Medicine Cabinet highlighting its main features such as aluminum construction, touch switch, adjustable brightness and color temperature, waterproof design, adjustable shelves, shatter-proof glass, HD reflection mirror, and recessed or surface mount options.
3. Installation Instructions
3.1. Pre-Installation Checklist
- Verify all components are present and undamaged.
- Ensure the wall structure can support the cabinet's weight (approximately 37.65 kg / 83 lbs).
- Turn off the main power supply to the installation area.
- Gather necessary tools: drill, level, measuring tape, screwdriver, wire strippers.
3.2. Dimensions and Planning
The cabinet dimensions are approximately 91.4 cm (36 inches) wide, 76.2 cm (30 inches) high, and 15.2 cm (6 inches) deep. Plan your installation location carefully, considering both height and proximity to electrical connections.

Image: Detailed dimensions of the medicine cabinet, showing overall width (35.9 inches), height (30 inches), depth (4.1 inches), and individual door widths (17.9 inches).
3.3. Mounting Options: Recessed vs. Wall Mounted
This cabinet supports both recessed and wall-mounted installations.

Image: Visual representation of the cabinet installed as wall-mounted (top) and recessed (bottom), demonstrating how the recessed option integrates the cabinet flush with the wall.
3.3.1. Wall Mounted Installation
- Mark the desired mounting height and width on the wall using a level and measuring tape.
- Drill pilot holes for the mounting screws according to the cabinet's pre-drilled holes or mounting bracket positions.
- Secure the mounting brackets (if applicable) to the wall using appropriate fasteners for your wall type (e.g., wall anchors for drywall, screws for studs).
- Carefully lift the cabinet and hang it onto the secured brackets or directly mount it to the wall using screws. Ensure it is level and securely fastened.
- Connect the electrical wiring for the LED lights and defogger to the household electrical supply, following local electrical codes. Ensure all connections are secure and insulated.
3.3.2. Recessed Installation
- Carefully measure and mark the opening required in the wall. The rough opening should be slightly larger than the recessed portion of the cabinet.
- Cut the opening in the wall using appropriate tools. Ensure no electrical wires or plumbing are in the cutting path.
- Frame the opening with wood studs if necessary to provide a secure mounting surface.
- Route the electrical wiring into the wall opening.
- Insert the cabinet into the wall opening. Secure it to the framing studs using screws through the pre-drilled holes on the cabinet's sides. Ensure the cabinet is flush with the wall and level.
- Connect the electrical wiring for the LED lights and defogger to the household electrical supply, following local electrical codes. Ensure all connections are secure and insulated.
3.4. Shelf Installation
The cabinet includes three adjustable glass shelves. Install the shelf clips into the desired positions inside the cabinet. Carefully place the glass shelves onto the clips. Adjust shelf height as needed to accommodate items.

Image: Interior view of the medicine cabinet showing the glass shelves and an inset diagram illustrating how the shelf height can be adjusted.
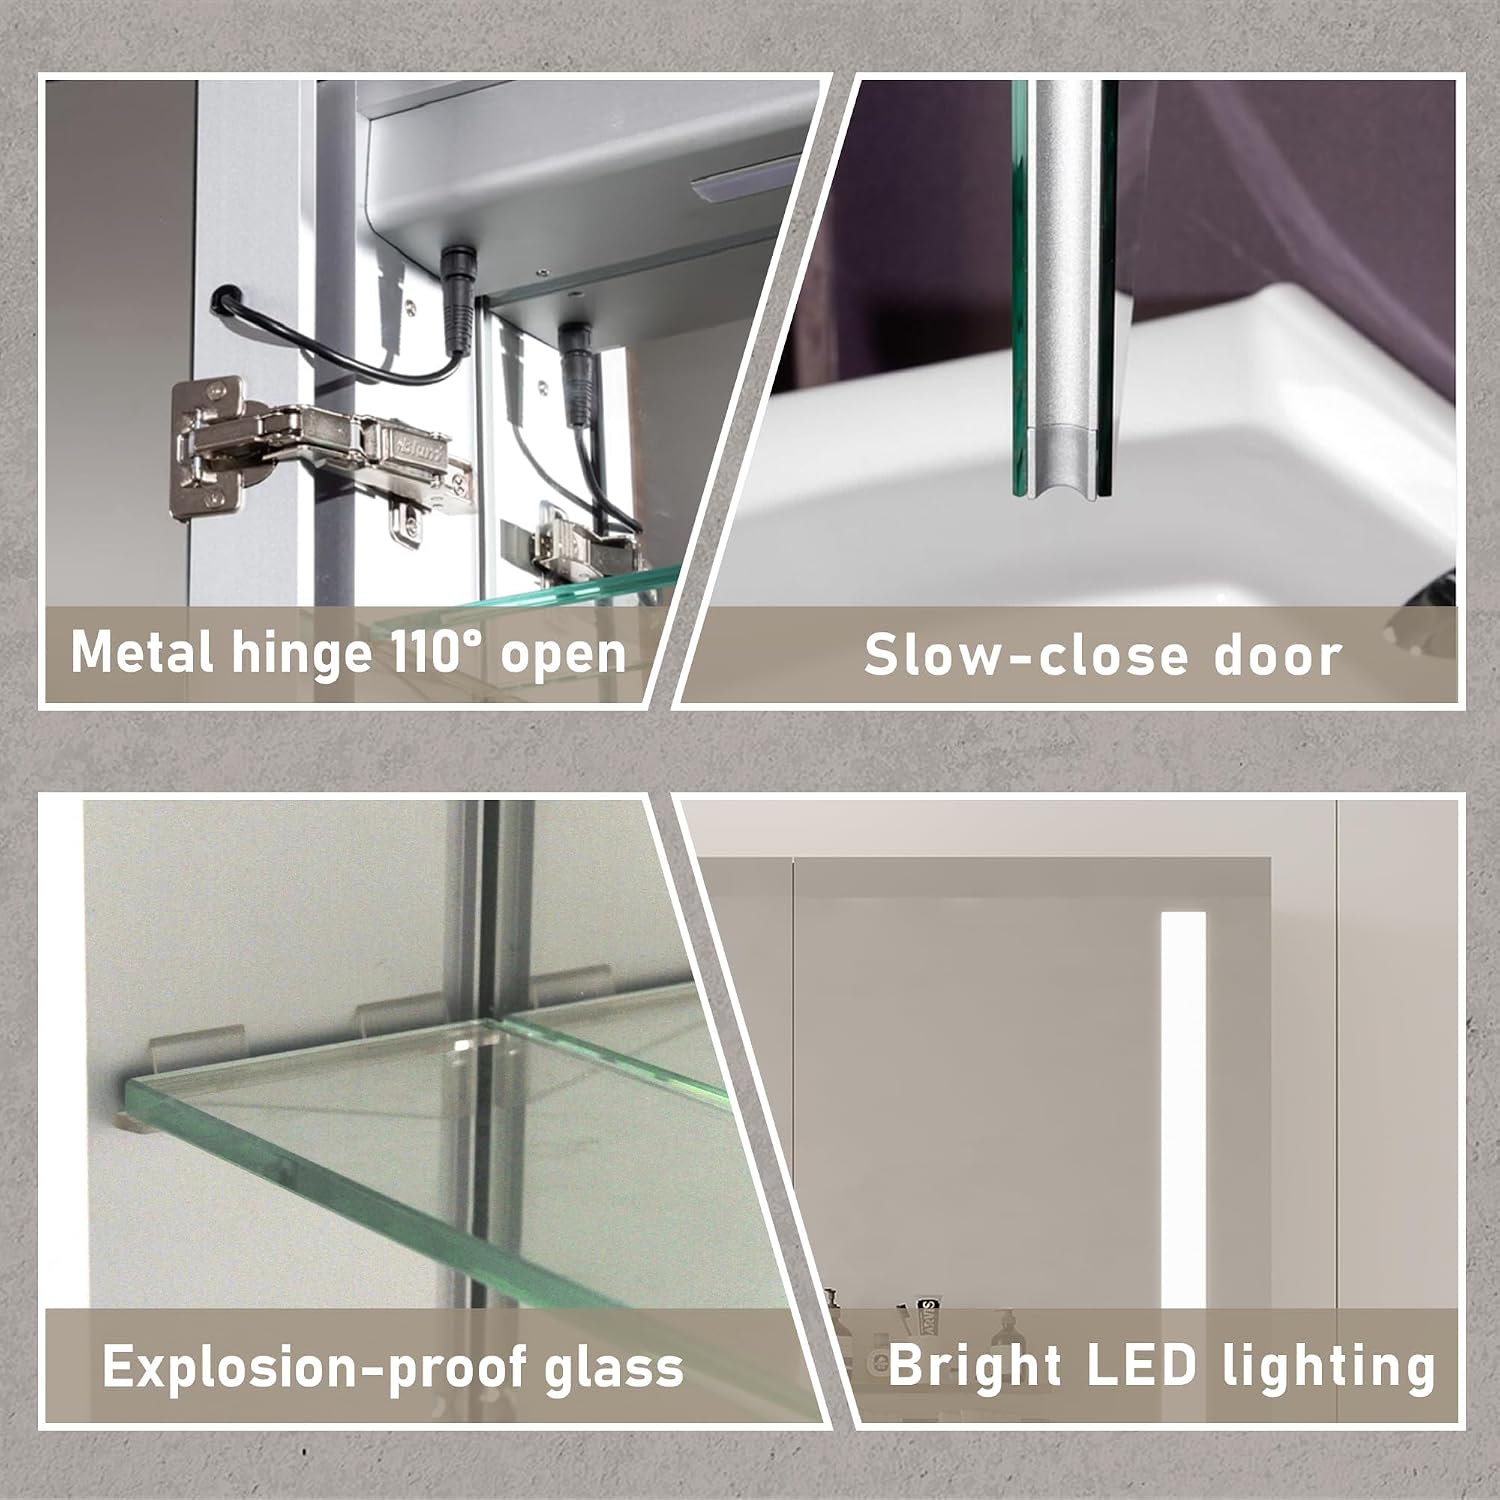
Image: Close-up views of cabinet components: metal hinge allowing 110° open, slow-close door mechanism, explosion-proof glass, and bright LED lighting strips.
4. Operating Instructions
The MIRPLUS LED Medicine Cabinet features intuitive touch controls located on the mirror surface. These controls are waterproof and can be operated even with wet hands.

Image: Diagram showing the touch control buttons on the mirror: Power/Brightness adjustment (long press), Defogger button, and Color Temperature adjustment (short press). It also indicates that the touch buttons are waterproof.
4.1. LED Lighting Control
- Power On/Off: Briefly press the Switch button (power icon) to turn the LED lights on or off.
- Adjust Brightness: When the lights are on, long press the Switch button to cycle through brightness levels (10% to 100%). Release the button when the desired brightness is reached.
- Adjust Color Temperature: Briefly press the Adjust Color Temperature button (up/down arrows icon) to cycle through the three color temperature settings:
- Warm Light (3000K): Soft, ambient lighting.
- Natural Light (4500K): Balanced, daylight-like illumination.
- Cool Light (6000K): Bright, crisp lighting.

Image: Visual demonstration of the adjustable color temperature (6000K, 4500K, 3000K) and brightness levels (100% to 10%) of the LED mirror.
4.2. Anti-Fog Function
- Activate Defogger: Briefly press the Defogger button (steam icon) to activate the anti-fog function. The indicator light will illuminate.
- Deactivate Defogger: Press the Defogger button again to turn off the anti-fog function.
- The intelligent heating technology prevents water vapor condensation, keeping the mirror clear during showers or baths.
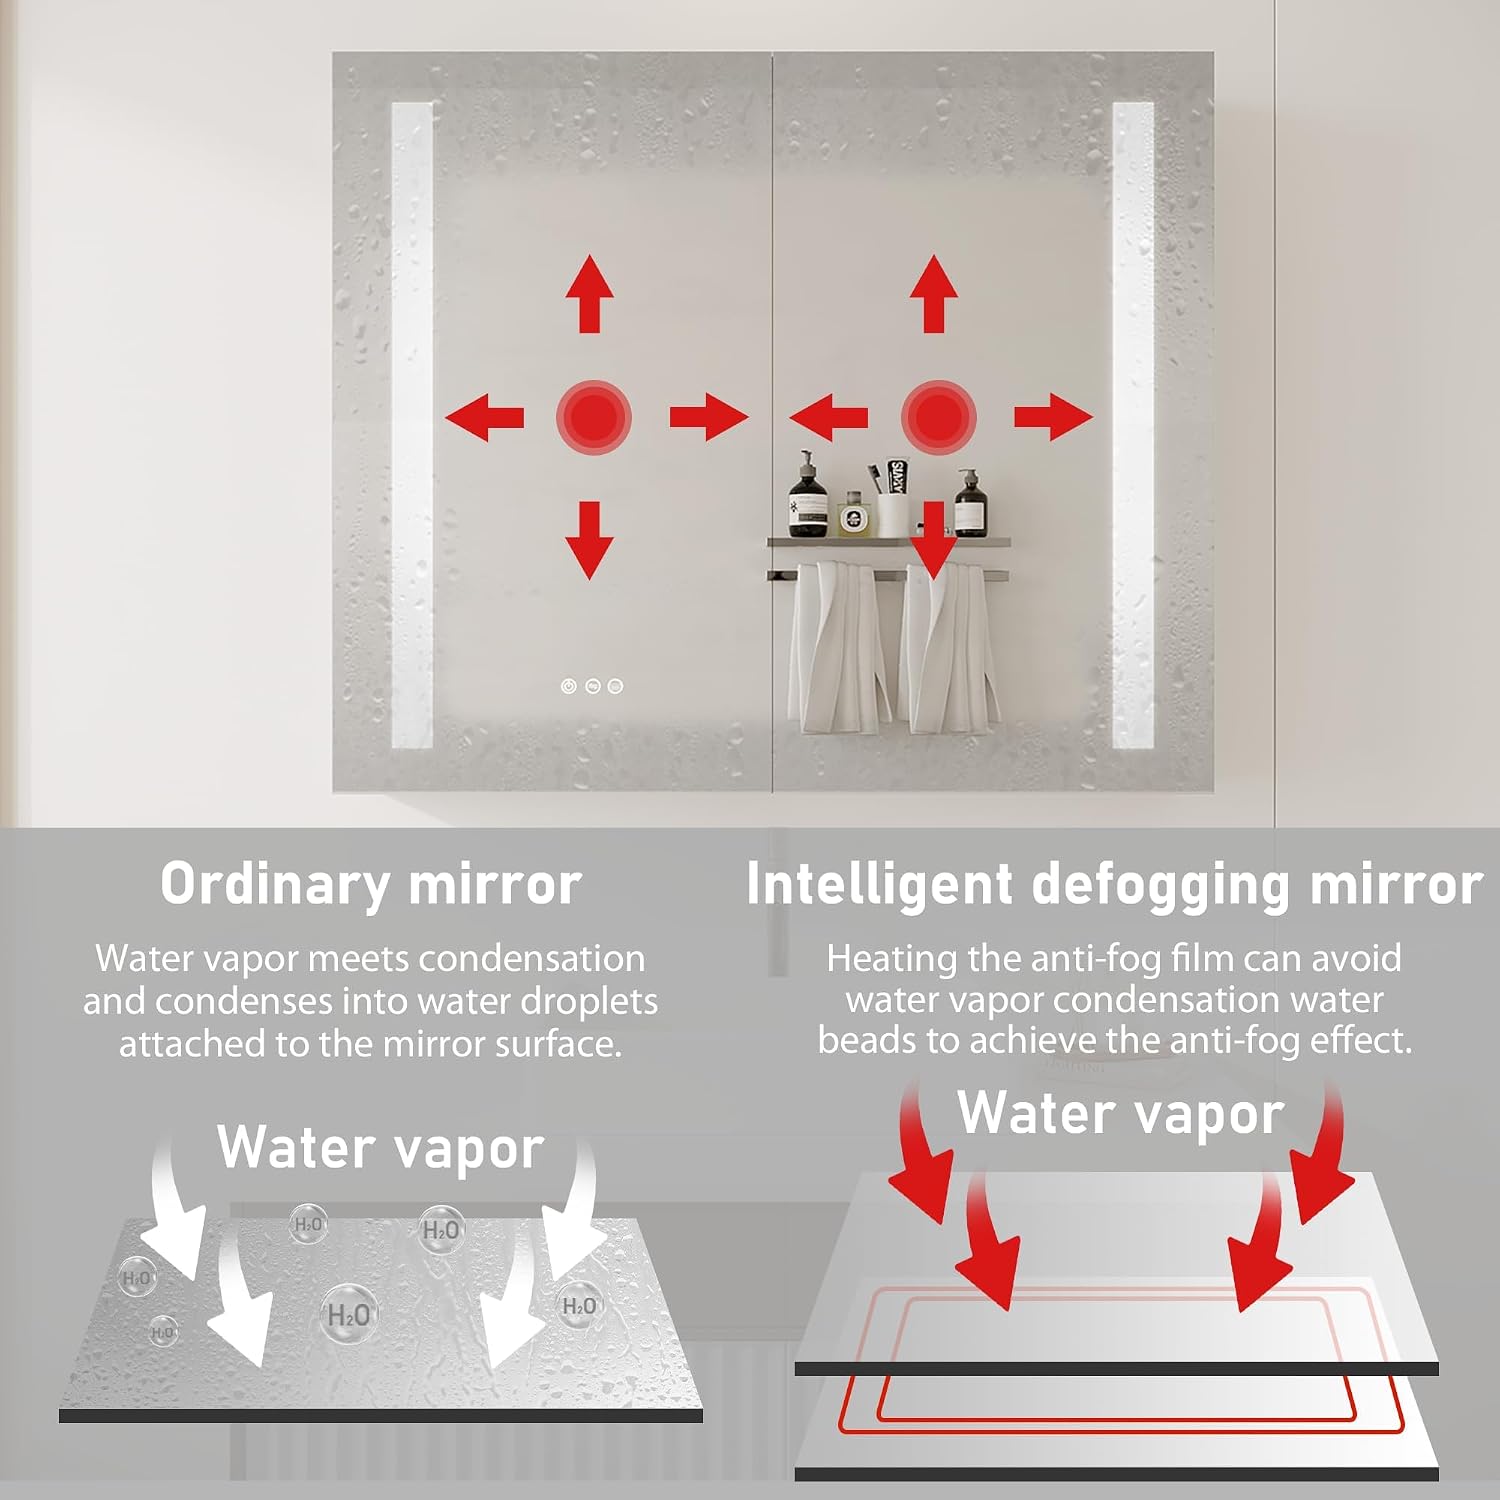
Image: Illustrates the difference between an ordinary mirror (top left, showing condensation) and an intelligent defogging mirror (top right, clear). A diagram below explains how water vapor condenses on an ordinary mirror versus how the anti-fog film prevents condensation on the intelligent mirror.
5. Maintenance
- Cleaning the Mirror: Wipe the mirror surface with a soft, damp cloth. For stubborn spots, use a mild glass cleaner. Avoid abrasive cleaners or harsh chemicals that may damage the mirror coating or frame.
- Cleaning the Cabinet: Wipe the aluminum frame and interior surfaces with a damp cloth. Dry immediately to prevent water spots.
- Electrical Components: Ensure all electrical connections remain dry. Do not spray water directly onto the electrical components.
- Shelf Care: Glass shelves can be removed for cleaning. Wash with mild soap and water, then dry thoroughly before reinserting.
6. Troubleshooting
6.1. LED Lights Not Working
- Check if the main power supply to the cabinet is on.
- Ensure the electrical connections are secure. If unsure, consult a qualified electrician.
- Press the power button on the mirror to ensure it is activated.
6.2. Anti-Fog Function Not Working
- Verify that the defogger button has been pressed and its indicator light is on.
- Allow a few minutes for the defogger to heat up and become effective.
- Ensure the power supply is stable.
6.3. Mirror Appears Damaged or Defective
- Inspect for any visible damage from shipping or installation.
- If damage is present upon receipt, contact customer service immediately.
7. Specifications
| Brand | MIRPLUS |
| Model Number | 802 |
| Material | Aluminum (Frame), Alloy Steel (Back), Glass (Shelves, Mirror) |
| Product Dimensions (W x H x D) | 91.4 cm x 76.2 cm x 15.2 cm (36 x 30 x 6 inches) |
| Item Weight | 37.65 kg (83 lbs) |
| Mounting Type | Wall Mount, Recessed |
| Number of Doors | 2 (Mirrored) |
| Number of Shelves | 3 (Adjustable Glass) |
| Special Features | Built-in Defogger, 3 Color LED Lights, Adjustable Brightness, Touch Switch, Shatter-proof glass |
| Care Instructions | Wipe with Damp Cloth |
8. Warranty and Customer Support
MIRPLUS is committed to providing excellent customer service and support. If you encounter any problems or require assistance with your LED Medicine Cabinet, please contact our customer service team.
- Product Consultation: For questions regarding product features or compatibility.
- Installation Guidance: Assistance with setup and mounting procedures.
- Maintenance Services: Advice on proper care and troubleshooting.
- Warranty Information: Please refer to your purchase documentation for specific warranty terms and conditions.
Our goal is to ensure every customer is satisfied with their MIRPLUS product and enjoys a quality service experience.


