
Introduction
Thank you for purchasing the Goldair GCF-521 5-Blade Ceiling Fan with Lamp. This manual provides essential information for the safe installation, operation, and maintenance of your new ceiling fan. Please read these instructions thoroughly before installation and retain them for future reference.
This 52-inch ceiling fan features five blades, a built-in lamp, and a three-speed pull chain control, designed for indoor use to provide both illumination and airflow.
Safety Information
Always follow basic safety precautions when installing and operating electrical appliances to reduce the risk of fire, electric shock, and personal injury.
- Ensure the power supply is disconnected at the main circuit breaker before installation or servicing.
- All electrical work must be performed by a qualified electrician and comply with local electrical codes.
- The mounting structure must be capable of supporting the weight of the fan (approximately 15 kg).
- Do not operate the fan with a damaged power cord or plug.
- Avoid placing objects in the path of the fan blades.
- This fan is designed for indoor use only.
Package Contents
Verify that all components are present before beginning installation. If any parts are missing or damaged, contact Goldair customer service.
- Motor Housing Assembly
- Fan Blades (5)
- Blade Brackets (5)
- Downrod and Canopy
- Mounting Bracket
- Light Kit Assembly
- Glass Shade
- Pull Chains (for fan speed and light)
- Hardware Pack (screws, washers, wire nuts)
- Instruction Manual
Setup and Installation
Professional installation by a qualified electrician is recommended to ensure safety and proper function.
1. Mounting the Bracket
Secure the mounting bracket to a ceiling joist or a fan-rated outlet box. Ensure all screws are tightened securely to prevent the fan from falling.
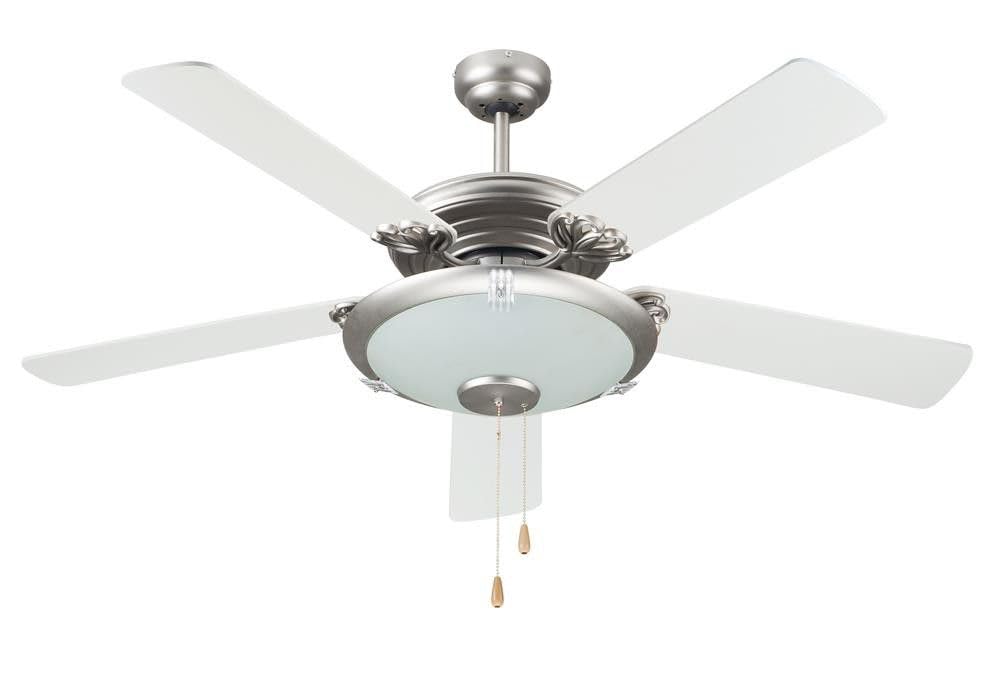
Image: Goldair GCF-521 Ceiling Fan with Lamp. This image displays the complete fan unit, including the motor housing, five white blades, and the integrated lamp with a frosted glass shade. Two pull chains are visible, extending from the lamp housing.
2. Assembling the Downrod and Motor
Insert the downrod through the canopy and connect it to the motor housing. Route the electrical wires from the motor through the downrod. Secure the downrod to the motor with the provided pin and cotter pin.
3. Hanging the Fan
Carefully lift the fan assembly and hang it onto the mounting bracket hook. This allows for hands-free wiring.
4. Electrical Connections
Connect the fan's electrical wires to the household wiring according to the wiring diagram provided in the full manual. Typically, this involves connecting live, neutral, and ground wires. Ensure all connections are secure with wire nuts.
5. Securing the Canopy
Once wiring is complete, carefully push the canopy up against the ceiling and secure it to the mounting bracket with the provided screws.
6. Attaching the Blades
Attach each fan blade to its respective blade bracket using the provided screws. Then, attach the blade assemblies to the motor housing. Ensure all screws are tight.
7. Installing the Light Kit
Connect the light kit wires to the corresponding wires from the motor housing. Secure the light kit to the bottom of the motor housing. Install the light bulbs (not included) and then attach the glass shade by twisting or securing it with screws, depending on the design.
Operating Instructions
After installation, restore power to the circuit. Your Goldair GCF-521 ceiling fan is operated by two pull chains.
- Fan Speed Control: One pull chain controls the fan speed. Pull the chain repeatedly to cycle through High, Medium, Low, and Off settings.
- Light Control: The other pull chain controls the integrated lamp. Pull the chain to turn the light On or Off.
For optimal comfort, adjust the fan speed according to room temperature and personal preference.
Maintenance
Regular maintenance ensures the longevity and efficient operation of your ceiling fan.
- Cleaning: Dust the fan blades and motor housing periodically with a soft, damp cloth. Do not use abrasive cleaners or solvents, as they may damage the finish. Ensure power is off before cleaning.
- Tightening Screws: Check all screws on the blade attachments and mounting hardware annually. Tighten any loose screws to prevent wobbling and noise.
- Light Bulb Replacement: Ensure the power is off before replacing light bulbs. Use bulbs of the correct wattage and type as specified in the full product manual.
Troubleshooting
If you experience issues with your Goldair GCF-521 ceiling fan, refer to the following common problems and solutions:
| Problem | Possible Cause | Solution |
|---|---|---|
| Fan does not start | No power supply; Loose wire connections; Faulty pull chain switch. | Check circuit breaker; Verify all wire connections are secure; Contact a qualified electrician. |
| Fan wobbles | Loose blade screws; Unevenly balanced blades; Loose mounting bracket. | Tighten all blade screws; Ensure blades are installed correctly; Check mounting bracket for secure attachment. |
| Fan is noisy (humming/whining) | Loose screws; Motor hum (normal for some fans); Improper installation; Bearings issue. | Check and tighten all screws on the fan and mounting bracket. Ensure proper installation. If noise persists and is excessive, contact customer support. |
| Light does not work | Burnt-out bulb; Loose wire connection in light kit; Faulty pull chain switch. | Replace bulb; Check light kit wiring; Contact a qualified electrician. |
Specifications
| Brand | Goldair |
| Model Number | GCF-521 |
| Colour | White |
| Electric Fan Design | Ceiling Fan |
| Power Source | Corded Electric |
| Style | Modern |
| Product Dimensions (D x W x H) | 66.5D x 41.2W x 24.5H centimetres |
| Room Type | Living Room |
| Special Feature | Quiet Operation (Note: Refer to troubleshooting for potential noise issues) |
| Recommended Uses | Cooling |
| Mounting Type | Ceiling Mount |
| Controller Type | Button Control (Pull chain) |
| Wattage | 70 watts |
| Number of Blades | 5 |
| Voltage | 230 Volts |
| Indoor/Outdoor Usage | Indoor |
| Material | Metal, Wood |
| Blade Length | 52 Inches |
| Country of Origin | China |
Warranty and Support
Goldair products are manufactured to high-quality standards. For warranty information, technical support, or to purchase replacement parts, please refer to the warranty card included with your product or visit the official Goldair website. Keep your proof of purchase for warranty claims.
For further assistance, please contact Goldair customer service.