
1. Introduction
The NITEBEAM CarryBright CBX4 is a comprehensive bicycle lighting system designed to enhance rider safety. It features front and rear turn signals, an integrated horn, and a smart wireless remote control for intuitive operation. This manual provides detailed instructions for setup, operation, maintenance, and troubleshooting to ensure optimal performance and longevity of your device.

2. Product Overview and Accessories
The CBX4 system includes all necessary components for installation and immediate use. Please verify that all items listed below are present in your package.
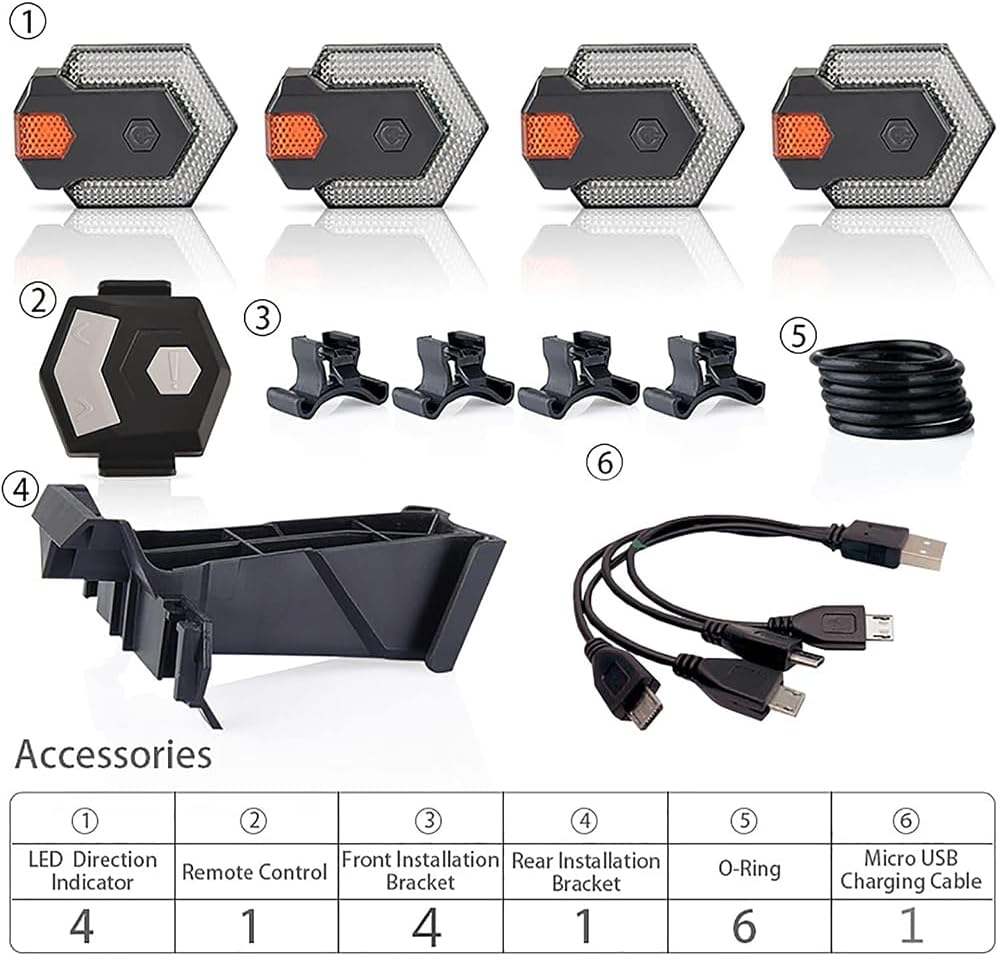
| Item No. | Description | Quantity |
|---|---|---|
| ① | LED Direction Indicator | 4 |
| ② | Remote Control | 1 |
| ③ | Front Installation Bracket | 4 |
| ④ | Rear Installation Bracket | 1 |
| ⑤ | O-Ring | 6 |
| ⑥ | Micro USB Charging Cable | 1 |
3. Setup and Installation
The CarryBright CBX4 is designed for easy installation and removal on various bicycle types, including standard bicycles, electric bicycles, and scooters. The lights can be mounted on handlebars or frames.
3.1 Installing the LED Direction Indicators
- Identify the desired mounting locations for the four LED indicators. Typically, two are mounted at the front (e.g., on handlebars or front fork) and two at the rear (e.g., on seat stays or rear rack).
- Attach the appropriate installation bracket (front or rear) to the chosen location using the provided O-rings. Ensure a secure fit.
- Slide each LED direction indicator onto its respective bracket until it clicks into place.
3.2 Installing the Remote Control
- Mount the remote control to a convenient location on your handlebar, typically near the grip for easy thumb access.
- Use the provided O-rings to secure the remote control bracket firmly to the handlebar.
- Slide the remote control onto its bracket.


4. Charging Instructions
The NITEBEAM CarryBright CBX4 lights are rechargeable via a standard USB port. Ensure the lights are fully charged before first use for optimal performance.
4.1 Charging the Lights
- Connect the provided Micro USB charging cable to the charging port on each LED direction indicator.
- Plug the USB end of the cable into any standard USB power source (e.g., computer USB port, USB wall adapter, power bank).
- During charging, the indicator light on the unit will typically show a red light.
- Once fully charged, the indicator light will turn green light.
- Disconnect the lights from the charging cable once fully charged.
The included charging cable is designed to charge all four lights simultaneously for convenience.

5. Operating Instructions
The NITEBEAM CarryBright CBX4 is operated wirelessly via the smart remote control. The lights are visible day and night, up to 100 meters, enhancing your visibility on the road.
5.1 Remote Control Functions
The remote control features intuitive buttons for various functions:
- Left Turn Signal: Press the left arrow button (<) to activate the left turn signal. The lights will flash for approximately 30 seconds.
- Right Turn Signal: Press the right arrow button (>) to activate the right turn signal. The lights will flash for approximately 30 seconds.
- Horn: A short click of the central button (!) will sound the integrated horn (120 dB).
- Night Caution LED: A 1st hold press of the central button (!) activates the night caution LED mode.
- All Lights Flash: A 2nd hold press of the central button (!) will make all lights flash simultaneously (emergency/hazard mode).
- All Lights Off: A 3rd hold press of the central button (!) will turn all lights off.


6. Maintenance
Proper maintenance ensures the longevity and reliable performance of your NITEBEAM CarryBright CBX4.
6.1 Cleaning
- Wipe the lights and remote control with a soft, damp cloth.
- Do not use abrasive cleaners or solvents, as these can damage the surface or internal components.
6.2 Water Resistance
The CBX4 lights feature an IPX6 water resistance rating, meaning they are protected against high-pressure water jets from any direction. This allows for riding in rain or through puddles without concern. However, they are not designed for submersion.
6.3 Battery Care
- Recharge the batteries regularly, even if the lights are not used frequently, to maintain battery health.
- Avoid fully discharging the batteries before recharging.
- Store the device in a cool, dry place when not in use for extended periods.
7. Troubleshooting
If you encounter issues with your NITEBEAM CarryBright CBX4, refer to the following common problems and solutions:
| Problem | Possible Cause | Solution |
|---|---|---|
| Lights not turning on | Low battery Remote control battery low Not paired correctly | Charge the lights fully Replace remote control battery (if applicable) Refer to pairing instructions (if provided, or try re-pairing by holding buttons) |
| Turn signals not flashing | Remote out of range Interference Light unit malfunction | Ensure remote is within 10m of lights Move away from strong electronic signals Contact customer support |
| Horn not sounding | Remote control battery low Horn button malfunction | Replace remote control battery (if applicable) Contact customer support |
| Lights not charging | Faulty cable Faulty USB port Charging port damage | Try a different Micro USB cable Try a different USB power source Contact customer support |
8. Specifications
Detailed technical specifications for the NITEBEAM CarryBright CBX4.
- Model: CBX4
- Brand: NITEBEAM / CarryBright
- Color: White, Red
- Power Source: Battery
- Water Resistance Level: IPX6 (Waterproof)
- Mounting Type: Handlebar mount or Frame mount
- Product Dimensions: 19.5L x 18.5W x 4.4H centimeters (approximate package dimensions)
- Weight: 340 g (approximate package weight)
- Remote Control Range: Up to 10 meters (wireless)
- Visibility: Up to 100 meters (day and night)
- Horn Output: 120 dB

9. Warranty and Support
For warranty information or technical support, please refer to the contact details provided with your purchase or visit the official CarryBright website. Keep your proof of purchase for warranty claims.
If you have any questions or require assistance, please do not hesitate to contact our customer service team.


