
Hantek Hantek2C72
Contents
Hantek 2-in-1 USB Automotive Handheld Oscilloscope and Multimeter User Manual
Model: Hantek2C72
1. Introduction
This manual provides essential instructions for the safe and effective operation of your Hantek 2-in-1 USB Automotive Handheld Oscilloscope and Multimeter, Model Hantek2C72. This compact device integrates an oscilloscope and a multimeter into a single portable unit, designed for various testing and measurement applications.
Please read this manual thoroughly before using the device to ensure proper functionality and to prevent damage.
2. What's in the Box
Verify that all items listed below are included in your package:
- Hantek2C72 Main Unit
- Oscilloscope Probes (Quantity and type may vary by package)
- Multimeter Test Leads
- USB Type-C Charging and Data Cable
- Power Adapter
- Carrying Case
- Lithium Ion Battery (pre-installed or separate)

Figure 2.1: Hantek2C72 main unit and included accessories, including probes, test leads, USB cable, power adapter, and carrying case.
3. Product Overview
The Hantek2C72 is a versatile 2-in-1 device combining the functionalities of a dual-channel oscilloscope and a digital multimeter. Its compact design and integrated battery make it suitable for portable use.
3.1 Key Features
- Oscilloscope: 250MSa/s sampling rate, 70MHz bandwidth, 10mV~10V vertical resolution, auto automatic measuring function, adjustable backlight brightness, auto power off, digital voltmeter function, cursor measurement, reference waveform, storage function.
- Multimeter: Standard multi-functional digital multimeter for AC/DC voltage/current, resistance, diode, capacitance, and on-off tests. Features high sensitivity, accuracy, clear display, strong overload ability, and ultra-portability.
- Power & Portability: Large-capacity lithium battery, ultra-low power design, Type-C charging and data transmission.
- User Interface: Color highlight LCD screen, minimalist keyboard design, AUTO one-key test.

Figure 3.1: The Hantek2C72 highlighting its 2-in-1 capabilities: Oscilloscope and Multimeter.
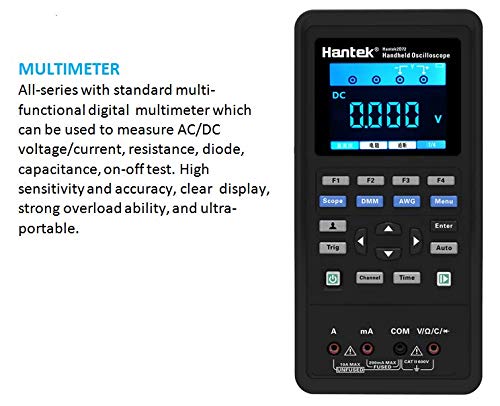
Figure 3.2: Display of the Multimeter function, indicating voltage measurement capabilities.
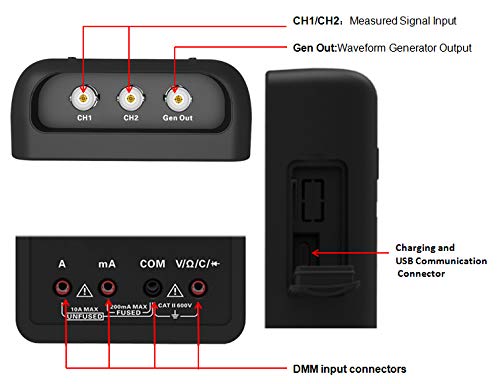
Figure 3.3: Detailed view of the device's input/output ports, including CH1/CH2 (Measured Signal Input) and DMM input connectors, along with the Charging and USB Communication Connector.
4. Setup
4.1 Battery Installation and Charging
The Hantek2C72 is powered by a built-in large-capacity lithium battery. Ensure the battery is properly installed and charged before first use.
- If the battery is not pre-installed, open the battery compartment cover on the back of the device and insert the 18650 lithium battery according to the polarity markings.
- Connect the provided Type-C USB cable to the device's charging port and the other end to the power adapter.
- Plug the power adapter into a standard electrical outlet. The device will begin charging.
- A full charge typically allows for a full day of continuous operation or up to two months of standby time due to its ultra-low power design.
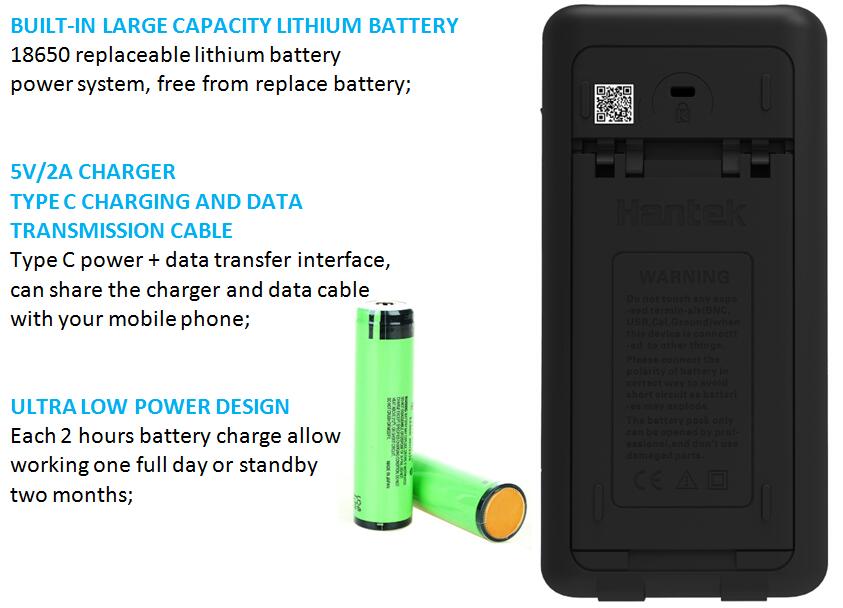
Figure 4.1: Illustration of the device's battery compartment, highlighting the 18650 replaceable lithium battery and Type-C charging port.
4.2 Connecting Probes and Test Leads
- For oscilloscope measurements, connect the oscilloscope probes to the CH1 and/or CH2 BNC connectors.
- For multimeter functions, connect the multimeter test leads to the designated DMM input connectors (A, mA, COM, V/Ω/C/->|).
5. Operating Modes
The Hantek2C72 features a minimalist keyboard design for simplified operation. Use the function buttons (F1-F4), navigation arrows, and dedicated mode buttons (Scope, DMM) to switch between functions and adjust settings.
5.1 Oscilloscope Mode
- Press the Scope button to enter oscilloscope mode.
- Connect the oscilloscope probes to the circuit under test.
- Press the AUTO button for one-key automatic waveform adjustment. This feature optimizes vertical scale, horizontal time base, and trigger settings for stable waveform display.
- Use the navigation arrows to adjust vertical sensitivity (V/div), horizontal time base (s/div), and trigger level.
- Access additional settings like cursor measurements, reference waveforms, and storage functions via the Menu button.

Figure 5.1: The Hantek2C72 displaying a waveform on its color LCD screen, demonstrating its compact size and clear display.
5.2 Multimeter Mode
- Press the DMM button to enter digital multimeter mode.
- Select the desired measurement function (voltage, current, resistance, capacitance, diode, continuity) using the menu or function buttons.
- Connect the multimeter test leads to the appropriate DMM input connectors and the circuit under test.
- Read the measurement values directly from the screen.
5.3 Video Demonstration
Video 5.1: This video provides a demonstration of the Hantek 2C42 model, showcasing its handheld oscilloscope functionality, including signal display and basic operation. It illustrates how the device captures and displays waveforms, and briefly touches upon its use in an automotive context for CAN bus signal analysis. Note that the 2C42 model shown in the video has a narrower bandwidth (40MHz vs 70MHz for 2C72) and, like the 2C72, does not include the arbitrary waveform generator feature.
6. Specifications
Below are the technical specifications for the Hantek2C72 model:
| Feature | Specification |
|---|---|
| Brand | Hantek |
| Model Number | Hantek2C72 |
| Product Dimensions | 8.66 x 5.91 x 4.72 inches |
| Item Weight | 0.5 Kilograms (1.1 Pounds) |
| Power Source | Battery Powered (1 Lithium Ion battery included) |
| Oscilloscope Channels | 2 Channels |
| Bandwidth | 70 MHz |
| Sampling Rate | 250 MSa/s |
| Multimeter | Included |
| Signal Generator | Not included in 2C72 model (available in 'D' series) |
| Date First Available | October 8, 2023 |
6.1 Hantek 2000 Series Comparison
The following table provides a comparison of different models within the Hantek 2000 series:

Figure 6.1: Comparison table for Hantek 2000 series models, detailing oscilloscope channels, bandwidth, sampling rate, and inclusion of multimeter and signal generator functions.
7. Maintenance
7.1 Cleaning
To clean the device, use a soft, dry cloth. For stubborn dirt, a slightly damp cloth with mild detergent can be used. Avoid abrasive cleaners or solvents that could damage the casing or screen.
7.2 Battery Care
To prolong battery life, avoid fully discharging the device frequently. Charge the battery regularly, even if the device is not in active use. Store the device in a cool, dry place when not in use for extended periods.
7.3 Storage
When storing the device, especially for long periods, ensure it is powered off and placed in its protective carrying case to prevent physical damage and exposure to dust or moisture.
8. Troubleshooting
If you encounter issues with your Hantek2C72, refer to the following common problems and solutions:
- Device does not power on: Ensure the battery is charged. Connect the device to the power adapter and try again. Check battery installation.
- No waveform displayed in Oscilloscope mode: Verify probes are correctly connected to the device and the circuit. Check the input signal source. Use the AUTO button to automatically adjust settings. Adjust vertical sensitivity and horizontal time base manually.
- Inaccurate Multimeter readings: Ensure test leads are properly connected to the correct input jacks for the selected measurement type. Verify the test leads are not damaged.
- Screen visibility issues in bright light: The device's screen may have reduced visibility in direct sunlight. Move to a shaded area for better viewing.
For further assistance, please contact Hantek customer support.
9. Warranty and Support
For information regarding product warranty, technical support, or service, please refer to the warranty card included with your product or visit the official Hantek website. Keep your purchase receipt as proof of purchase for warranty claims.
Ask a question about this manual
Ask about setup, troubleshooting, compatibility, parts, safety, or missing instructions. Manuals+ will review the question and use this page’s manual context to help answer it.