
1. Introduction
Thank you for choosing the VONLUCE 52-inch Ceiling Fan with Lights and Remote Control. This manual provides essential information for the safe installation, operation, and maintenance of your new ceiling fan. Please read these instructions thoroughly before installation and retain them for future reference.
This ceiling fan features a 52-inch sweep, integrated lighting with 3 color temperature options, a 6-speed reversible DC motor for year-round comfort, and convenient remote control operation. It is designed for both indoor and outdoor (covered patio) use.
2. Safety Information
- Electrical Safety: Always disconnect power at the main circuit breaker before installing, cleaning, or servicing the fan. Ensure all electrical connections comply with local codes and ordinances. If you are unfamiliar with electrical wiring, consult a qualified electrician.
- Mounting: The fan must be mounted to a structurally sound ceiling joist or outlet box capable of supporting the fan's weight (approximately 11.88 lbs). Use only the outlet box marked "Acceptable for Fan Support of 35 lbs (15.9 kg) or less."
- Blade Clearance: Ensure fan blades are at least 7 feet (2.1 meters) from the floor and have adequate clearance from walls or other obstructions.
- Motor Operation: Do not insert objects into the path of the fan blades.
- Light Source: Do not attempt to replace the integrated LED light source. Contact customer support if the light fails.
- Outdoor Use: This fan is suitable for damp locations, such as covered patios, but must not be exposed to direct water spray or rain.
3. Package Contents
Verify that all components are present before beginning installation. If any parts are missing or damaged, contact VONLUCE customer service.

Image: Main components of the VONLUCE 52-inch ceiling fan, including the fan motor housing, three wooden blades, the remote control, and its wall-mounted holder.
- Ceiling Fan Motor Assembly
- Wooden Fan Blades (3)
- Downrods (5-inch and 10-inch options)
- Mounting Bracket
- Remote Control with Wall Holder
- Hardware Pack (screws, wire nuts, etc.)
- User Manual
4. Specifications
| Feature | Specification |
|---|---|
| Model Name | CFN1309 |
| Fan Size | 52 Inch |
| Motor Type | DC Motor |
| Number of Blades | 3 |
| Fan Speeds | 6 |
| Light Color Temperatures (CCT) | 3 (3000K Warm White, 4500K Neutral White, 6500K Cool White) |
| Control Method | Remote Control |
| Timer Functions | 1/2/4/8 Hour |
| Noise Level | <35 dB |
| Power Source | DC |
| Wattage | 20 watts |
| Voltage | 12 Volts (DC) |
| Item Weight | 11.88 pounds |
| Indoor/Outdoor Usage | Indoor, Outdoor (covered patios) |
5. Setup and Installation
Installation of the VONLUCE ceiling fan is designed to be straightforward. It is recommended to have two people for installation. A detailed user manual and video resources are typically provided by the manufacturer for reference.
5.1 Room Size and Mounting Options
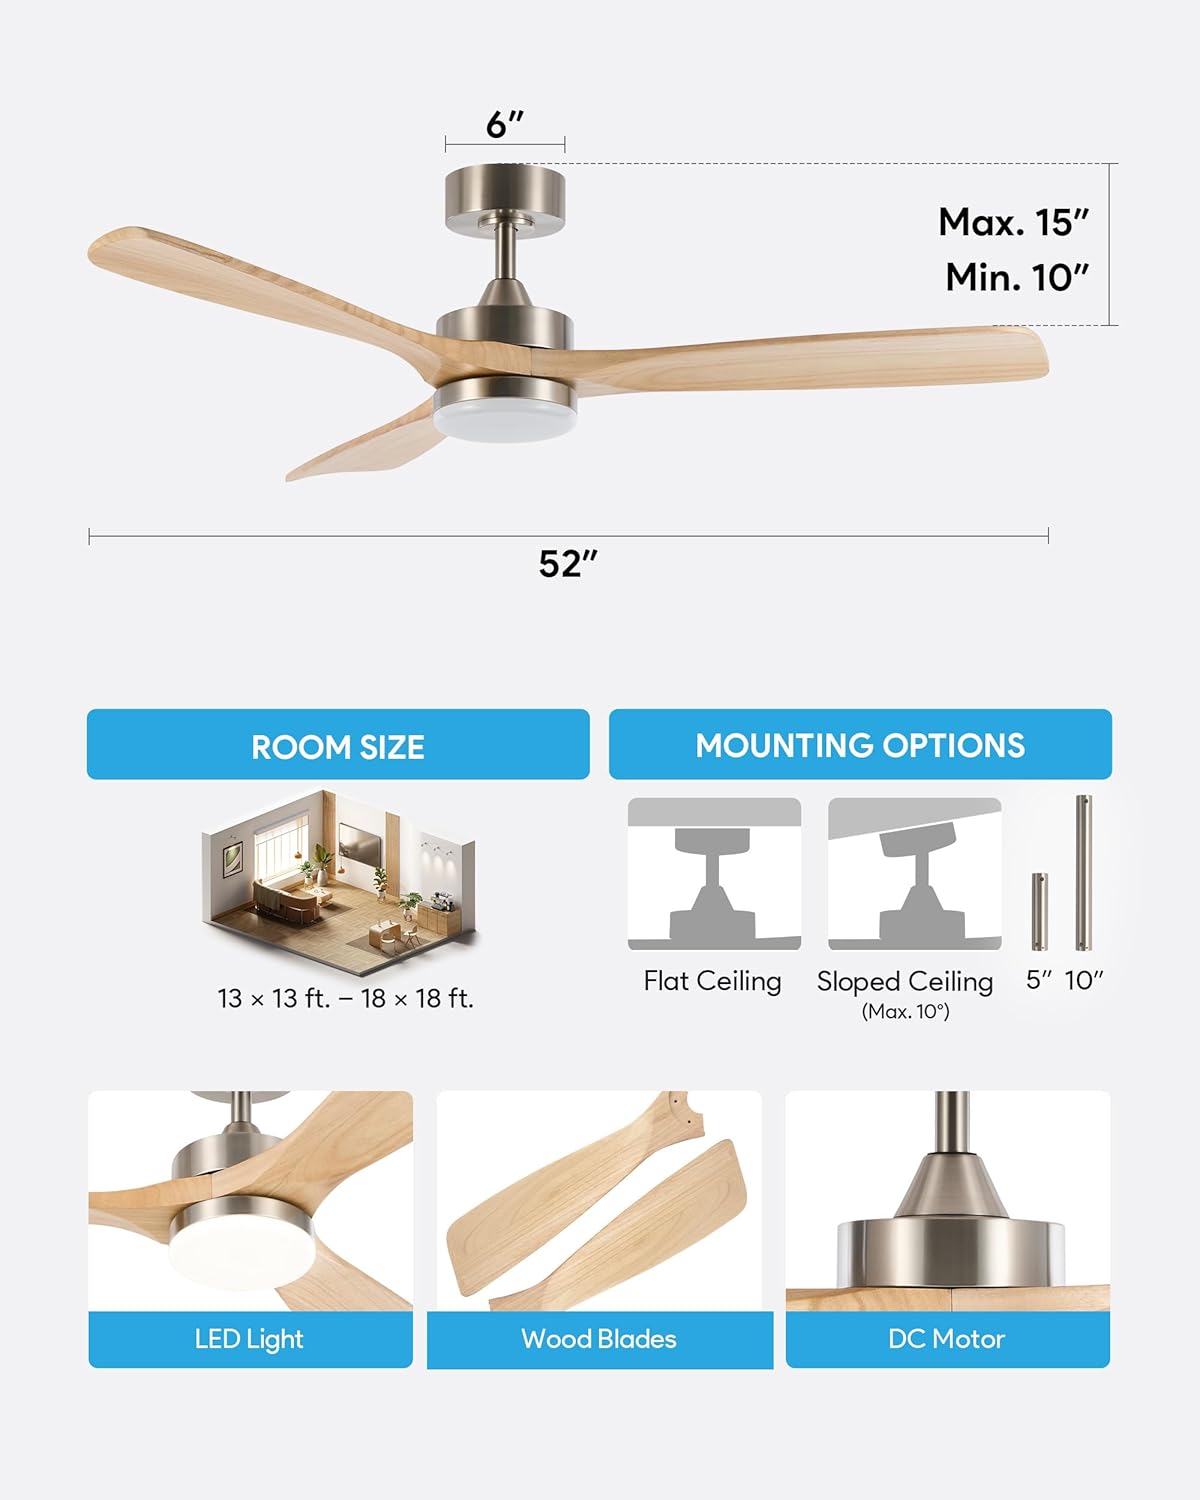
Image: Visual guide for fan dimensions (52 inches), suitable room sizes (e.g., 13x13 ft to 18x18 ft), and mounting options including flat ceiling, sloped ceiling (max 10 degrees), and downrod lengths (5-inch and 10-inch).
- Recommended Room Size: Up to 18 ft x 18 ft for optimal airflow.
- Ceiling Compatibility: Suitable for flat ceilings and sloped ceilings with a maximum slope of 10 degrees.
- Downrods: Includes 5-inch and 10-inch downrods to accommodate various ceiling heights.
5.2 General Installation Steps (Summary)
- Power Disconnection: Turn off power at the circuit breaker.
- Mounting Bracket Installation: Secure the mounting bracket to the ceiling outlet box.
- Downrod Assembly: Assemble the chosen downrod with the fan motor.
- Wiring: Connect the fan's electrical wires to the household wiring according to the wiring diagram in the full manual. Ensure the safety cable is properly secured.
- Canopy Installation: Secure the canopy to cover the wiring and mounting bracket.
- Blade Attachment: Attach the wooden fan blades to the motor housing.
- Light Kit Installation: Install the integrated LED light kit.
- Power Restoration: Restore power and test the fan.
Note: For detailed, step-by-step instructions, refer to the complete installation guide provided with your product.
6. Operating Instructions
Your VONLUCE ceiling fan is operated using the included remote control. Ensure the remote has fresh batteries installed.

Image: Remote control layout showing buttons for fan power, speed adjustment (1-6), reverse function, timer settings (1H, 2H, 4H, 8H), light power, and color temperature adjustment (3000K, 4500K, 6500K). It also indicates a 'Nature Mode' button that can be held for 5 seconds to mute the fan.
6.1 Remote Control Functions
- Fan On/Off: Press to turn the fan on or off.
- Fan Speed (1-6): Adjusts the fan speed from gentle breeze (1-2) to cooling air (5-6).
- Reverse Fan Direction: Changes the direction of blade rotation for summer cooling or winter warming.
- Timer (1H/2H/4H/8H): Sets the fan to turn off automatically after 1, 2, 4, or 8 hours.
- Light On/Off: Turns the integrated LED light on or off.
- 3 Color Temperatures (3CCT): Cycles through 3000K (Warm White), 4500K (Neutral White), and 6500K (Cool White) light settings.
- Nature Mode: Activates a varying fan speed to simulate natural breezes. Hold this button for 5 seconds to mute the fan's operational beeps.
- Memory Function: The fan remembers the last light status and wind speed if it runs for more than 10 seconds before shutdown. It will resume these settings when turned on again.
6.2 Airflow Direction (Reversible DC Motor)

Image: A visual representation of the fan's reversible function, showing blue arrows pointing down for 'Cooler in Summer' and orange arrows pointing up for 'Warmer in Winter', demonstrating how the fan circulates air differently based on the season.
- Summer Mode (Downward Airflow): Press the reverse button to make the blades rotate counter-clockwise, creating a downward breeze that provides a cooling effect.
- Winter Mode (Upward Airflow): Press the reverse button again to make the blades rotate clockwise, drawing warm air up towards the ceiling and distributing it evenly throughout the room, helping to keep the room warmer.
7. Maintenance
Regular maintenance ensures optimal performance and extends the lifespan of your ceiling fan.
- Cleaning: To clean the fan, wipe with a soft, damp cloth. Do not use abrasive cleaners or solvents, as these may damage the finish or electrical components. Ensure power is disconnected before cleaning.
- Blade Care: The wooden blades are hand-finished and lacquered. Clean them gently to avoid scratching.
- Tightening Screws: Periodically check all screws on the fan and mounting hardware to ensure they are securely tightened. Loose connections can cause noise or wobble.
- No Lubrication Required: The DC motor is permanently lubricated and does not require oiling.
8. Troubleshooting
If you experience issues with your fan, refer to the following common problems and solutions:
| Problem | Possible Cause | Solution |
|---|---|---|
| Fan does not start | No power to the fan; Loose wire connections; Remote control not paired or batteries dead. | Check circuit breaker; Ensure all wires are securely connected; Replace remote batteries or re-pair remote (refer to full manual for pairing instructions). |
| Fan is noisy | Loose screws; Unbalanced blades; Motor issue. | Tighten all screws on the fan and mounting bracket; Check for bent blades or use a blade balancing kit; If noise persists, contact customer support. |
| Light does not work | Loose wire connection; Light switch off; Integrated LED failure. | Check light wire connections; Ensure light is turned on via remote; Contact customer support for LED failure. |
| Remote control not working | Dead batteries; Remote not paired; Obstruction between remote and receiver. | Replace batteries; Re-pair remote (refer to full manual); Ensure clear line of sight to fan receiver. |
If you encounter a problem not listed here or the suggested solutions do not resolve the issue, please contact VONLUCE customer support.
9. Warranty and Support
For warranty information and customer support, please refer to the warranty card included with your product or visit the official VONLUCE website. You can typically find contact details for technical assistance, replacement parts, and warranty claims there.
VONLUCE Direct: Seller Information


