1. Introduction
The ARCTIC Liquid Freezer III 240 A-RGB is an all-in-one liquid CPU cooler designed for efficient heat dissipation in high-performance computing systems. This manual provides detailed instructions for the installation, operation, and maintenance of your cooler, ensuring optimal performance and longevity.
Key features include a PWM-controlled pump, addressable RGB (A-RGB) fans, specialized mounting solutions for Intel and AMD processors, active VRM cooling, and integrated cable management for a clean build.

Image 1.1: The ARCTIC Liquid Freezer III 240 A-RGB cooler, highlighting its award-winning design and essential cooling capabilities.
2. Safety Information
- Always disconnect power from your PC before installation or maintenance.
- Handle components with care to avoid damage.
- Keep out of reach of children.
- Do not open the pump or radiator as this may void the warranty and cause leaks.
- Ensure proper grounding to prevent electrostatic discharge (ESD) damage to components.
3. Package Contents
Verify that all components are present before beginning installation:
- ARCTIC Liquid Freezer III 240 A-RGB All-in-One Cooler (Radiator, Pump/Cold Plate, Fans pre-installed)
- Intel Mounting Kit (LGA1851, LGA1700)
- AMD Mounting Kit (AM5, AM4)
- Thermal Paste
- Mounting Screws and Hardware
- User Manual (Digital via QR code on packaging)
4. Compatibility
4.1. CPU Socket Compatibility
- Intel: LGA1851, LGA1700
- AMD: AM5, AM4
4.2. Case and Motherboard Compatibility
The radiator dimensions are approximately 277mm (L) x 120mm (W) x 65.5mm (H, including fans). Ensure your PC case has sufficient clearance for a 240mm radiator with a thickness of 38mm, plus the fans.
Important Note: Oversized components, particularly coolers on the M.2_1 slot of certain motherboards, may interfere with the installation of the Liquid Freezer III. It is recommended to consult the ARCTIC official website for a detailed compatibility checker or refer to your motherboard's manual for clearance specifications.

Image 4.1: Radiator dimensions (38mm thickness) and various size options (420, 360, 280, 240mm) for case compatibility checks.
5. Setup and Installation
Before starting, ensure your system is powered off and unplugged. It is highly recommended to watch the official ARCTIC installation video (accessible via QR code on the product packaging) for a visual guide.
5.1. Preparing the CPU
- Clean the CPU surface thoroughly with isopropyl alcohol to remove any old thermal paste or residue.
- Apply a small amount of the provided thermal paste to the center of the CPU. A pea-sized dot is generally sufficient.
5.2. Installing Mounting Brackets
Select the appropriate mounting hardware for your CPU socket (Intel or AMD).
5.2.1. Intel LGA1851 / LGA1700 Installation
- Install the Intel contact frame onto your motherboard. This frame improves contact pressure distribution for more efficient heat transfer.
- Secure the backplate and standoffs according to the instructions for your specific socket.

Image 5.1: Diagram illustrating the installation of the LGA1700 contact frame for improved CPU contact and heat transfer.
5.2.2. AMD AM5 / AM4 Installation
- Utilize the native AMD offset mounting. This design optimizes coverage of the CPU hotspot for Ryzen processors, enhancing heat transfer efficiency.
- Attach the AMD mounting clips to the pump unit and secure them to the motherboard's stock backplate.

Image 5.2: Diagram showing the native AMD offset mounting, positioning the cold plate to optimally cover the CPU hotspot.
5.3. Mounting the Pump/Cold Plate
- Carefully place the pump/cold plate assembly onto the CPU, aligning it with the mounting brackets.
- Secure the pump unit using the provided screws, tightening them in a cross pattern until snug. Do not overtighten.
5.4. Mounting the Radiator and Fans
- Position the radiator in your desired mounting location within the PC case (e.g., top, front).
- Secure the radiator to the case using the appropriate screws.
- The fans are pre-installed on the radiator. Ensure their orientation is correct for optimal airflow (intake or exhaust, depending on your case's cooling strategy).
5.5. Cable Management and Connections
The Liquid Freezer III features integrated cable management, where the PWM cables of the radiator fans are routed within the hoses. This results in a single visible cable connection to the motherboard.
- Connect the main PWM connector from the cooler to your motherboard's CPU_FAN header.
- For A-RGB lighting, connect the A-RGB cable to a compatible 3-pin 5V A-RGB header on your motherboard.
- The cooler also includes a PWM-controlled VRM fan. This fan's cable is integrated and will draw power from the main PWM connection, providing active cooling to voltage regulator modules.
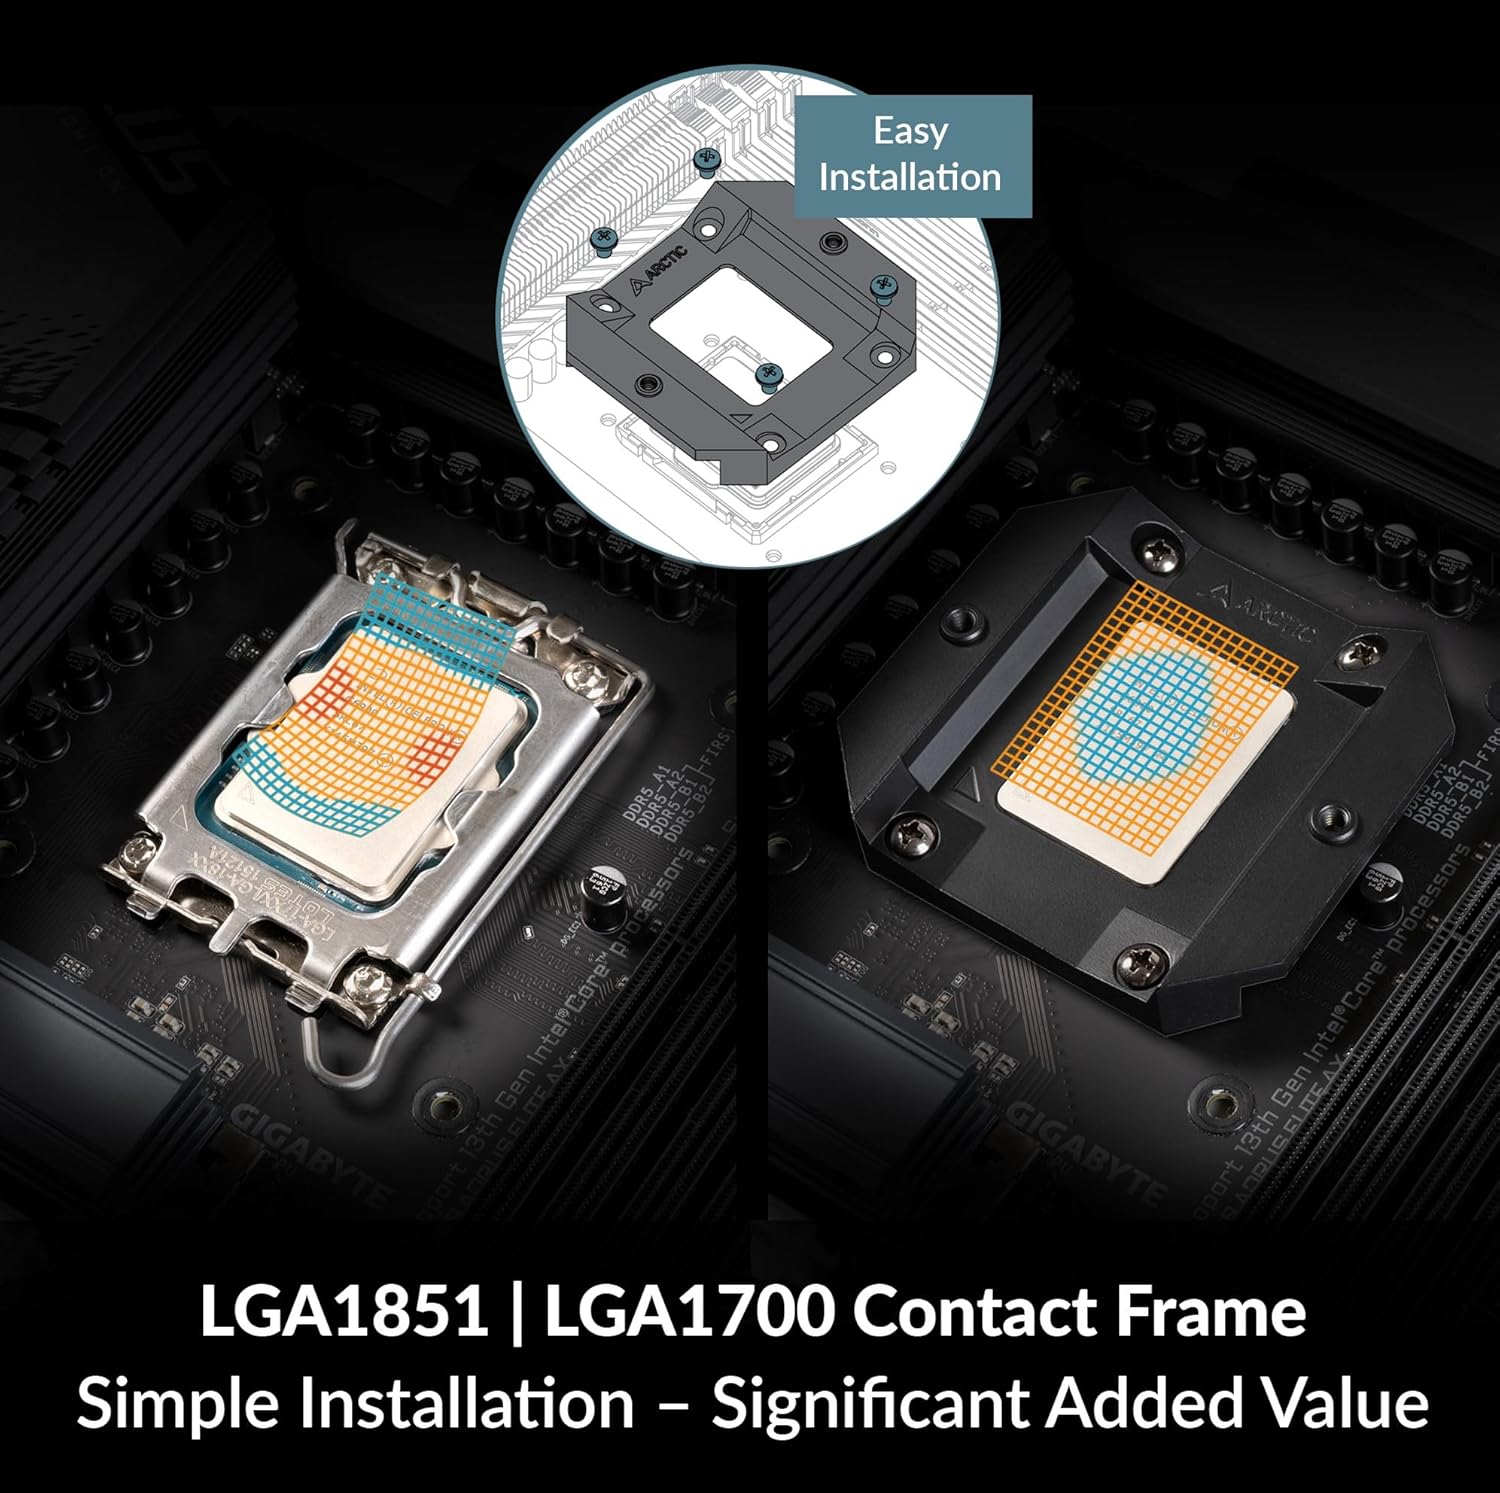
Image 5.3: Diagram illustrating the integrated cable management with a single PWM connector for pump, VRM fan, and radiator fans, and a separate A-RGB connector.

Image 5.4: Close-up view of the PWM-controlled VRM fan, which actively cools motherboard components around the CPU socket.
6. Operation
6.1. Fan and Pump Control
The Liquid Freezer III's pump and fans are PWM-controlled, allowing for dynamic speed adjustments based on CPU temperature. This can be configured through your motherboard's BIOS/UEFI settings or dedicated software provided by your motherboard manufacturer.
- Recommended: Set a custom fan curve in your motherboard's BIOS to balance cooling performance and noise levels. Aggressive fan curves can lead to higher noise, while a more relaxed curve can reduce noise at the cost of slightly higher temperatures.
- The integrated VRM fan operates automatically based on the PWM signal, contributing to overall system stability by cooling critical motherboard components.
6.2. A-RGB Lighting Control
The A-RGB lighting on the fans and pump can be controlled via your motherboard's A-RGB software (e.g., ASUS Aura Sync, MSI Mystic Light Sync, ASRock Polychrome Sync, Gigabyte RGB Fusion 2.0). Ensure the A-RGB cable is correctly connected to a compatible 3-pin 5V A-RGB header on your motherboard.

Image 6.1: The ARCTIC Liquid Freezer III 240 A-RGB installed in a PC, showcasing its individually addressable RGB LEDs.
7. Maintenance
Regular maintenance helps ensure optimal performance and extends the lifespan of your cooler.
- Dust Removal: Periodically clean the radiator fins and fan blades to prevent dust buildup, which can impede airflow and reduce cooling efficiency. Use compressed air or a soft brush.
- Cable Inspection: Check all cables for secure connections and signs of wear.
- Liquid Level: The AIO unit is a closed loop system and does not require refilling. If you suspect a leak or significant performance drop, contact support.
8. Troubleshooting
| Problem | Possible Cause | Solution |
|---|---|---|
| High CPU Temperatures | Improper thermal paste application, loose cold plate, dust buildup on radiator, incorrect fan orientation, pump failure. | Reapply thermal paste, ensure cold plate is securely mounted, clean radiator/fans, verify fan direction, check pump connection. |
| Excessive Fan Noise | Aggressive fan curve settings, fan obstruction, faulty fan. | Adjust fan curve in BIOS, ensure no cables are hitting fans, replace faulty fan if necessary. |
| A-RGB Lighting Not Working | Incorrect cable connection, incompatible motherboard header, software issue. | Verify A-RGB cable is connected to a 3-pin 5V A-RGB header, check motherboard software settings, ensure motherboard header is enabled. |
| Cooler Does Not Fit | Case clearance issues, motherboard component interference. | Double-check case and motherboard compatibility before purchase. Refer to ARCTIC's compatibility checker. |
9. Specifications
- Model: ACFRE00150A
- Product Dimensions: 10.91"L x 4.72"W x 2.48"H (277mm x 120mm x 65.5mm)
- Brand: ARCTIC
- Power Connector Type: 4-Pin PWM
- Voltage: 12 Volts
- Wattage: 5 watts
- Cooling Method: Liquid (Water)
- Compatible Devices: Intel LGA1851, LGA1700; AMD AM5, AM4
- Material: Aluminium (Radiator), Copper, Micro Skived Fins (Cold Plate)
- Maximum Rotational Speed: 2000 RPM (Fans)
- Air Flow Capacity: 48.8 Cubic Feet Per Minute (Fans)
- Item Weight: 3.31 pounds (1.5 kg)
- Included Components: ARCTIC Liquid Freezer III 240 A-RGB (White)
10. Warranty and Support
10.1. Warranty Information
The ARCTIC Liquid Freezer III 240 A-RGB comes with a 6-year manufacturer's warranty. Please retain your proof of purchase for warranty claims. The warranty covers defects in materials and workmanship under normal use.
10.2. Technical Support
For technical assistance, troubleshooting beyond this manual, or warranty inquiries, please visit the official ARCTIC support website or contact their customer service department. Contact details can typically be found on the ARCTIC website.


