
Scheppach ROBOCUT-L500
Scheppach RoboCut L500 Robotic Lawnmower User Manual
Model: ROBOCUT-L500
Introduction
This user manual provides essential information for the safe and efficient operation, setup, and maintenance of your Scheppach RoboCut L500 Robotic Lawnmower. Please read this manual thoroughly before operating the device and keep it for future reference.

Figure 1: Scheppach RoboCut L500 Robotic Lawnmower with its charging station, boundary wire, and spare blades.
Safety Instructions
Always observe the following safety precautions to prevent injury and damage to the device:
- Read all instructions carefully before use.
- Keep children and pets away from the working area.
- Do not operate the mower in wet conditions or during rain. The integrated rain sensor will prevent operation in such conditions.
- Ensure the boundary wire is correctly installed to define the mowing area.
- Regularly inspect the blades for wear and damage. Replace as necessary.
- Use the manual stop function (red button) immediately in case of emergency.
- Only use original spare parts and accessories.
Setup and Installation
1. Unpacking and Components
Carefully unpack all components and check for completeness. The package should include:
- Scheppach RoboCut L500 Robotic Lawnmower
- Charging Station with power supply
- Boundary Wire (approx. 100m)
- Fixing Pegs (approx. 130x)
- Spare Blades (6x)
- User Manual

Figure 2: The robotic lawnmower shown with its installation kit (100m boundary wire, 130 pegs) and accessories (6 spare blades).
2. Charging Station Placement
Select a suitable location for the charging station. It should be on a flat surface, close to a power outlet, and in an area that allows the robot easy access to and from the station. Ensure there is enough clear space around the station.
3. Boundary Wire Installation
The boundary wire defines the mowing area. Lay the wire around the perimeter of your lawn, securing it with the provided pegs. Ensure the wire is taut and buried or securely fastened to the ground to prevent tripping hazards and damage to the wire. Leave sufficient distance from obstacles like walls, fences, and ponds. The RoboCut L500 is designed for areas up to 400 m² and can handle gradients up to 35%.
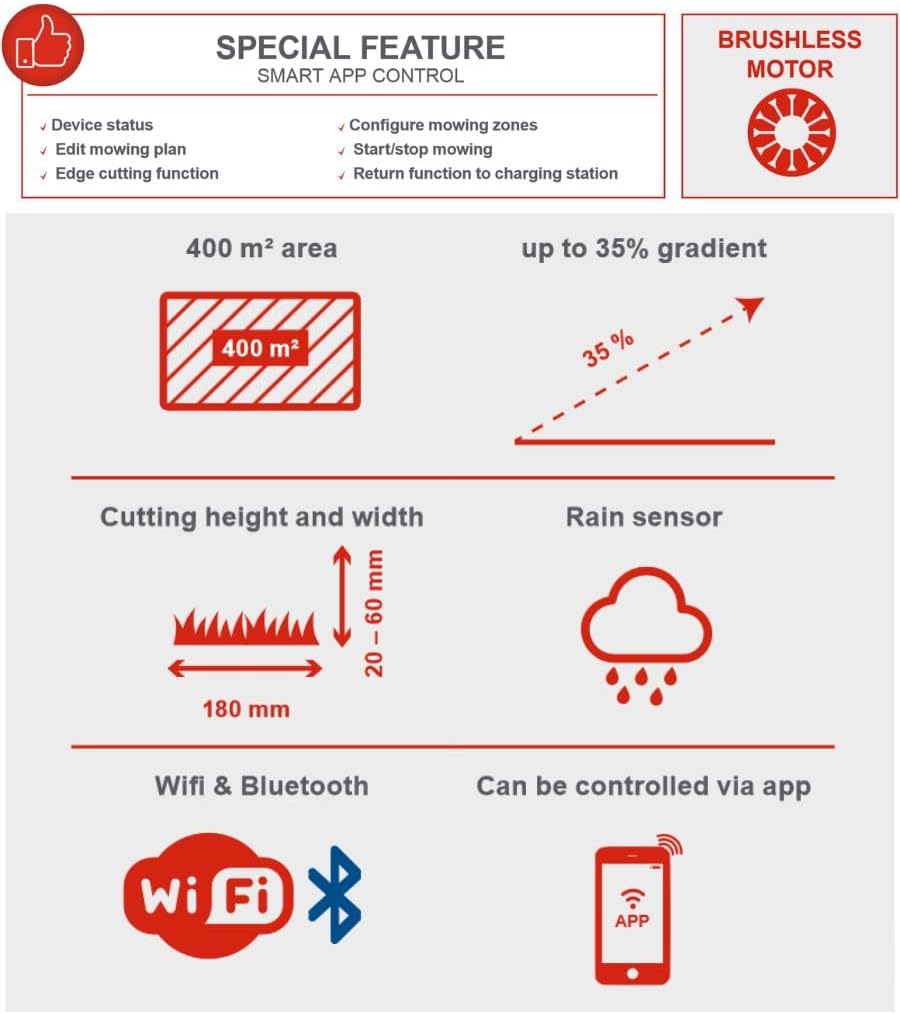
Figure 3: Key operational specifications including a maximum mowing area of 400 m², ability to climb gradients up to 35%, cutting height range of 20-60 mm, cutting width of 180 mm, integrated rain sensor, and connectivity via WiFi and Bluetooth for app control.
4. Initial Charging
Place the robotic lawnmower into the charging station. Ensure the charging contacts align. The indicator light on the charging station will confirm proper connection. Allow the mower to fully charge before its first operation.
Operating Instructions
1. Powering On and Off
To power on, press the main power button. To power off, press and hold the main power button or use the red STOP button for immediate halt.

Figure 4: Close-up view highlighting the manual stop function, the rain sensor, the three integrated cutting blades, the charging station, and the floating cutting head mechanism that adapts to uneven surfaces.
2. Setting Cutting Height
The cutting height can be adjusted steplessly from 20 mm to 60 mm using the rotary knob on top of the mower. Turn the knob to your desired height setting.

Figure 5: A hand demonstrating the adjustment of the cutting height knob, which allows for stepless adjustment between 20 and 60 mm.
3. Smart App Control (WLAN & Bluetooth)
The RoboCut L500 can be controlled via a dedicated smartphone app using WLAN or Bluetooth connectivity. The app allows you to:
- Monitor device status
- Edit mowing plans and schedules
- Configure mowing zones
- Activate edge cutting function
- Start/stop mowing manually
- Send the mower back to the charging station
Figure 6: The infographic details the smart app control features, including monitoring device status, editing mowing plans, configuring zones, edge cutting, and remote start/stop/return to charging station.
4. Mowing Operation
Once configured, the mower will operate automatically within the defined boundary. It features a brushless motor for efficient operation and a floating cutting head that reliably compensates for uneven surfaces, ensuring a consistent cut. The mower operates quietly at approximately 55 dB.

Figure 7: The Scheppach RoboCut L500 in action, demonstrating its automatic mowing capability on a well-maintained lawn.

Figure 8: This image highlights features such as extremely quiet operation (55 dB), simple installation, definable mowing zones and edge cutting function, an edge sensor, and large wheels for maximum grip. It also reiterates the included accessories: 3 in-built blades, 100m installation wire, and 130 pegs.
Maintenance
1. Cleaning
Regularly clean the mower's chassis, wheels, and cutting deck. Use a soft brush or cloth. Do not use high-pressure cleaners or excessive water directly on the electronic components.
2. Blade Replacement
The RoboCut L500 uses 3 in-built blades. For optimal cutting performance, inspect the blades regularly and replace them when they become dull or damaged. Always wear protective gloves when handling blades. Use only original Scheppach replacement blades.
3. Winter Storage
Before winter, thoroughly clean the mower and charging station. Store the device in a dry, frost-free location. Ensure the battery is fully charged before storage and recharge it periodically during long storage periods to maintain battery health.
Troubleshooting
| Problem | Possible Cause | Solution |
|---|---|---|
| Mower does not start. | Battery low; Power button not pressed; Safety features engaged. | Charge battery; Press power button firmly; Check for obstacles or lifted mower. |
| Mower stays in charging station. | No schedule set; Rain sensor activated; Boundary wire issue. | Set mowing schedule via app; Wait for rain to stop; Check boundary wire connection. |
| Uneven cutting. | Dull blades; Incorrect cutting height setting. | Replace blades; Adjust cutting height. |
| Mower gets stuck. | Obstacles in mowing area; Steep slope. | Remove obstacles; Ensure area is within 35% gradient limit. |
Technical Specifications
| Feature | Specification |
|---|---|
| Model Number | ROBOCUT-L500 |
| Part Number | 59130019944 |
| Brand | Scheppach |
| Mowing Area Capacity | Up to 400 m² |
| Cutting Width | 18 cm |
| Cutting Height Adjustment | 20 - 60 mm (stepless) |
| Max. Gradient | 35% |
| Noise Level | Approx. 55 dB |
| Connectivity | WLAN, Bluetooth (App Control) |
| Power Source | Battery-powered |
| Motor Type | Brushless |
| Material | Plastic |
| Item Weight | 13.94 kg |
| Included Boundary Wire | 100 m |
| Included Fixing Pegs | 130 pcs |
| Included Blades | 6 pcs (spare) |
Warranty and Support
Scheppach products are manufactured with high quality standards. For warranty information and customer support, please refer to the warranty card included with your product or visit the official Scheppach website. Keep your proof of purchase for warranty claims.
For technical assistance or spare parts, please contact Scheppach customer service.
Related documentsROBOCUT-L500

Ask a question about this manual
Ask about setup, troubleshooting, compatibility, parts, safety, or missing instructions. Manuals+ will review the question and use this page’s manual context to help answer it.