
naspaluro F-01
naspaluro Ergonomic Office Chair, Model F-01 User Manual
Comprehensive Guide for Assembly, Operation, and Maintenance
1. Introduction
Thank you for choosing the naspaluro Ergonomic Office Chair, Model F-01. This manual provides detailed instructions for assembling, operating, and maintaining your new chair. Please read this manual thoroughly before assembly and use to ensure proper function and longevity of your product.

The naspaluro Ergonomic Office Chair, Model F-01, designed for comfort and support.
2. Product Features
- Complete Ergonomic Design: Features 3D adjustable armrests and headrests, 2D lumbar support, and a backrest tilting up to 135°. These adjustments are designed to adapt to various body types for optimal comfort, especially for taller individuals.
- 3D Headrests and Armrests: 3D armrests offer height adjustment up to 8 cm, depth adjustment up to 5 cm, and lateral rotation up to 30 degrees. The 3D headrests can be adjusted in height up to 9 cm, depth up to 3.5 cm, and rotate 180 degrees for comprehensive neck support.
- Adjustable Lumbar Support: The lumbar support is padded with high-elastic sponge for comfort. It can be adjusted up and down by 3 cm and forward and backward by 3 cm, providing targeted back support and helping to prevent discomfort.
- Comfortable and Breathable: Equipped with a 9cm high-density foam cushion and a mesh backrest for effective ventilation, ensuring comfort even during prolonged use (4-8 hours). The backrest can recline up to 135° for relaxation.
- Safety and Sturdy Construction: Built with a metal base for durability, supporting up to 330 lbs (150 kg). Ultra-quiet 360° swivel casters allow smooth movement on various floor types without leaving marks.
- Integrated Coat Hanger: Includes a removable clothes and hat rack for added convenience.

Key ergonomic features of the naspaluro office chair.
3. Package Contents
Please ensure all components are present before beginning assembly:
- Office Chair Components (Seat, Backrest, Headrest, Armrests, Base, Casters)
- Installation Tool (Allen wrench)
- Office Chair Accessories (Screws, washers, caps)
- User's Manual (This document)
4. Assembly Instructions
Follow these step-by-step instructions to assemble your naspaluro Ergonomic Office Chair. It is recommended to assemble the chair on a soft, clean surface to prevent damage.
4.1. Caster and Base Assembly
- Insert the five casters into the holes at the end of each leg of the chair base. Push firmly until they click into place.
- Place the gas lift cylinder into the center hole of the assembled base.
4.2. Seat Assembly
- Attach the seat plate mechanism to the underside of the seat cushion using the provided screws. Ensure the "FRONT" label on the seat cushion aligns with the front of the seat plate mechanism.
- Attach the armrests to the seat cushion using the designated screws. Note that armrests are typically labeled 'L' for left and 'R' for right.
4.3. Backrest and Headrest Assembly
- Connect the backrest to the seat plate mechanism using the appropriate screws.
- Insert the headrest into the top of the backrest. Secure it with the provided screws.
- Attach the coat hanger to the designated slot on the backrest, if desired.
4.4. Final Assembly
- Carefully place the assembled seat and backrest onto the gas lift cylinder. Press down firmly to secure.
Official video demonstrating the assembly process of the office chair.
5. Operating Instructions
Your naspaluro Ergonomic Office Chair offers multiple adjustment options to customize your seating experience for maximum comfort and support.
5.1. Seat Height Adjustment
- To raise the seat: While standing, pull the lever located under the right side of the seat upwards. The seat will rise automatically. Release the lever at the desired height.
- To lower the seat: While seated, pull the lever located under the right side of the seat upwards. The seat will lower. Release the lever at the desired height.
5.2. Backrest Recline and Rocking Function
- To recline: Pull the lever located under the left side of the seat outwards. Lean back to the desired angle (up to 135°). Push the lever inwards to lock the backrest in place.
- To enable rocking: Pull the lever located under the left side of the seat outwards. The chair will now rock freely.
- To adjust rocking tension: Rotate the round knob located under the front-center of the seat. Turn clockwise to increase tension (harder to recline) and counter-clockwise to decrease tension (easier to recline).
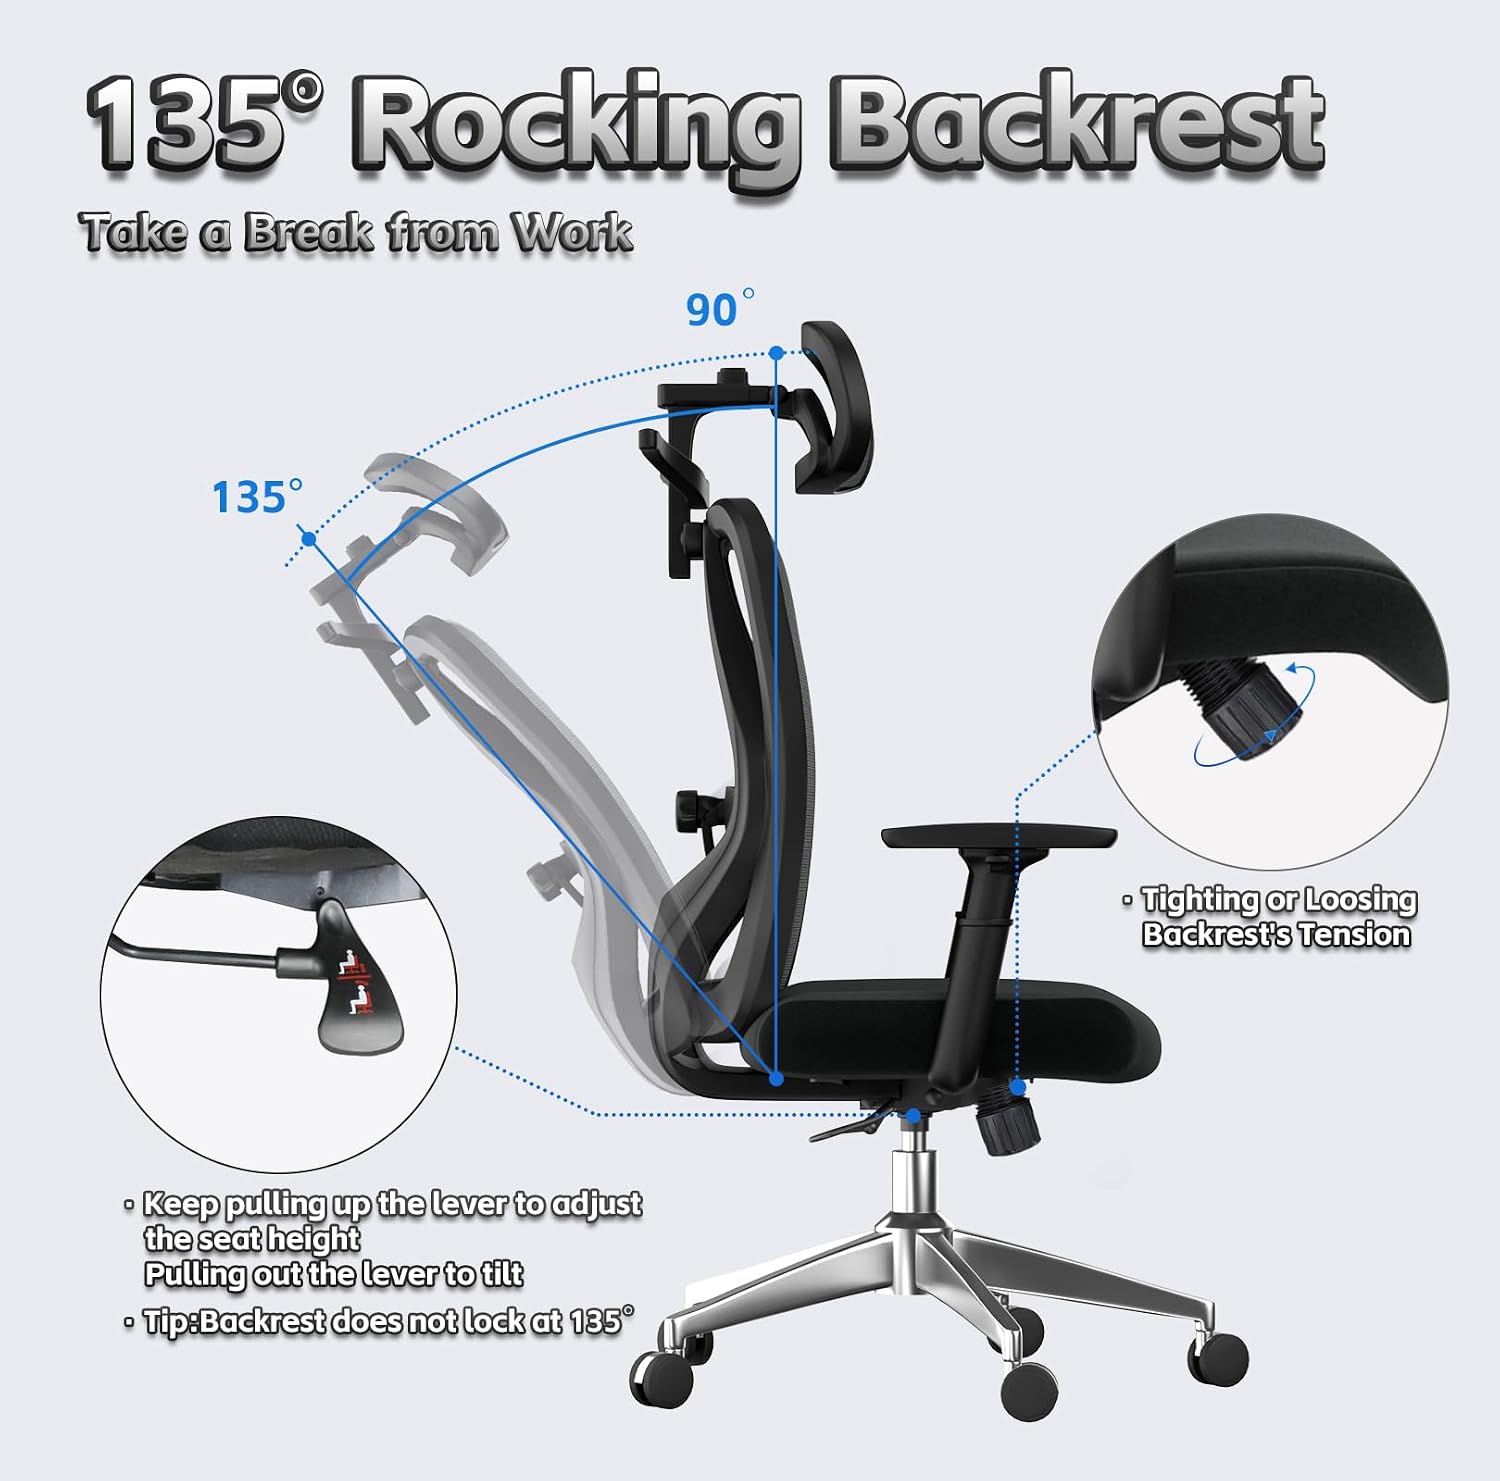
Adjusting the rocking backrest and tension for personalized comfort.
5.3. Armrest Adjustments (3D)
- Height Adjustment: Press the button on the side of each armrest and slide the armrest up or down (up to 8 cm). Release the button to lock.
- Depth Adjustment: Slide the armrest pad forward or backward (up to 5 cm).
- Rotation: Rotate the armrest pad left or right (up to 30 degrees).

Detailed view of the 3D adjustable armrests.
5.4. Headrest Adjustments (3D)
- Height Adjustment: Pull the headrest up or push it down (up to 9 cm).
- Depth Adjustment: Push the headrest forward or pull it backward (up to 3.5 cm).
- Rotation: Rotate the headrest 180 degrees to find the optimal angle for neck support.

Detailed view of the 3D adjustable headrest.
5.5. Lumbar Support Adjustment (2D)
- Vertical Adjustment: Use the knob on the back of the chair to adjust the lumbar support up or down (up to 3 cm).
- Depth Adjustment: Use the same knob to adjust the lumbar support forward or backward (up to 3 cm) to provide optimal support for your lower back.
Official video demonstrating the various adjustable features of the chair, including headrest, armrests, lumbar support, and rocking function.
6. Maintenance
Proper maintenance will extend the life and appearance of your office chair.
- Cleaning: Wipe clean with a damp cloth. Avoid harsh chemicals or abrasive cleaners.
- Regular Checks: Periodically check all screws and bolts to ensure they are tight. Retighten if necessary.
- Caster Care: Keep casters free of hair and debris to ensure smooth movement.
7. Troubleshooting
If you encounter any issues with your chair, please refer to the following common solutions:
- Chair Squeaks: Check all connections and tighten any loose screws. Applying a small amount of silicone lubricant to moving parts may help.
- Difficulty Adjusting Height: Ensure the gas lift lever is fully engaged or disengaged as required. If the issue persists, the gas lift cylinder may need replacement.
- Headrest Not Providing Adequate Support (for taller users): While the headrest offers extensive adjustments, some very tall users may find it sits lower than desired when upright. Experiment with the depth and tilt adjustments to find the most comfortable position.
- Backrest Not Reclining/Locking: Check the recline lever and tension knob. Ensure the lever is pulled out for rocking and pushed in to lock. Adjust the tension knob to ensure it's not too tight.
8. Specifications
| Feature | Detail |
|---|---|
| Brand | naspaluro |
| Model Name | F-B |
| Model Number | F-01 |
| Color | Black |
| Material | Alloy Steel, Nylon, Fabric (Seat), Sponge (Fill) |
| Product Dimensions (D x W x H) | 27.6"D x 25.8"W x 53.5"H |
| Item Weight | 34 Pounds |
| Weight Capacity | 330 LBS (150 kg) |
| Seat Height | Adjustable, up to 23.6 Inches |
| Seat Depth | 21.26 inches |
| Back Style | High Back |
| Reclining Position Count | 3 (up to 135°) |
| Furniture Base Movement | 360° Swivel |
| Recommended Uses | Computer, Gaming, Office, Reading |
9. Warranty and Support
For warranty information or customer support, please refer to the documentation included with your purchase or contact naspaluro customer service through the retailer where the product was purchased. Keep your purchase receipt for warranty claims.
Related documentsF-01


Ask a question about this manual
Ask about setup, troubleshooting, compatibility, parts, safety, or missing instructions. Manuals+ will review the question and use this page’s manual context to help answer it.