1. Introduction
The Eurotronic Comet Plus Kit provides an intelligent solution for controlling heating in up to six radiators. This system allows for precise temperature management and energy savings through programmable time profiles. The included PROGmatic stick facilitates convenient programming via a PC, offering enhanced control over your heating schedule without reliance on internet connectivity or external applications.
2. Safety Information
- Read this manual thoroughly before installation and operation.
- Keep the device away from moisture, dust, and direct sunlight.
- Do not open the device housing; there are no user-serviceable parts inside.
- Use only the specified battery type (AA 1.5V). Ensure correct polarity when inserting batteries.
- Keep batteries out of reach of children. Do not recharge non-rechargeable batteries.
- Dispose of used batteries and the device according to local regulations.
3. Package Contents
The Eurotronic Comet Plus Kit includes the following components:
- Comet Plus Radiator Thermostats (quantity as per kit)
- PROGmatic USB Programming Stick
- User Manual (this document)
- AA 1.5V Batteries (2 per thermostat)
- Adapter Set for Danfoss RA, RAV, and RAVL valves

4. Setup
4.1. Battery Insertion
- Carefully remove the battery cover from the back of the Comet Plus thermostat.
- Insert two AA 1.5V batteries, ensuring correct polarity (+/-).
- Replace the battery cover securely.

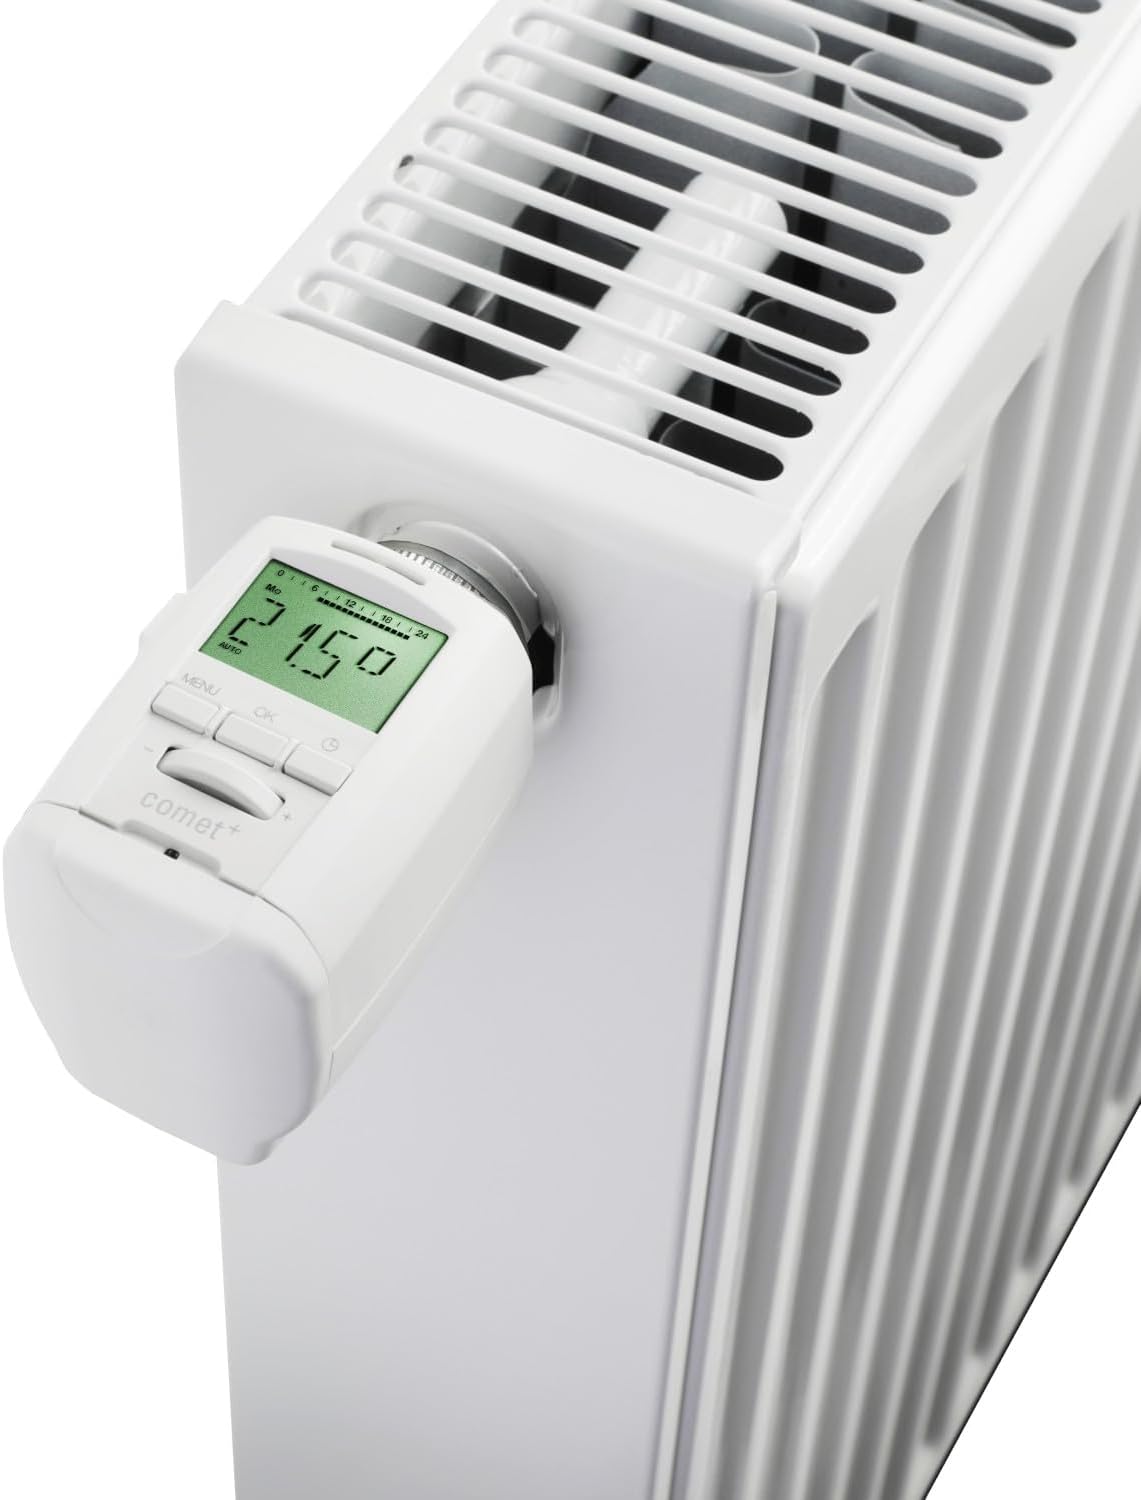
4.2. Mounting on Radiator Valve
The Comet Plus thermostat is designed for easy installation on standard radiator valves with an M30 x 1.5mm thread. Adapters are provided for Danfoss RA, RAV, and RAVL valves.
- Remove your existing thermostat head from the radiator valve.
- If your valve is a Danfoss RA, RAV, or RAVL type, select the appropriate adapter and secure it to the valve.
- Screw the Comet Plus thermostat onto the valve (or adapter) using its metal nut until it is hand-tight. Do not overtighten.
- The display should now show "INST" or a similar installation prompt. Press the OK button to initiate the installation process. The thermostat will perform a calibration run to adapt to your valve.
4.3. Initial Configuration and PROGmatic Stick Usage
After successful mounting, you can configure the thermostat directly on the device or use the PROGmatic stick for PC-based programming.
4.3.1. Direct Device Configuration
- Use the MENU and OK buttons, along with the +/- buttons, to set the current time, date, and desired temperature profiles directly on the thermostat's display. Refer to the on-screen prompts for guidance.
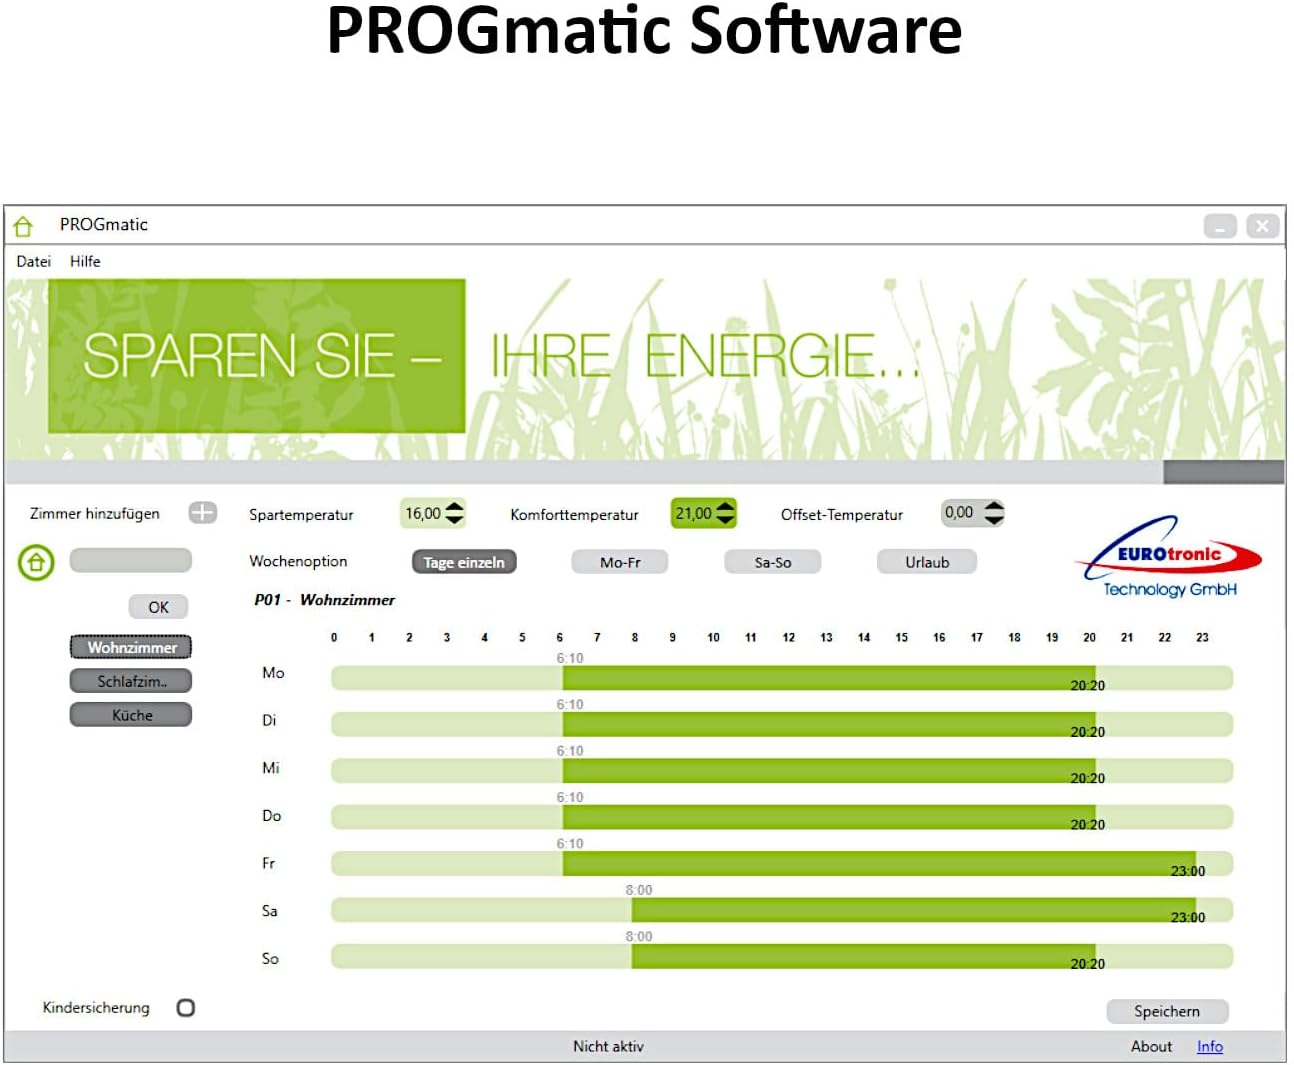
4.3.2. PC Programming with PROGmatic Stick
- Install the PROGmatic software on your Windows PC or laptop. The software is typically available for download from the Eurotronic website or provided on a CD (if included).
- Connect the PROGmatic USB stick to an available USB port on your computer.
- Connect the Comet Plus thermostat to the PROGmatic stick using a suitable USB cable (often a mini-USB to USB-A cable).
- Launch the PROGmatic software. You can now create and manage personalized time profiles for your thermostat(s) on your computer.
- Once profiles are set, transfer them to the thermostat via the PROGmatic stick.


5. Operation
5.1. Basic Temperature Adjustment
To manually adjust the temperature, use the +/- buttons on the thermostat. The new temperature will be displayed and maintained until the next programmed time slot or until manually changed again.
5.2. Programmable Time Profiles
The Comet Plus allows for customized heating schedules throughout the day and week. These profiles can be set directly on the device or more conveniently via the PROGmatic software. Each profile defines specific temperatures for different times, optimizing comfort and energy consumption.
5.3. Intelligent Functions
- Window Open Detection: The thermostat automatically detects a sudden drop in temperature (e.g., when a window is opened) and temporarily closes the valve to prevent unnecessary heating.
- Holiday Mode: Set a specific temperature for a defined period (e.g., during a vacation) to save energy while you are away.
- Anti-Frost Function: If the room temperature drops below a certain threshold (typically 6°C), the thermostat will automatically open the valve to prevent pipes from freezing.
- Anti-Calc Function: To prevent calcification of the valve, the thermostat performs a full valve opening and closing cycle once a week.
- Automatic Summer/Winter Time Change: The device automatically adjusts to daylight saving time changes.
5.4. Display Information
The integrated LED display shows the current temperature, operating mode (e.g., AUTO), and other relevant information. The display is backlit for improved visibility in low-light conditions.
6. Maintenance
6.1. Battery Replacement
When the battery symbol appears on the display, it indicates that the batteries are low and need to be replaced. Follow the steps in Section 4.1 to replace the two AA 1.5V batteries. It is recommended to replace both batteries simultaneously.
6.2. Cleaning
Clean the thermostat's exterior with a soft, dry cloth. Do not use abrasive cleaners, solvents, or wet cloths, as these can damage the device or its electronics.
7. Troubleshooting
| Problem | Possible Cause | Solution |
|---|---|---|
| Display is blank or dim. | Low or depleted batteries. Incorrect battery insertion. | Replace batteries (Section 6.1). Ensure correct polarity. |
| Thermostat does not control heating. | Improper mounting. Valve stuck. Calibration error. | Check mounting (Section 4.2). Manually check if the radiator valve pin moves freely. Re-initiate installation/calibration. |
| Temperature is not accurate. | Thermostat is near a heat source or draft. Calibration offset needed. | Ensure thermostat is not obstructed or exposed to direct heat/cold. Adjust temperature offset in settings if available. |
| Cannot transfer profiles via PROGmatic stick. | Software not installed correctly. USB connection issue. Thermostat not in programming mode. | Reinstall PROGmatic software. Check USB cable and port. Ensure thermostat is properly connected and ready for data transfer. |
8. Specifications
| Feature | Detail |
|---|---|
| Brand | Eurotronic |
| Model Number | 115101E |
| Color | White |
| Product Dimensions (L x W x H) | 6.6 x 10.6 x 13.3 cm |
| Item Weight | 1.6 Kilograms (Kit) |
| Voltage | 15 Volts (Internal circuit, not direct power) |
| Batteries | 2 x AA 1.5V (per thermostat) - included |
| Temperature Control Type | Programmable |
| Included Components | PROGmatic Stick, Radiator Thermostats, Adapters |
| Display Type | LED |
| Mounting Type | Radiator Valve (M30 x 1.5mm thread) |
| Backlight | Yes |
9. Warranty & Support
9.1. Warranty Information
Eurotronic products are manufactured with high-quality standards. For specific warranty terms and conditions, please refer to the warranty card included with your product or visit the official Eurotronic website. Keep your proof of purchase for warranty claims.
9.2. Customer Support
Should you encounter any issues or have questions regarding your Eurotronic Comet Plus Kit, please contact Eurotronic customer support. Contact details can typically be found on the official Eurotronic website or in the product packaging.