1. Introduction
This manual provides comprehensive instructions for the waveshare Triple LCD HAT, designed for Raspberry Pi series boards. It features a 1.3-inch IPS main LCD screen and two 0.96-inch IPS secondary LCD screens, all communicating via SPI interface. This HAT is suitable for various embedded applications, IoT projects, and DIY endeavors requiring multi-screen display capabilities.

Figure 1.1: Overview of the waveshare Triple LCD HAT connected to a Raspberry Pi.
This image displays the waveshare Triple LCD HAT, a blue circuit board with three integrated LCD screens. The central screen is larger (1.3-inch) and flanked by two smaller screens (0.96-inch) on either side. The HAT is shown connected to a Raspberry Pi, illustrating its compact form factor and multi-display capability. The screens are displaying various graphical interfaces, including system status indicators and a desktop environment.
2. Features
- Standard Raspberry Pi 40PIN GPIO Header: Ensures compatibility with Raspberry Pi series boards.
- 1.3-inch IPS Main LCD Screen:
- Driver Chip: ST7789
- Interface: SPI communication
- Resolution: 240×240 pixels
- Color Depth: Supports 65K color display
- Viewing Angle: Wide viewing angle

Figure 2.1: Detailed specifications of the 1.3-inch main LCD screen.
This image provides a visual breakdown of the 1.3-inch main LCD screen's characteristics, including its size (1.3"), resolution (240x240), display color (65K), communication interface (SPI), and driver chip (ST7789). It highlights the screen's suitability for clear and vivid color image display in various application scenarios.
- Dual 0.96-inch IPS Secondary LCD Screens:
- Driver Chip: ST7735S
- Interface: SPI communication
- Resolution: 160×80 pixels
- Color Depth: Supports 65K color display
- Functionality: Ideal for displaying key information, status indicators, or small graphics.
- Onboard User-Defined Keys: Two user-defined keys for extended applications, allowing customization of functions.

Figure 2.2: Illustration of the dual 0.96-inch secondary LCD screens and onboard user-defined keys.
This image showcases the two 0.96-inch secondary LCD screens, emphasizing their capability for 65K color display via SPI communication. It also highlights the two onboard user-defined keys (K1 and K2), which can be customized for various applications, providing additional interactive functionality to the HAT.

Figure 2.3: Key features of the Triple LCD HAT, highlighting its multi-screen capability and compatibility.
This image illustrates the Triple LCD HAT with text overlays emphasizing its features. It shows the main 1.3-inch LCD and two 0.96-inch secondary LCDs, along with a note about examples for Raspberry Pi, VisionFive2, Arduino, and STM32. The image reinforces the product's core functionality as a multi-display solution for various development boards.
3. Package Contents
Verify that all items listed below are included in your package:
- Zero LCD HAT (A) x1
- Standoffs pack x1
4. Pin Definition
The Triple LCD HAT utilizes the Raspberry Pi's 40-pin GPIO header. Understanding the pin assignments is crucial for proper connection and software configuration.
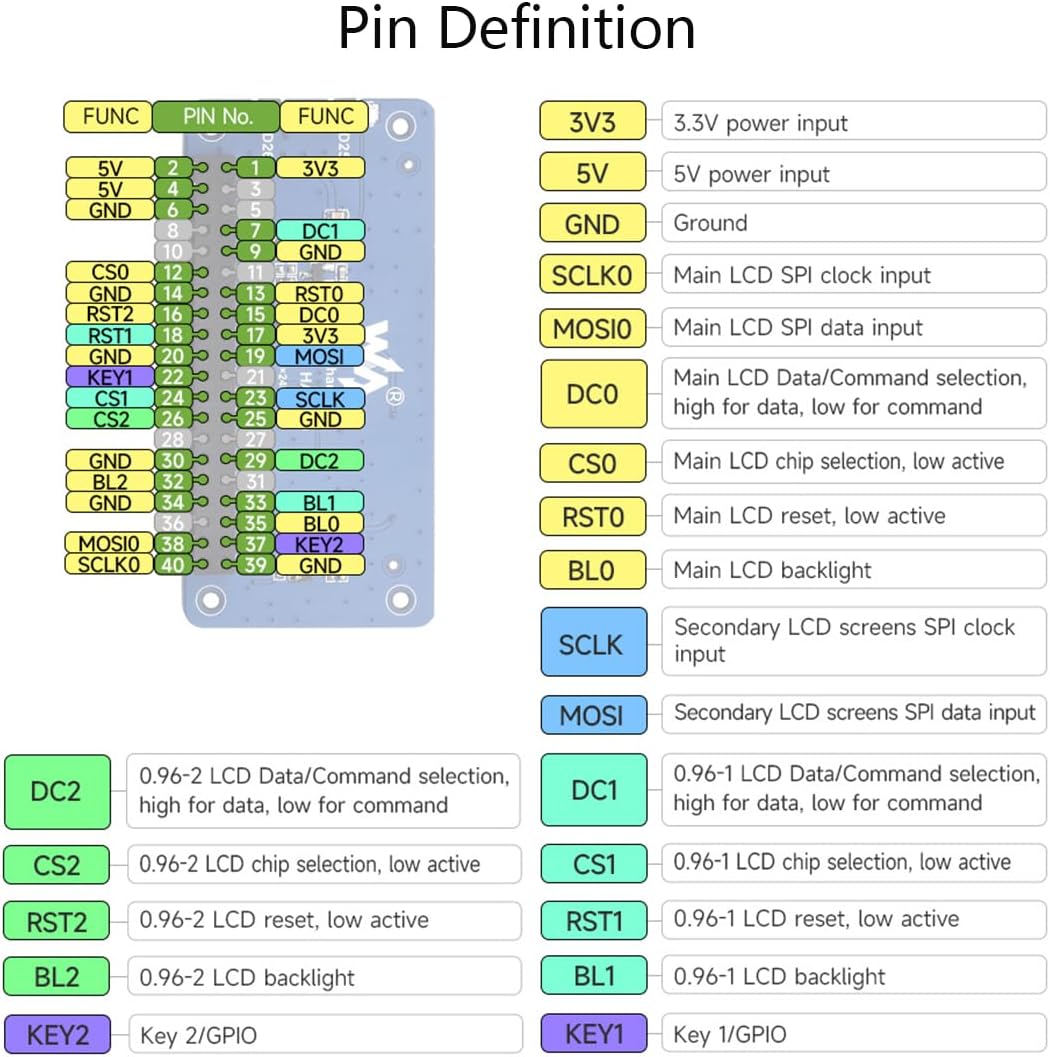
Figure 4.1: Pinout diagram for the Triple LCD HAT.
This image displays a detailed pin definition diagram for the Triple LCD HAT. It shows the 40-pin GPIO header with each pin labeled with its function (e.g., 3V3, 5V, GND, SCLK0, MOSI0, DC0, CS0, RST0, BL0 for the main LCD, and SCLK, MOSI, DC1, CS1, RST1, BL1, DC2, CS2, RST2, BL2 for the secondary LCDs, along with KEY1 and KEY2). This diagram is essential for hardware connections and software development.
| Pin No. | Function | Description |
|---|---|---|
| 1, 17 | 3V3 | 3.3V power input |
| 2, 4 | 5V | 5V power input |
| 6, 9, 14, 20, 25, 30, 34, 39 | GND | Ground |
| 11 | SCLK0 | Main LCD SPI clock input |
| 12 | MOSI0 | Main LCD SPI data input |
| 13 | DC0 | Main LCD Data/Command selection, high for data, low for command |
| 15 | CS0 | Main LCD chip selection, low active |
| 16 | RST0 | Main LCD reset, low active |
| 18 | BL0 | Main LCD backlight |
| 23 | SCLK | Secondary LCD screens SPI clock input |
| 24 | MOSI | Secondary LCD screens SPI data input |
| 26 | DC1 | 0.96-1 LCD Data/Command selection, high for data, low for command |
| 27 | CS1 | 0.96-1 LCD chip selection, low active |
| 28 | RST1 | 0.96-1 LCD reset, low active |
| 29 | BL1 | 0.96-1 LCD backlight |
| 31 | DC2 | 0.96-2 LCD Data/Command selection, high for data, low for command |
| 32 | CS2 | 0.96-2 LCD chip selection, low active |
| 33 | RST2 | 0.96-2 LCD reset, low active |
| 35 | BL2 | 0.96-2 LCD backlight |
| 36 | KEY2 | Key 2/GPIO |
| 37 | KEY1 | Key 1/GPIO |
5. Setup Instructions
5.1 Hardware Connection
- Prepare Raspberry Pi: Ensure your Raspberry Pi is powered off before connecting the HAT.
- Attach Standoffs: Secure the provided standoffs to the Raspberry Pi board.
- Mount HAT: Carefully align the 40-pin GPIO header of the Triple LCD HAT with the Raspberry Pi's GPIO pins. Gently press down until the HAT is securely seated.
- Secure HAT: Use the provided screws with the standoffs to firmly attach the HAT to the Raspberry Pi.
5.2 Software Configuration
The Triple LCD HAT requires specific software drivers and configuration to function correctly with your Raspberry Pi. Waveshare provides comprehensive online development resources and examples for various platforms, including Raspberry Pi, VisionFive2, Arduino, and STM32.
- Access Online Resources: Visit the official Waveshare wiki or documentation page for the Triple LCD HAT. A common link for Waveshare documentation is n9.cl/ptqwj.
- Install Drivers: Follow the instructions provided in the online documentation to install the necessary drivers for the ST7789 (main screen) and ST7735S (secondary screens) driver chips. This typically involves enabling SPI on your Raspberry Pi and compiling/installing specific libraries.
- Run Examples: Utilize the provided example code to test the functionality of all three LCD screens and the user-defined keys. These examples demonstrate how to display text, graphics, and interact with the HAT.
Note: Familiarity with Linux command-line operations and basic programming (e.g., Python, C) is recommended for software setup.
6. Operating Instructions
Once the hardware is connected and software drivers are installed, you can begin operating the Triple LCD HAT.
- Power On: Power on your Raspberry Pi. The screens should initialize and display content based on your configured software.
- Display Content: Use the provided software libraries and examples to send data to each screen. The 1.3-inch main screen is suitable for primary graphical output, while the 0.96-inch secondary screens can display supplementary information like sensor readings, system status, or small icons.
- Utilize User Keys: The two onboard user-defined keys (K1 and K2) can be programmed to trigger specific actions or navigate menus within your application. Refer to the software examples for programming these keys.

Figure 6.1: Example of multi-screen collaboration with the Triple LCD HAT.
This image demonstrates the Triple LCD HAT in various application scenarios. It shows the main screen displaying a desktop environment, while the secondary screens show system metrics like CPU usage and temperature. This highlights the HAT's capability for multi-screen collaboration and flexible application in Raspberry Pi projects.
7. Application Scenarios
The waveshare Triple LCD HAT offers versatile display options for a range of projects:
- Multi-screen Collaboration: Display primary information on the 1.3-inch screen and supplementary data, status indicators, or small graphics on the two 0.96-inch screens.
- IoT Applications: Monitor sensor data, network status, or device controls in a compact form factor.
- Embedded Systems: Integrate into custom embedded devices for user interfaces or diagnostic displays.
- DIY Projects: Enhance various DIY electronics projects with interactive visual feedback.
8. Maintenance
To ensure the longevity and optimal performance of your Triple LCD HAT, follow these maintenance guidelines:
- Cleaning: Gently wipe the screen surfaces with a soft, lint-free cloth. Avoid using abrasive cleaners or solvents.
- Handling: Handle the HAT by its edges to avoid touching the electronic components or screens directly.
- Storage: Store the HAT in a dry, cool environment, away from direct sunlight and extreme temperatures.
- Power Off Before Disconnecting: Always power off your Raspberry Pi before connecting or disconnecting the HAT to prevent damage.
9. Troubleshooting
If you encounter issues with your Triple LCD HAT, consider the following troubleshooting steps:
- No Display:
- Verify that the HAT is correctly seated on the Raspberry Pi's GPIO header.
- Ensure the Raspberry Pi is powered on and functioning.
- Check software configuration: Confirm that SPI is enabled and the correct drivers are installed and loaded.
- Review the pin definitions (Section 4) to ensure no wiring errors if using custom connections.
- Incorrect Display/Garbled Output:
- Recheck driver installation and configuration. Incorrect driver parameters (e.g., resolution, color depth) can cause display issues.
- Ensure the correct SPI bus and chip select pins are being used in your software.
- User Keys Not Responding:
- Verify that the GPIO pins for KEY1 and KEY2 are correctly configured in your software.
- Check for any conflicts with other GPIO usage.
- Online Resources: Refer to the Waveshare online documentation and community forums for further assistance. Many common issues have documented solutions.
10. Specifications
| Feature | Detail |
|---|---|
| Model | Triple LCD HAT-1.3inch+0.96LCDs |
| Main Screen Size | 1.3 inches |
| Main Screen Resolution | 240×240 pixels |
| Main Screen Driver | ST7789 |
| Secondary Screen Size | 0.96 inches (x2) |
| Secondary Screen Resolution | 160×80 pixels |
| Secondary Screen Driver | ST7735S |
| Interface | SPI (Serial Peripheral Interface) |
| GPIO Header | Standard Raspberry Pi 40PIN |
| User Keys | 2 (user-defined) |
| Dimensions (approx.) | 65mm x 31mm (HAT board) |
| Weight (approx.) | 0.634 ounces (18 grams) |
11. Product Dimensions
The physical dimensions of the Triple LCD HAT are provided below for integration planning.
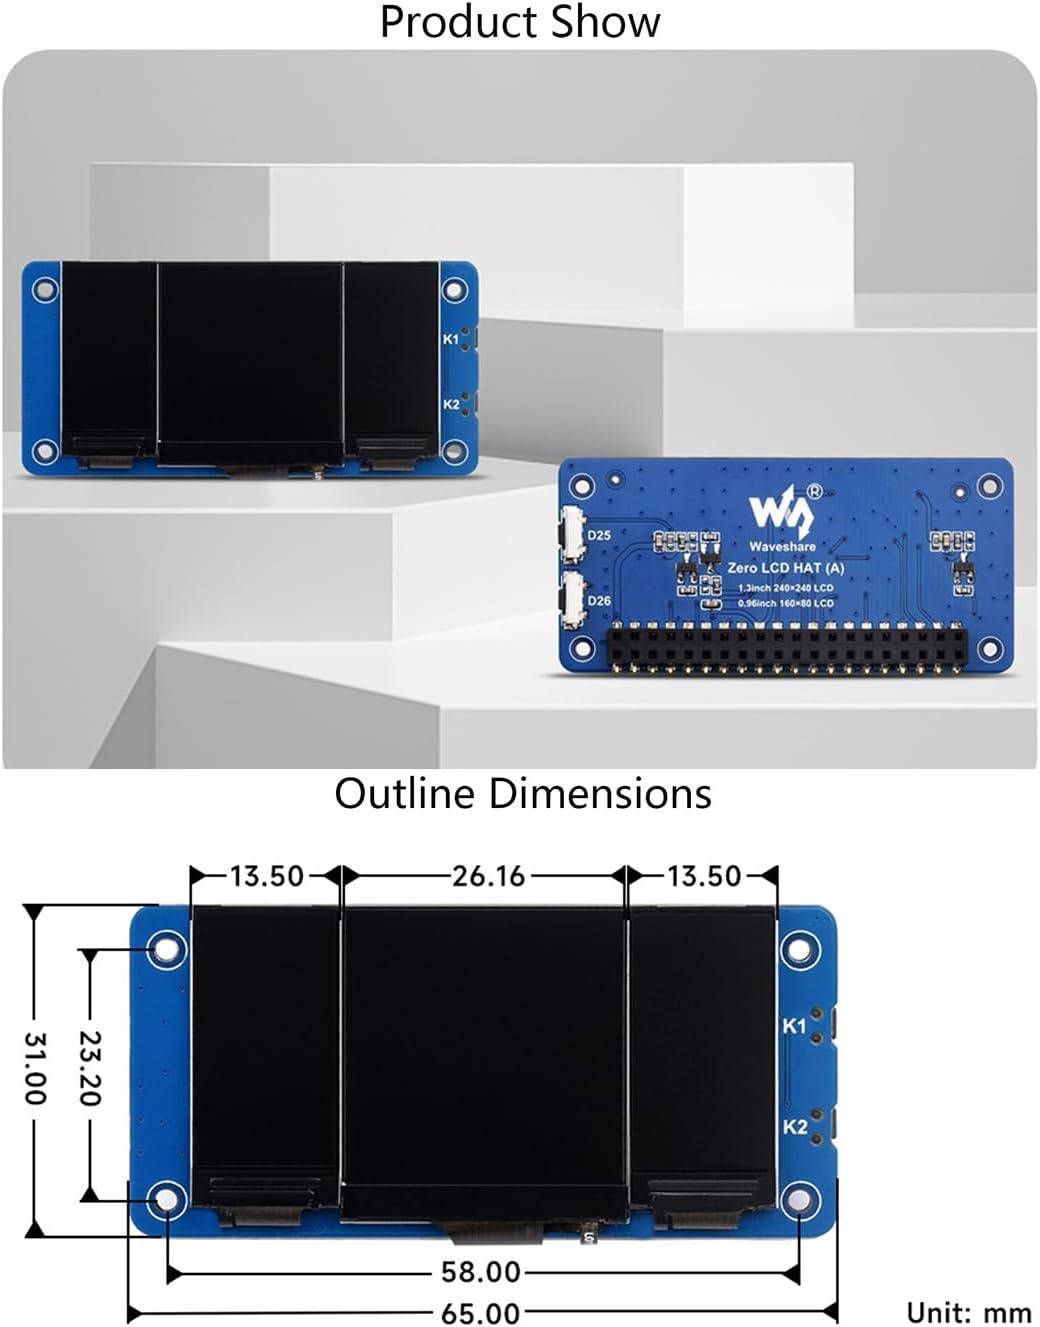
Figure 11.1: Outline dimensions of the Triple LCD HAT.
This image provides a technical drawing of the Triple LCD HAT, showing its outline dimensions in millimeters. Key measurements include the overall length of 65.00mm, width of 31.00mm, and the spacing between components. This detailed diagram is useful for enclosure design and physical integration into projects.
12. Support and Warranty
For technical support, documentation, and additional resources, please visit the official Waveshare website or their dedicated product wiki page. Information regarding product warranty is typically available on the Waveshare official website or through your point of purchase.
- Online Documentation: n9.cl/ptqwj
- Manufacturer Website: www.waveshare.com


