1. Introduction
Thank you for choosing the VANBAR 4K Dash Cam. This device is designed to provide high-quality video recording of your journeys, offering peace of mind and crucial evidence in case of incidents. Equipped with advanced features such as 4K Ultra HD resolution, GPS tracking, Wi-Fi connectivity, and voice control, it ensures comprehensive coverage and ease of use.
Please read this manual thoroughly before using the product to ensure proper operation and to maximize its potential.
2. Product Overview
2.1. Package Contents
- VANBAR 4K Dash Cam (Main Unit)
- Rear Camera (Waterproof)
- GPS Module
- Car Charger (Type-C)
- Suction Cup Mount
- 64GB High-Durability SD Card
- User Manual
- Wiring Pry Tool
- Extension Cable
- Mirror Cloth
- SIM Ejector Pin (for SD card slot)

Figure 1: Main unit and included accessories.
2.2. Key Features
- 4K Ultra HD Recording: Front camera records in 3840*2160P, capturing clear details like license plates.
- Front & Rear Simultaneous Recording: Provides comprehensive coverage for both front and rear views.
- Wi-Fi Connectivity: Connects to a smartphone app (RoadCam) for instant video playback, download, and settings adjustment.
- GPS Tracking: Records driving speed and route data, viewable on PC with dedicated software.
- Voice Control: Hands-free operation for common functions like taking photos, locking videos, and screen control.
- 24-Hour Parking Monitoring: Utilizes time-lapse recording and G-sensor to protect your vehicle while parked.
- G-Sensor (Impact Detection): Automatically locks and saves video footage upon detecting a collision.
- Loop Recording: Overwrites the oldest unlocked files when the SD card is full, ensuring continuous recording.
- HDR/WDR Technology: Enhances image quality in varying light conditions, including strong backlight and low light.
- Super Night Vision: Equipped with F2.0 bright lens and IMX589 image sensor for clear night recordings.
- Waterproof Rear Camera: Durable design for external mounting.
- Type-C Power Cable: Improved charging speed, stability, convenience, durability, and heat resistance.

Figure 2: Overview of 4K and Wi-Fi capabilities.
3. Setup
3.1. Installing the SD Card
- Ensure the dash cam is powered off.
- Locate the SD card slot on the side of the main unit.
- Insert the provided 64GB SD card into the slot until it clicks into place.
- To remove, gently push the card until it pops out.
3.2. Mounting the Dash Cam
- Clean the windshield area where you intend to mount the dash cam.
- Attach the suction cup mount to the main unit.
- Press the suction cup firmly against the windshield and flip the lever to secure it.
- Adjust the angle of the dash cam to ensure a clear view of the road ahead.
3.3. Connecting the Rear Camera
- Connect the rear camera cable to the main unit's rear camera port.
- Route the cable neatly along the vehicle's interior trim using the provided pry tool.
- Mount the rear camera on the rear windshield or license plate area. For external mounting, ensure the surface is clean and dry before attaching.
- Connect the red wire of the rear camera cable to the vehicle's reverse light power source for backup assist functionality.
3.4. Power Connection
- Connect the Type-C car charger to the dash cam's power input.
- Plug the other end of the car charger into your vehicle's cigarette lighter socket.
- For 24-hour parking monitoring, a dedicated hardwire kit (sold separately) is required to connect directly to the vehicle's fuse box.
4. Operating Instructions
4.1. Basic Operation
- Power On/Off: The dash cam will automatically power on and start recording when the vehicle engine starts. It will power off automatically when the engine is turned off. You can also manually power on/off by pressing and holding the power button.
- Recording: Once powered on, the dash cam automatically begins loop recording. A red dot or recording icon on the screen indicates active recording.
4.2. Wi-Fi Function and App Connection
The built-in Wi-Fi allows you to connect your smartphone to the dash cam for easy access to recordings and settings.
- Download the "RoadCam" app from your smartphone's app store (available for Android and iPhone).
- On the dash cam, navigate to the Wi-Fi settings and turn Wi-Fi ON.
- On your smartphone, go to Wi-Fi settings and connect to the dash cam's Wi-Fi network (SSID and password will be displayed on the dash cam screen).
- Open the RoadCam app. You can now view live footage, play back recorded videos, download files to your phone, and adjust settings.

Figure 3: Wi-Fi connectivity for instant confirmation.
4.3. GPS Functionality
The external GPS module records your vehicle's speed, direction, and location data, which can be viewed alongside video footage using dedicated PC playback software.
- Ensure the GPS module is connected to the dash cam and properly positioned to receive satellite signals.
- After recording, transfer the video files to your computer.
- Install the dedicated GPS player software (usually provided on the included SD card or available for download from the manufacturer's website).
- Open the video files with the GPS player to view driving routes, speed, and other data on a map.

Figure 4: GPS tracking and dedicated playback software.
4.4. Voice Control
Operate the dash cam hands-free using simple voice commands. This feature helps maintain focus on driving.
- Say "Take Photo" to capture a still image.
- Say "Open Wi-Fi" to activate the Wi-Fi function.
- Say "Lock Video" to protect the current recording from being overwritten.
- Say "Screen On" or "Screen Off" to control the display.
- Say "Front Camera" or "Back Camera" to switch camera views.

Figure 5: Voice control commands for hands-free operation.
4.5. Parking Monitoring and G-Sensor
The dash cam offers 24-hour parking surveillance. When the engine is off, the G-sensor detects impacts and automatically triggers recording, saving the footage as an emergency file.
- G-Sensor: Detects sudden movements or impacts. Sensitivity can usually be adjusted in settings.
- Time-Lapse Parking Monitoring: Records continuously at a low frame rate (e.g., 1 frame per second) to save storage space while capturing extended periods.

Figure 6: Parking monitoring and impact recording features.
4.6. Backup Assist Function
When the rear camera is properly connected to the reverse light, the dash cam display will automatically switch to the rear camera view with parking guidelines when the vehicle is put into reverse.
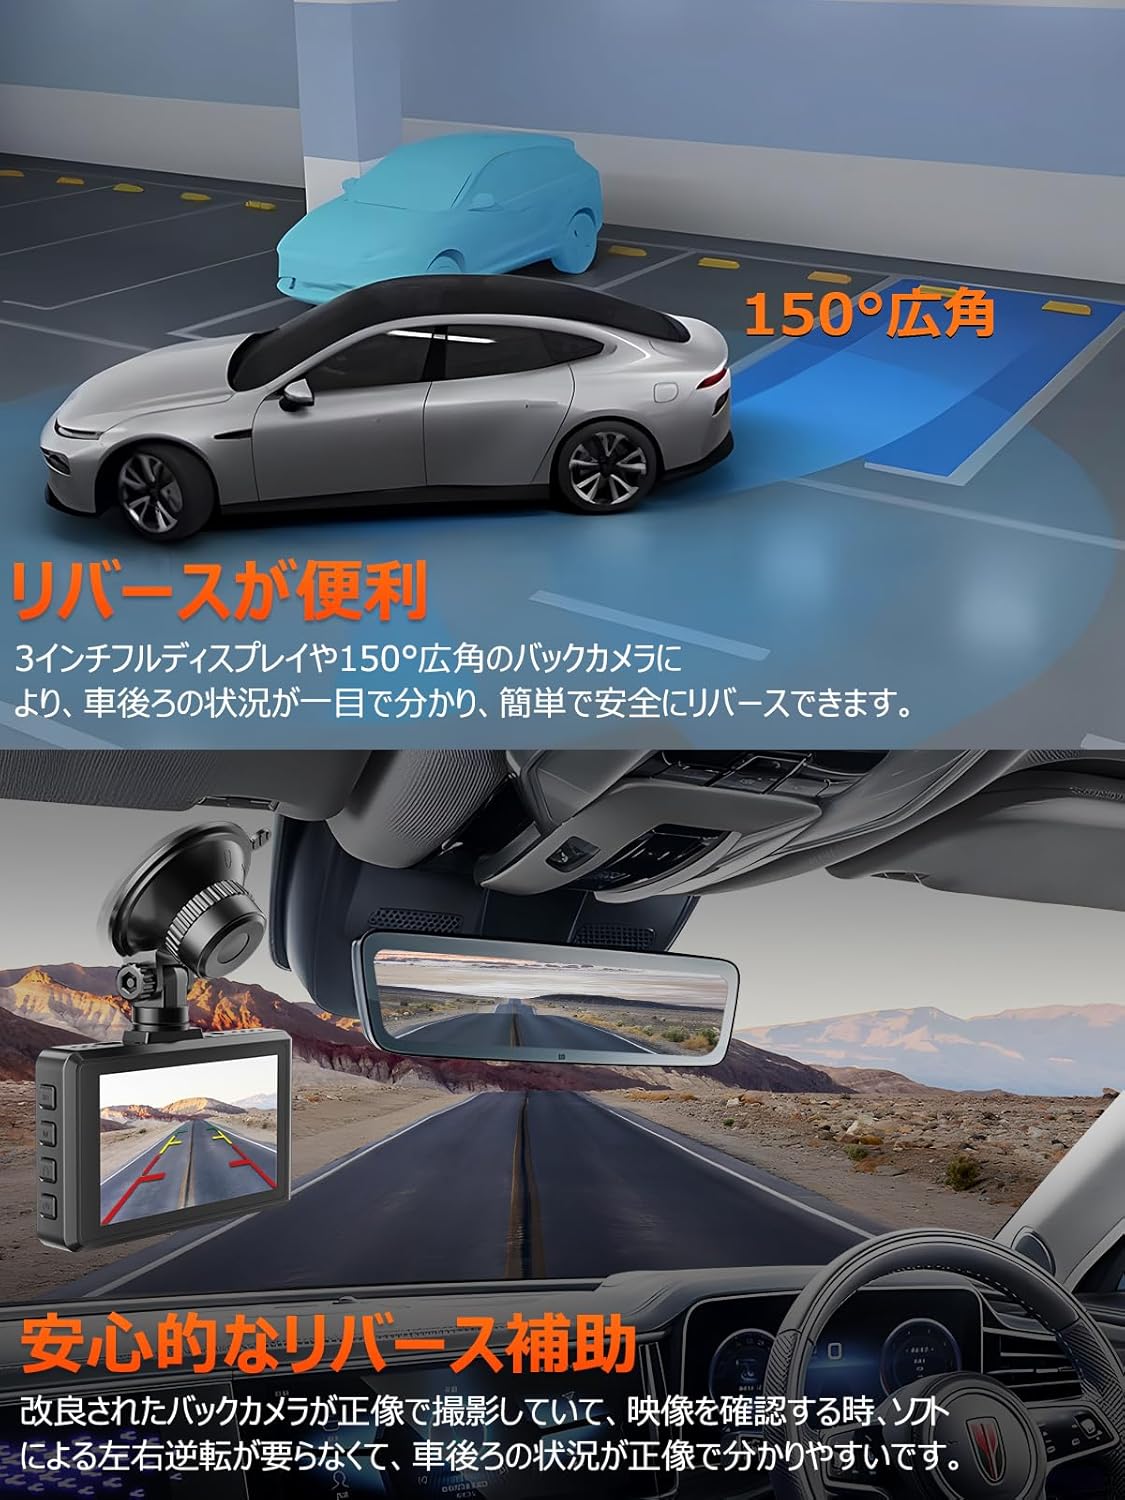
Figure 7: Rear camera view for convenient reversing.
5. Maintenance
5.1. Cleaning the Device
- Use a soft, dry cloth to clean the dash cam body.
- For the lens, use a lens cleaning cloth (like the included mirror cloth) to gently wipe away dust or smudges. Do not use abrasive cleaners or solvents.
5.2. SD Card Management
- It is recommended to format the SD card once a month to ensure optimal performance and prevent data corruption.
- To format, go to the dash cam's settings menu, find the "Format SD Card" option, and confirm. This will erase all data on the card, so back up any important files first.
6. Troubleshooting
| Problem | Possible Cause / Solution |
|---|---|
| Dash cam does not power on. | Check power connection. Ensure the car charger is properly plugged into both the dash cam and the vehicle's cigarette lighter. Test the cigarette lighter with another device. If using a hardwire kit, check fuse connections. |
| Recording stops or freezes. | SD card issue. Format the SD card (back up data first). Ensure the SD card is Class 10 or higher. Replace the SD card if the issue persists. |
| Wi-Fi connection unstable or fails. | Ensure the "RoadCam" app is updated. Restart both the dash cam and your smartphone. Check Wi-Fi settings on the dash cam and phone. Ensure no other devices are interfering with the Wi-Fi signal. |
| Date and time are incorrect. | Ensure the GPS module is connected and receiving a signal. The dash cam should automatically synchronize time via GPS. Manually set the date and time in the settings if GPS signal is weak or unavailable. |
| Video quality is poor (blurry, dark). | Clean the camera lens. Ensure the protective film is removed from the lens. Check settings for resolution and exposure. Ensure the windshield is clean. |
| Voice control not responding. | Speak clearly and loudly. Ensure the microphone is not obstructed. Check voice control settings in the menu. |
7. Specifications
| Feature | Specification |
|---|---|
| Brand | VANBAR |
| Model Number | DC600-4 |
| Screen Size | 3 inches |
| Video Capture Resolution | Front: 3840x2160P (4K), Rear: 1920x1080P |
| Lens Aperture | F2.0 |
| Front Camera Angle | 170° Super Wide Angle |
| Rear Camera Angle | 150° Wide Angle |
| Storage Support | Up to 512GB (64GB SD card included) |
| Mounting Type | Adhesive Mount |
| Control Method | Voice, App Control |
| Product Dimensions | 3.8 x 8.5 x 5 cm |
| Item Weight | 0.74 kg |
8. Warranty and Support
VANBAR products purchased on Amazon come with a standard 1-year warranty. Customers who register their product can extend this warranty to 3 years. To register for the 3-year extended warranty, please contact our customer service center with your order number.
We are committed to providing the best shopping experience and continuously improving our products based on customer feedback. We offer permanent free version updates for our dash cams.
For any inquiries, technical support, or warranty claims, please contact us through the following channels:
- Phone: Refer to the first page of your product manual for contact number.
- Email: Refer to the first page of your product manual for email address.
- LINE Official Account: @645cthlb