1. Introduction
This manual provides detailed instructions for the setup, operation, maintenance, and troubleshooting of your BOSGAME Mini PC E3. The BOSGAME E3 is a compact and powerful mini computer designed for various applications, from office tasks to home entertainment. It features an Intel Twin Lake N150 processor, 16GB DDR4 RAM, and a 512GB NVMe SSD, offering efficient performance in a small form factor.
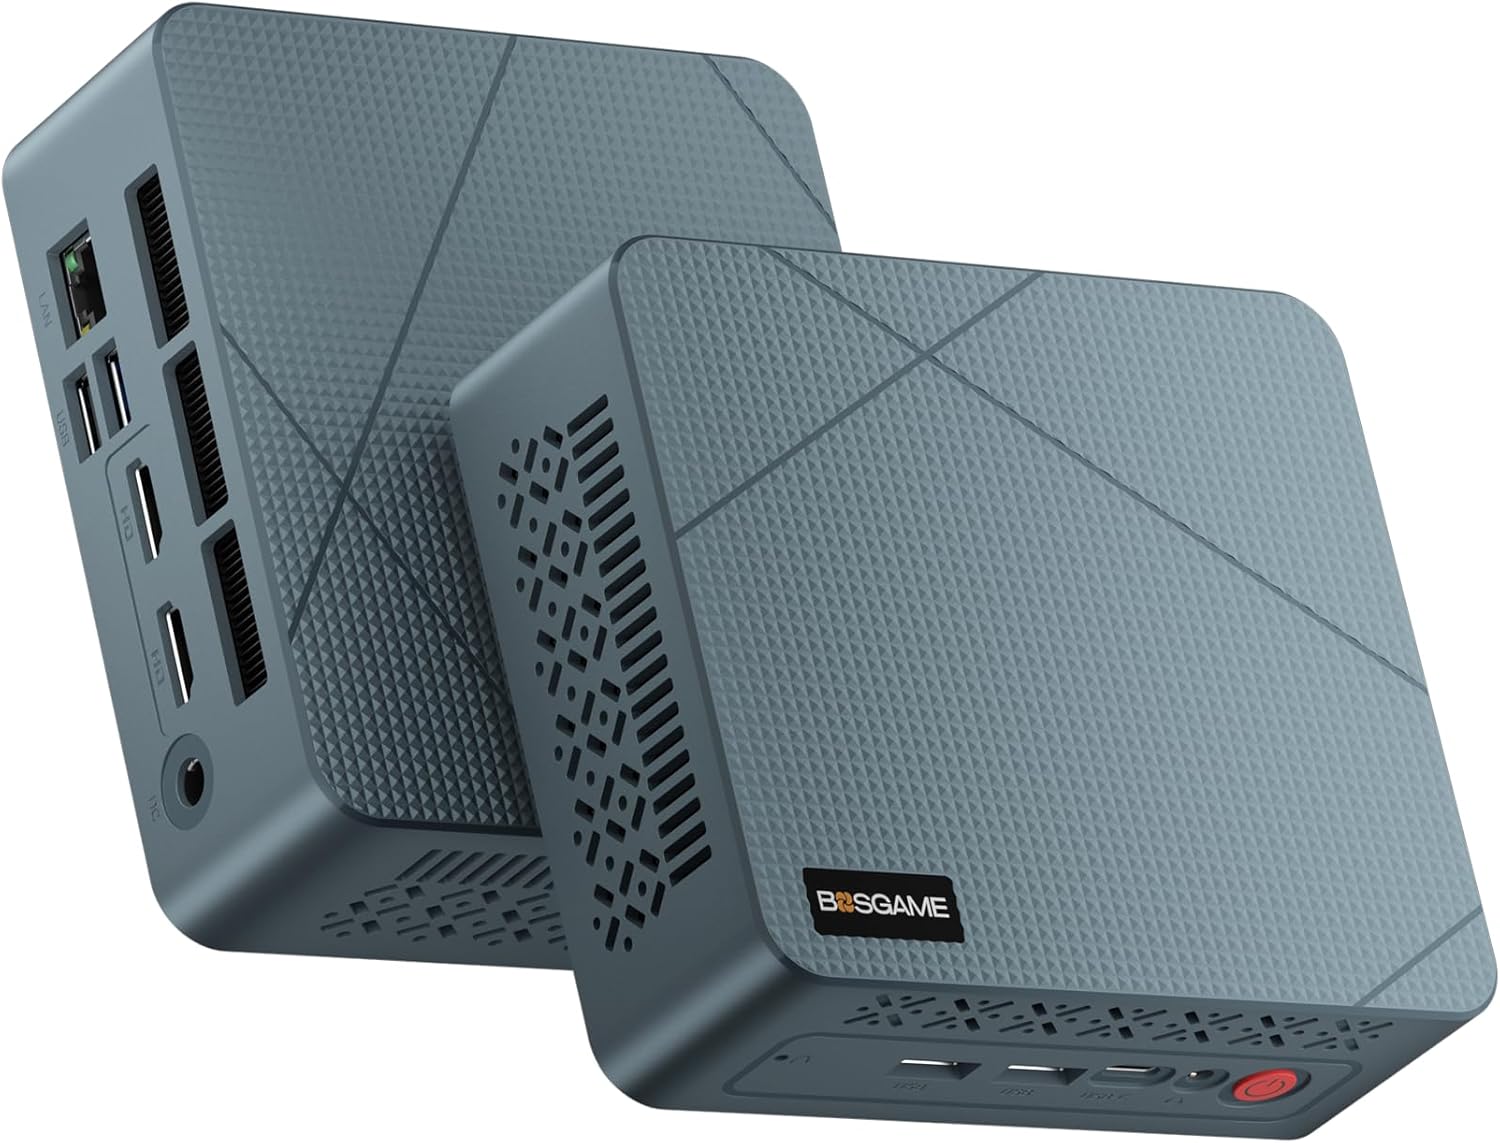
Image: Front and rear view of the BOSGAME Mini PC E3, showcasing its compact design and various ports.
2. Package Contents
Please verify that all items listed below are included in your package. If any items are missing or damaged, please contact BOSGAME support.
- 1 x BOSGAME E3 Mini PC
- 1 x Power Adapter (DC 12V/3A, AC 100~240V, 50/60Hz)
- 1 x HDMI Cable
- 1 x VESA Mount with Screws
- 1 x User Manual

Image: Contents of the BOSGAME Mini PC E3 package, including the mini PC, power adapter, HDMI cable, VESA mount, and user manual.
3. Product Overview
The BOSGAME Mini PC E3 is designed with a variety of ports for versatile connectivity. Familiarize yourself with the port layout for optimal setup.
3.1 Front Panel
- Power Button: To turn the device on or off.
- USB 3.2 (5Gbps) Ports: For connecting peripherals such as keyboards, mice, and external storage.
- USB-C (Full-function, 4K@60Hz) Port: Supports data transfer, video output, and power delivery.
- Audio Jack: For connecting headphones or speakers.
3.2 Rear Panel
- 2.5G RJ45 LAN Port: For wired network connection, offering speeds up to 2.5 Gigabit.
- USB 3.2 (10Gbps) Ports: High-speed ports for data transfer.
- HDMI 2.0 Ports (x2, 4K@60Hz): For connecting displays.
- DC Power Input: For connecting the power adapter.

Image: Detailed view of the BOSGAME Mini PC E3's front and rear panels, highlighting the various USB, HDMI, LAN, USB-C, and audio ports.
4. Setup Instructions
4.1 Initial Connection
- Connect your monitor(s) to the HDMI ports or the USB-C port using the provided HDMI cable or a compatible USB-C to display cable.
- Connect your keyboard and mouse to the USB ports.
- For wired internet, connect an Ethernet cable to the 2.5G RJ45 LAN port.
- Connect the power adapter to the DC power input port on the rear panel, then plug the adapter into a power outlet.
4.2 First Boot and Operating System Setup
- Press the power button on the front panel. The device will power on.
- Follow the on-screen instructions to complete the Windows 11 operating system setup. It is recommended to disconnect from the internet during the initial setup to avoid mandatory Microsoft account login, then connect once the desktop is accessible.
- Once the setup is complete, connect to your Wi-Fi network if not using a wired connection.
4.3 VESA Mount Installation
The BOSGAME Mini PC E3 can be mounted to the back of a compatible monitor using the included VESA mount.
- Attach the VESA bracket to the Mini PC using the provided screws.
- Attach the other side of the VESA bracket to the VESA mounting holes on the back of your monitor using the appropriate screws.
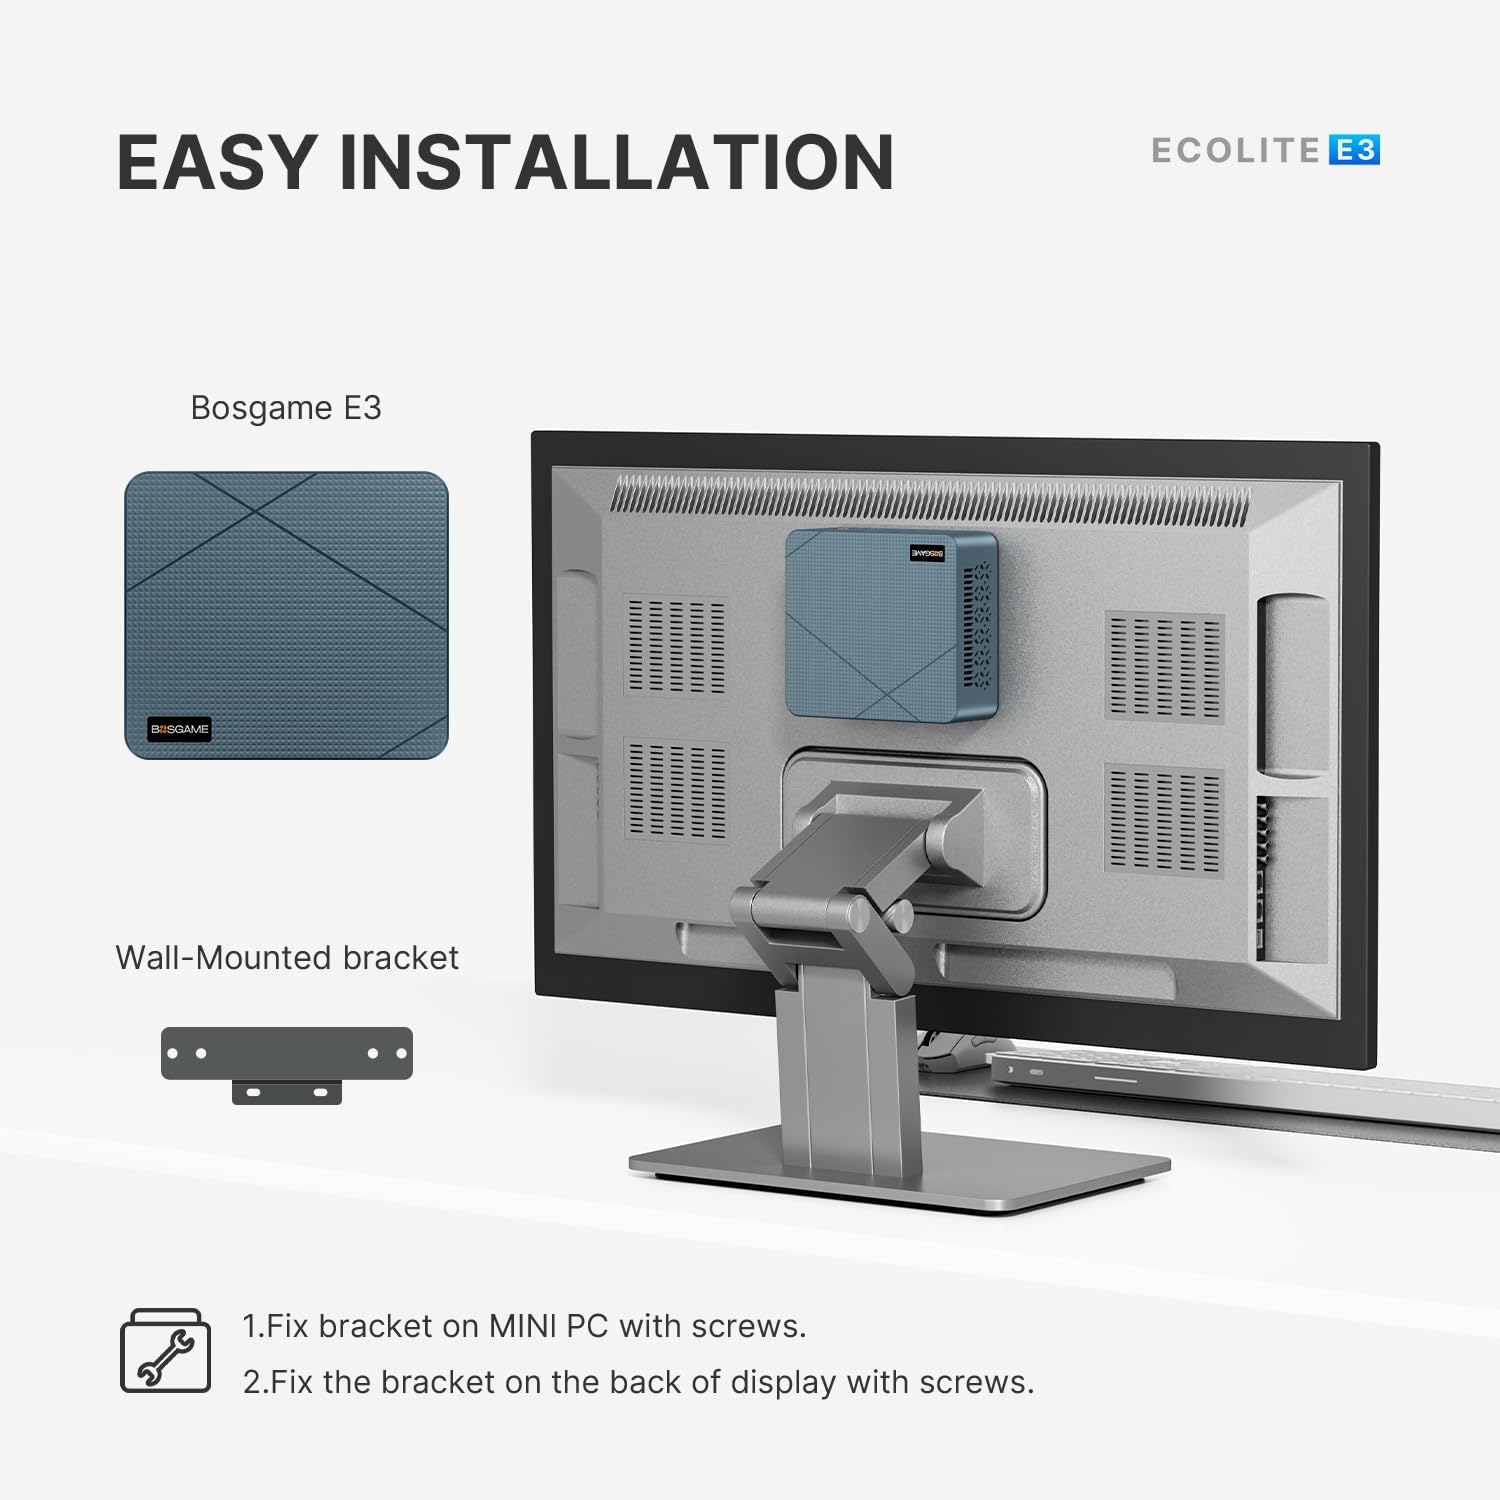
Image: Diagram illustrating the two-step process of installing the BOSGAME Mini PC E3 using the VESA mount onto the back of a monitor.
5. Operating Instructions
5.1 Power On/Off
- Power On: Press the red power button on the front panel.
- Power Off: Click the Start menu in Windows, then select Power > Shut down. Alternatively, press and hold the power button for 5 seconds to force a shutdown (not recommended for regular use).
5.2 Network Connectivity
- Wired Connection: Ensure an Ethernet cable is connected to the 2.5G RJ45 LAN port. The system should automatically detect the connection.
- Wireless Connection (Wi-Fi 5):
- Click the Wi-Fi icon in the Windows taskbar.
- Select your desired network from the list and click "Connect".
- Enter the network security key (password) if prompted.
- Bluetooth 5.0: For connecting wireless peripherals like headphones or mice.
- Go to Windows Settings > Bluetooth & devices.
- Ensure Bluetooth is turned on.
- Click "Add device" and follow the instructions to pair your Bluetooth device.

Image: Diagram illustrating the BOSGAME Mini PC E3's wireless connectivity capabilities, including Wi-Fi 5 and Bluetooth 5.0, connecting to various devices in an office environment.
5.3 Triple Display Setup
The BOSGAME E3 supports up to three simultaneous 4K displays via its two HDMI 2.0 ports and one full-function USB-C port.
- Connect your primary monitor to one of the HDMI ports.
- Connect your second monitor to the other HDMI port.
- Connect your third monitor to the USB-C port using a compatible USB-C to display cable or adapter.
- Once all monitors are connected, right-click on the desktop, select "Display settings," and configure your display arrangement (extend, duplicate, etc.).

Image: A BOSGAME Mini PC E3 connected to three displays, demonstrating its triple screen display capability for enhanced productivity and entertainment.
6. Maintenance
6.1 Cleaning
- Regularly clean the exterior of the Mini PC with a soft, dry cloth.
- Use compressed air to gently clear dust from ventilation openings to maintain optimal airflow and prevent overheating. Ensure the device is powered off and unplugged before cleaning.
6.2 Storage Expansion
The BOSGAME E3 comes with a 512GB M.2 2280 NVMe SSD and can be expanded up to 4TB.
- To upgrade or replace the M.2 NVMe SSD, power off the device and disconnect all cables.
- Carefully open the chassis (refer to specific instructions if available, or seek professional assistance).
- Locate the M.2 slot and replace or install the new NVMe SSD.
- Close the chassis and reconnect all cables.

Image: Internal components of the BOSGAME Mini PC E3, showing the 16GB DDR4 SODIMM RAM and 512GB M.2 2280 NVMe SSD, highlighting its high capacity and performance.
6.3 Driver Updates
While the system comes with pre-installed drivers, it is advisable to periodically check the official BOSGAME support website for updated drivers. Note that driver updates may not be frequent for all components.
7. Troubleshooting
| Problem | Possible Cause | Solution |
|---|---|---|
| No power | Power adapter not connected or faulty. | Ensure the power adapter is securely connected to the Mini PC and a working power outlet. Test with another outlet if possible. |
| No display on monitor | Incorrect cable connection, monitor input not selected, or faulty cable/monitor. |
|
| No internet connection | Wi-Fi not connected, Ethernet cable disconnected, or network issues. |
|
| Peripherals (keyboard/mouse) not working | Loose connection, faulty peripheral, or driver issue. |
|
8. Specifications
| Feature | Detail |
|---|---|
| Brand | BOSGAME |
| Model | E3 |
| Processor | Intel Twin Lake N150 (4 cores, 4 threads, up to 3.6GHz) |
| RAM | 16 GB DDR4 SODIMM (2666 MHz) |
| Storage | 512 GB M.2 2280 NVMe SSD (expandable up to 4TB) |
| Graphics | Integrated Intel UHD Graphics (Graphics Frequency: 1000 MHz) |
| Operating System | Support Win/Ubuntu/Linux (Windows 11 pre-installed) |
| Wireless Connectivity | Wi-Fi 5 (802.11a/g/n/ac), Bluetooth 5.0 |
| Ethernet | 2.5G RJ45 LAN |
| Video Output | 2 x HDMI 2.0 (4K@60Hz), 1 x Full-function USB-C (4K@60Hz) |
| USB Ports | 2 x USB 3.2 (10Gbps), 2 x USB 3.2 (5Gbps), 1 x USB-C (Full-function) |
| Audio | 1 x Audio Jack |
| Dimensions (LxWxH) | 4.96 x 4.41 x 1.57 inches (126mm x 112mm x 41mm) |
| Weight | Approximately 346g (0.76 pounds) |
| Power Adapter | DC 12V/3A |

Image: The BOSGAME Mini PC E3 being held, illustrating its compact size and light weight (390g), with dimensions of 4.96 x 4.41 x 1.61 inches.
9. Warranty and Support
9.1 Warranty Information
BOSGAME offers a 1-year warranty on all PCs from the date of purchase. Additionally, you are eligible for 30 days of worry-free returns.
9.2 Technical Support
For technical assistance, BOSGAME provides 24/7 technical support for the lifetime of the product.
- Contact via Amazon: Log in to your Amazon buyer account, find your order, click "Get Help," and then "Ask a question."
- Direct Email Support: You can also reach out to BOSGAME support directly via email at support@bosgamepc.com. Responses are typically provided on working days.

Image: BOSGAME warranty and support information, detailing contact methods via Amazon and direct email.


