Important Safeguards
When using electrical appliances, basic safety precautions should always be followed, including the following:
- Read all instructions before operating.
- Do not touch hot surfaces. Use handles or knobs.
- To protect against electrical shock, do not immerse cord, plugs, or the appliance in water or other liquid.
- Close supervision is necessary when any appliance is used by or near children.
- Unplug from outlet when not in use and before cleaning. Allow to cool before putting on or taking off parts.
- Do not operate any appliance with a damaged cord or plug or after the appliance malfunctions or has been damaged in any manner.
- The use of accessory attachments not recommended by the appliance manufacturer may cause injuries.
- Do not use outdoors.
- Do not let cord hang over edge of table or counter, or touch hot surfaces.
- Do not place on or near a hot gas or electric burner, or in a heated oven.
- Extreme caution must be used when moving an appliance containing hot oil or other hot liquids.
- Always attach plug to appliance first, then plug cord into the wall outlet. To disconnect, turn any control to "off", then remove plug from wall outlet.
- Do not use appliance for other than intended household use.
Parts Identification
Familiarize yourself with the components of your Royalcraft Electric Roaster Oven.
- 1. Roaster Base: The main housing unit containing the heating element and control panel.
- 2. Removable Roasting Pan: The inner pan where food is placed for cooking. It is non-stick for easy cleaning.
- 3. Roasting Rack: A wire rack designed to elevate food within the roasting pan, promoting even cooking and allowing fats to drip away.
- 4. Self-Basting Lid: The lid features a unique design that collects condensation and drips it back onto the food, ensuring moisture and flavor retention.

Image: The self-basting lid design, illustrating how moisture is returned to the food during cooking.
- 5. Control Knob: Used to select temperature settings and functions (Keep Warm, Defrost, 150-450°F).

Image: Detailed view of the control knob, highlighting the Defrost and Warm functions.
- 6. Indicator Light: Illuminates when the roaster is heating and turns off when the set temperature is reached.

Image: The complete Royalcraft 18-Quart Electric Roaster Oven, showcasing its main components.
Setup Before First Use
- Unpack the roaster oven and all its components. Remove any packaging materials, stickers, or labels.
- Wash the removable roasting pan and roasting rack in warm, soapy water. Rinse thoroughly and dry completely. The exterior of the roaster base can be wiped with a damp cloth. Do not immerse the roaster base in water.
- Place the roaster base on a stable, heat-resistant surface, away from walls or cabinets to allow for proper ventilation.
- Insert the clean roasting pan into the roaster base, then place the roasting rack inside the pan.
- For the first use, it is recommended to operate the roaster empty for 30 minutes at 350°F (175°C) to burn off any manufacturing oils. Some smoke or odor may be present; this is normal. Ensure the area is well-ventilated.
- Allow the unit to cool completely, then wipe the interior of the roasting pan and rack again if desired.
Operating Instructions
General Roasting
- Prepare your food and place it on the roasting rack inside the removable pan.
- Cover the roaster with the self-basting lid.
- Plug the power cord into a standard electrical outlet.
- Turn the control knob to your desired temperature setting (150-450°F). The indicator light will illuminate.
- The indicator light will turn off once the set temperature is reached, and cycle on and off during cooking to maintain the temperature.
- Monitor cooking progress. The self-basting lid helps retain moisture, reducing the need for manual basting.
- Once cooking is complete, turn the control knob to "OFF" and unplug the appliance.
- Use oven mitts to carefully remove the lid and then the roasting rack with food.
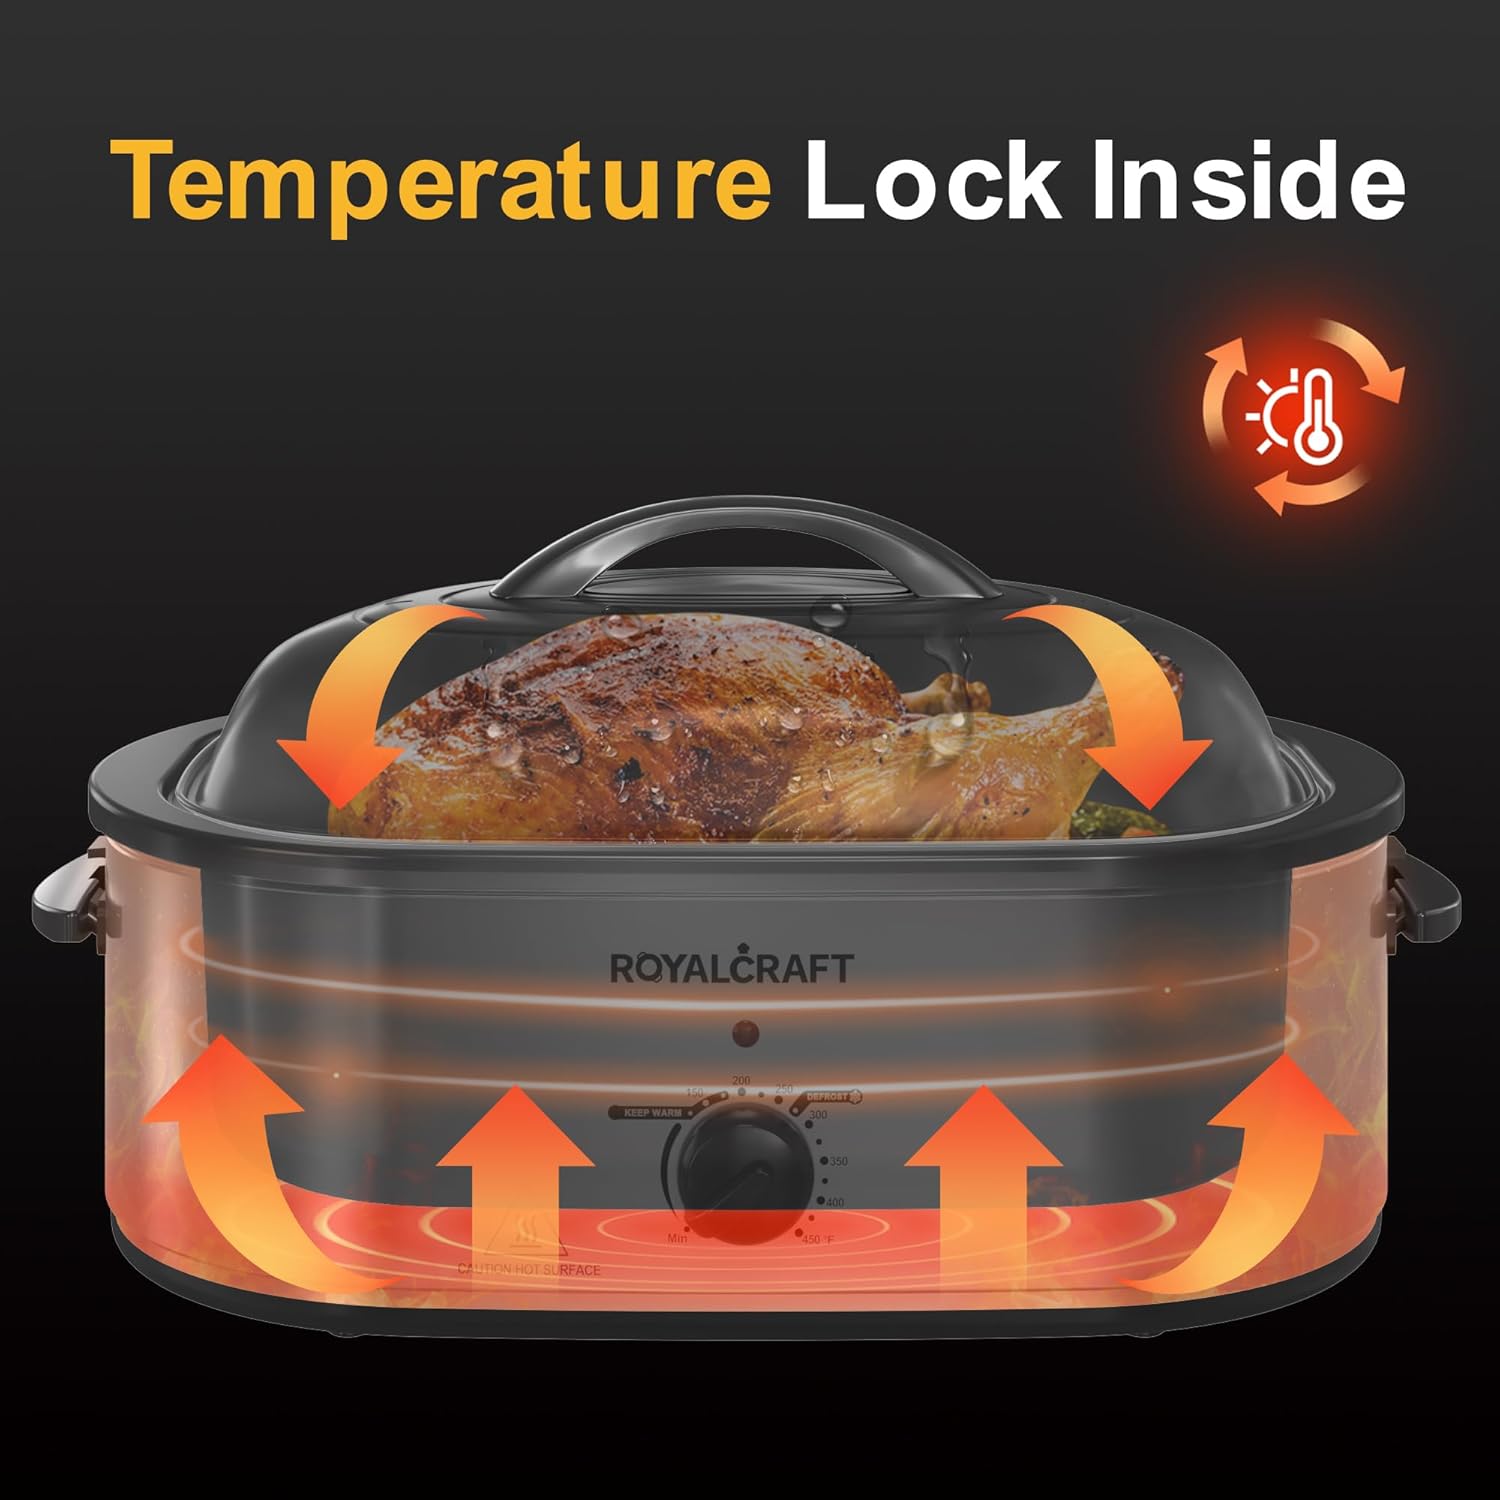
Image: Illustration of how heat is locked inside the roaster for efficient and even cooking.

Image: Example of a roasted turkey, demonstrating the potential results from using the roaster oven.
Defrost Function
The defrost function is designed to safely thaw frozen foods, such as turkeys, before cooking.
- Place the frozen item on the roasting rack within the pan.
- Set the control knob to the "DEFROST" setting.
- Follow recommended defrosting times based on the food item's weight. Always ensure food is fully thawed before proceeding with cooking.
Keep Warm Function
Use the "KEEP WARM" setting to maintain food at a serving temperature after cooking without further cooking it.
- After cooking, turn the control knob to "KEEP WARM".
- This setting is ideal for buffet-style serving or holding food until guests are ready.
- Do not use the "KEEP WARM" setting for extended periods (more than 2-4 hours) to prevent food from drying out or entering unsafe temperature zones.
Versatile Cooking Options
Beyond roasting, this appliance offers multiple cooking functionalities:
- Baking: Use for casseroles, breads, and desserts.
- Broiling: Achieve browning and crisping.
- Slow Cooking: Ideal for stews, pot roasts, and other slow-cooked dishes.
- Food Warmer/Buffet Server: Keep multiple dishes warm for gatherings.

Image: The roaster oven with its roasting rack, highlighting the convenience of freeing up your main oven and the lid rest feature.
Cleaning and Maintenance
Proper cleaning and maintenance will ensure the longevity and optimal performance of your roaster oven.
- Always unplug the roaster oven and allow it to cool completely before cleaning.
- Remove the roasting pan and rack. These are dishwasher safe or can be washed by hand in warm, soapy water. The non-stick surface makes cleaning easy.
- Wipe the exterior of the roaster base with a damp cloth. Do not use abrasive cleaners or scouring pads, as these can damage the finish.
- Never immerse the roaster base, power cord, or plug in water or any other liquid.
- Ensure all parts are thoroughly dry before reassembling or storing the appliance.
- Store the roaster oven in a dry place.
Troubleshooting
| Problem | Possible Cause | Solution |
|---|---|---|
| Appliance does not turn on. | Not plugged in; power outlet malfunction; control knob not set. | Ensure the power cord is securely plugged into a working outlet. Check the circuit breaker. Turn the control knob to a temperature setting. |
| Food is cooking unevenly. | Overcrowding; improper temperature setting; lid not sealed properly. | Do not overcrowd the pan. Adjust temperature as needed. Ensure the lid is seated correctly. |
| Smoke or odor during first use. | Manufacturing oils burning off. | This is normal for the first use. Ensure good ventilation. It should dissipate after initial use. |
| Lid or handles become hot. | Normal operation for heating appliances. | Always use oven mitts or heat-resistant gloves when handling the lid or handles during and after operation. |
Specifications
| Feature | Detail |
|---|---|
| Brand | RoyalCraft |
| Model Number | ZER |
| Capacity | 18 Quarts |
| Product Dimensions | 23.3"D x 15.7"W x 10.4"H |
| Control Type | Knob |
| Temperature Range | 150-450°F |
| Special Features | Self-Basting Lid, Defrost Function, Keep Warm Function, Removable Pan & Rack |
| Material | Stainless Steel (exterior) |
Warranty and Support
For warranty information, product support, or to inquire about replacement parts, please refer to the official RoyalCraft website or contact their customer service department. Keep your purchase receipt as proof of purchase for warranty claims.
RoyalCraft prioritizes customer needs and offers policies such as warranties and return options. For specific details, please visit the RoyalCraft Store on Amazon.