
Introduction
The Motorola Solutions T110 Two-Way Portable Radio is designed for simple, reliable communication. Ideal for various activities such as camping, exploring, or general family use, this radio allows you to stay connected with ease. Featuring 22 channels and an easy pairing function, the T110 series ensures instant communication at the push of a button. This manual provides essential information for setting up, operating, maintaining, and troubleshooting your T110 radios.
Package Contents
Your Motorola Solutions T110 Two-Way Portable Radio package includes the following items:
- 12 x T110 Two-Way Radios
- 12 x Belt Clips
- Personalization Stickers
- 3 x AAA Batteries (per radio, pre-installed or included separately)

Figure 1: Contents of the Motorola T110 12-Pack. This image displays twelve red Motorola T110 radios, each with a black antenna and a digital display showing "8 Tx".
Product Overview
Familiarize yourself with the key components of your T110 radio.
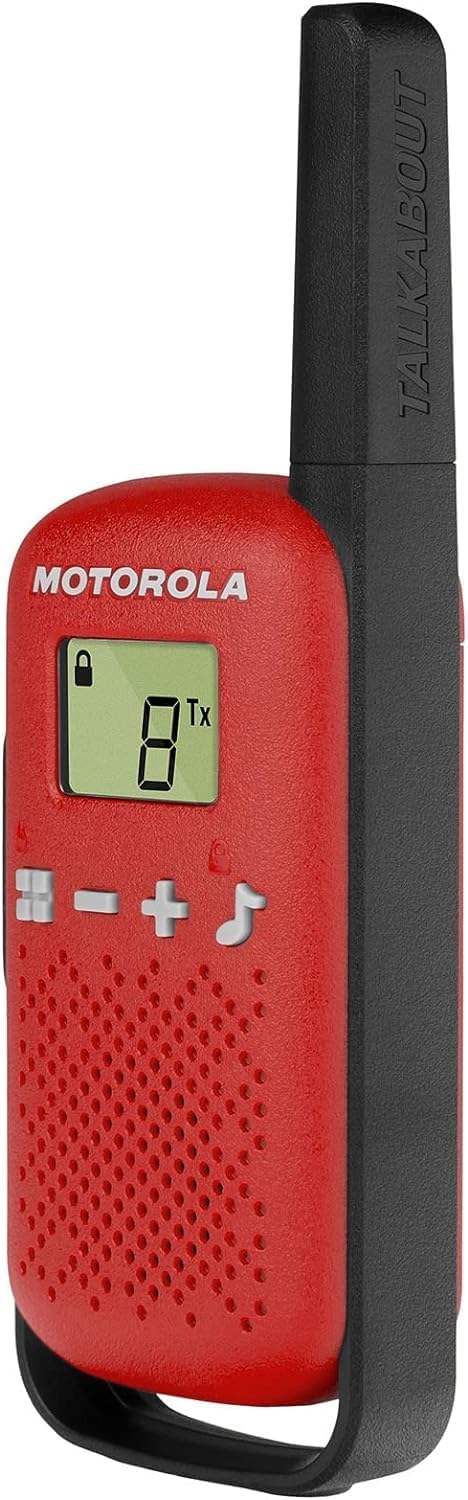
Figure 2: Front and side view of the T110 radio. This image shows the red body of the radio, the black antenna, the LCD display, and the control buttons.

Figure 3: Back view of the T110 radio. This image highlights the textured back surface and the slot for the belt clip.
- Antenna: For transmitting and receiving signals.
- LCD Display: Shows channel number, battery level, and transmission status.
- Power/Menu Button: Turns the radio on/off and accesses menu options.
- Up/Down Buttons: Adjust volume and navigate channels.
- Push-to-Talk (PTT) Button: Press and hold to transmit your voice.
- Speaker/Microphone: For audio output and input.
- Belt Clip Slot: For attaching the included belt clip.
Setup
1. Battery Installation
Each T110 radio requires 3 AAA batteries. These are typically included in the package.
- Ensure the radio is turned off.
- Locate the battery compartment cover on the back of the radio.
- Gently slide down or unlatch the cover to open the compartment.
- Insert 3 AAA batteries, observing the polarity markings (+/-) inside the compartment.
- Replace the battery compartment cover, ensuring it clicks securely into place.
2. Attaching the Belt Clip
The included belt clip allows for convenient carrying of your radio.
- Align the belt clip with the slot on the back of the radio.
- Slide the belt clip firmly upwards until it locks into position.
- To remove, press the release tab on the belt clip and slide it downwards.

Figure 4: T110 radio with belt clip attached. This image shows the black belt clip securely fastened to the back of the red radio unit.
3. Powering On/Off
- To turn on: Press and hold the Power/Menu button until the display lights up.
- To turn off: Press and hold the Power/Menu button until the display turns off.
4. Easy Pairing
The T110 radios feature an easy pairing function to quickly set up all radios to the same channel and code.
- Turn on all radios you wish to pair.
- On one radio (the "master" radio), press and hold the Easy Pairing button (often indicated by a house icon or similar) until you hear a tone or see a specific icon flash on the display.
- On the other radios, press the Easy Pairing button briefly. They should automatically detect and sync with the master radio's channel and code.
- Confirm all radios are on the same channel by checking their displays.
Operating Your Radio
1. Channel Selection
The T110 radio has 22 FRS channels. To change channels:
- With the radio on, press the Power/Menu button once to enter channel selection mode. The channel number on the display will flash.
- Use the Up (+) or Down (-) buttons to select your desired channel (1-22).
- Press the Power/Menu button again to confirm your selection and exit channel selection mode, or wait a few seconds for it to automatically confirm.
2. Transmitting and Receiving
- To Transmit: Press and hold the Push-to-Talk (PTT) button. Speak clearly into the microphone, holding the radio approximately 2-3 inches from your mouth. Release the PTT button when you finish speaking. The "Tx" icon will appear on the display when transmitting.
- To Receive: Ensure the PTT button is not pressed. The radio will automatically receive signals on the selected channel.
3. Volume Adjustment
Use the Up (+) or Down (-) buttons to adjust the listening volume when the radio is not in menu mode.
4. Low Battery Warning
The radio will indicate a low battery condition by flashing a battery icon on the display or emitting an audible tone. Replace the AAA batteries promptly to ensure continued operation.
5. Communication Range
The T110 radio can achieve a range of up to 16 miles under optimum conditions with an unobstructed line of sight. Actual range will vary significantly based on terrain, weather conditions, electromagnetic interference, and obstructions such as buildings or dense foliage. For best results, operate in open areas with minimal interference.
Maintenance
1. Cleaning Your Radio
- Wipe the radio's exterior with a soft, damp cloth.
- Do not use abrasive cleaners or solvents.
- Ensure the radio is dry before storing or using.
2. Battery Care
- Remove batteries from the radio if it will not be used for an extended period to prevent leakage.
- Dispose of used batteries responsibly according to local regulations.
3. Storage
Store your radios in a cool, dry place away from direct sunlight and extreme temperatures.
Troubleshooting
| Problem | Possible Cause | Solution |
|---|---|---|
| Radio does not turn on. | Batteries are dead or incorrectly installed. | Check battery polarity. Replace with fresh AAA batteries. |
| Cannot communicate with other radios. | Radios are on different channels or out of range. | Ensure all radios are on the same channel. Use the Easy Pairing function. Move closer to the other radio. Check for obstructions. |
| Static or poor audio quality. | Out of range, interference, or low battery. | Move closer to the other radio. Avoid sources of electromagnetic interference. Replace batteries. |
| Low battery warning persists after changing batteries. | Batteries are not fresh or are low quality. | Ensure you are using new, high-quality AAA batteries. |
Specifications
| Feature | Detail |
|---|---|
| Model Number | T110 |
| Channels | 22 FRS Channels |
| Frequency Range | 462-467 MHz |
| Maximum Talking Range | Up to 16 miles (under optimum conditions) |
| Power Source | 3 x AAA Batteries (per radio) |
| Voltage | 4.5 Volts |
| Dimensions (H x W x D) | 6.38 x 1.85 x 6.38 inches (per radio) |
| Weight | 4.19 pounds (total for 12-pack) |
| Water Resistance Level | Water Resistant |
| Included Components | Radios, Belt Clips, Personalization Stickers |
Note: The listed weight of 4.19 pounds refers to the total package weight for the 12-pack. Individual radio weight is significantly less.
Warranty and Support
Motorola Solutions products are designed for reliability and performance. For information regarding warranty coverage, technical support, or service, please refer to the warranty card included with your product or visit the official Motorola Solutions website. You may also contact their customer service for assistance.
For additional resources and product information, visit the Motorola Solutions Store on Amazon.


