Introduction
This manual provides comprehensive instructions for the installation, operation, and maintenance of your CURT 13519 Class 3 Trailer Hitch. Designed for select Toyota Grand Highlander, Lexus TX 350, 500h, and 500h+ models, this hitch offers dependable strength and a versatile design for various towing needs. Please read this manual thoroughly before installation and use to ensure safe and proper operation.

Image: The CURT 13519 Class 3 Trailer Hitch, featuring a 2-inch receiver and a durable black powder coat finish.
Features and Benefits
- Dependable Strength: This trailer hitch is rated for 5,000 lbs. gross trailer weight (GTW) and 500 lbs. tongue weight (TW). Note: Always adhere to the lowest-rated towing component's capacity.
- Versatile Design: Equipped with a standard 2-inch x 2-inch hitch receiver, suitable for various towing applications. Not compatible with vertical hanging bike racks.
- Fully Tested: Every CURT Class 3 trailer hitch undergoes rigorous testing in real-world, on-vehicle conditions at CURT's Detroit engineering facility, adhering to SAE J684 standards for safety.
- Rust, Chip, UV-Resistant: Features a unique dual-coat finish, combining rust-resistant liquid A-coat with a highly durable black powder coat, co-cured for superior protection against environmental elements.
- Easy to Install: Designed for a custom, factory fit on specific model years of the Toyota Grand Highlander and Lexus TX 350, TX 500h, and TX 500h+. No drilling required for installation.

Image: An illustration highlighting key features such as vehicle-specific design, industry-leading dual-coat finish, standard hitch receiver, and fully tested design.
Image: A graphic indicating the 2-inch receiver tube size of the hitch.

Image: A graphic with a drill icon crossed out, indicating that no drilling is required for the installation of this hitch.
Specifications
| Attribute | Detail |
|---|---|
| Brand | CURT |
| Model Number | 13519 |
| Item Weight | 45 Pounds |
| Product Dimensions | 21 x 45 x 11 inches |
| Vehicle Service Type | Toyota Grand Highlander, Lexus TX 350, TX 500h, TX 500h+ |
| Material | Carbon Steel |
| Finish Type | Powder Coated |
| Automotive Fit Type | Vehicle Specific Fit |
| Maximum Towing Capacity (GTW) | 5000 Pounds |
| Tongue Weight (TW) | 500 Pounds |
| Receiver Tube Size | 2-inch x 2-inch |
| UPC | 612314054732 |
What's in the Box
Upon opening the package, you should find the following components:
- CURT Class 3 Trailer Hitch (Model 13519)
- Installation Hardware (if applicable, typically included with the hitch)
- Instruction Sheet (this manual serves as a comprehensive guide)
Setup and Installation
The CURT 13519 trailer hitch is designed for a custom, vehicle-specific fit, ensuring straightforward installation without the need for drilling on compatible models. While specific steps may vary slightly by vehicle, the general process involves mounting the hitch to the vehicle's frame using the provided hardware.
General Installation Guidelines:
- Prepare the Vehicle: Ensure the vehicle is on a level surface and properly supported. Refer to your vehicle's owner's manual for specific safety precautions.
- Locate Mounting Points: Identify the designated mounting points on your vehicle's frame. These are typically pre-drilled holes.
- Position the Hitch: Carefully lift and position the trailer hitch against the vehicle's frame, aligning the hitch's mounting holes with the vehicle's mounting points. It may be helpful to have assistance due to the hitch's weight.
- Secure with Hardware: Insert the provided bolts and fasteners through the aligned holes. Hand-tighten all hardware initially.
- Torque Fasteners: Refer to the specific torque specifications provided with your hitch's hardware kit. Use a torque wrench to tighten all fasteners to the recommended specifications. Proper torquing is critical for safety and performance.
- Final Inspection: After installation, visually inspect all connections to ensure they are secure and that the hitch is properly aligned and does not interfere with any vehicle components.
Note: For detailed, step-by-step instructions specific to your vehicle model, always refer to the installation sheet included with your CURT trailer hitch. Professional installation is recommended if you are unsure about any steps.

Image: A close-up view of the standard 2-inch hitch receiver, ready for a ball mount or other towing accessories.

Image: A CURT trailer hitch properly installed and connected to the rear of a vehicle, showing the receiver tube and safety chain loops.
Operating Instructions
Once installed, your CURT Class 3 trailer hitch allows you to connect various towing accessories and trailers. Proper operation is crucial for safety.
Connecting a Trailer:
- Insert Ball Mount: Slide your appropriate ball mount (with the correct hitch ball size for your trailer coupler) into the 2-inch receiver tube.
- Secure Ball Mount: Align the pin hole on the ball mount with the hole on the receiver tube and insert a hitch pin and clip (or a locking hitch pin) to secure it.
- Attach Trailer Coupler: Lower the trailer coupler onto the hitch ball, ensuring it is fully seated and latched according to the trailer manufacturer's instructions.
- Connect Safety Chains: Cross the trailer's safety chains underneath the trailer tongue and attach them to the safety chain loops on the hitch. This provides a backup connection in case the primary coupling fails.
- Connect Trailer Wiring: If your trailer has lights or electric brakes, connect the trailer's wiring harness to your vehicle's towing electrical connector. Test all lights (running, brake, turn signals) and, if applicable, the electric brakes.
Towing Considerations:
- Weight Capacity: Never exceed the lowest weight rating of any component in your towing system (vehicle, hitch, ball mount, hitch ball, or trailer).
- Tongue Weight: Ensure the trailer's tongue weight is within the recommended range (typically 10-15% of the gross trailer weight) to maintain stability.
- Driving Adjustments: When towing, allow for increased braking distances, wider turns, and reduced acceleration. Avoid sudden maneuvers.
- Pre-Trip Inspection: Before each trip, inspect all towing connections, lights, and tires on both the vehicle and trailer.
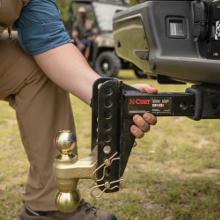
Image: A hand holding a hitch ball mount, demonstrating how it is inserted into the receiver.
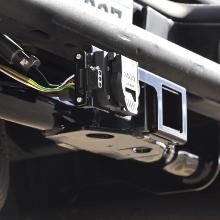
Image: A close-up of a trailer wiring harness connected to a vehicle's electrical system, essential for trailer lights and brakes.

Image: A vehicle towing a travel trailer on a winding road, illustrating the product in use for recreational towing.
Maintenance
Regular maintenance will ensure the longevity and safe operation of your CURT trailer hitch.
- Inspect Regularly: Periodically inspect the hitch for any signs of damage, corrosion, or wear. Pay close attention to welds, mounting points, and the receiver tube.
- Check Fasteners: Before each towing trip, and periodically during regular use, check all mounting bolts and nuts to ensure they are properly torqued. Re-torque if necessary according to the manufacturer's specifications.
- Clean and Protect: Keep the hitch clean from dirt, salt, and road debris. The dual-coat finish provides excellent protection, but regular cleaning, especially after exposure to harsh conditions, will help maintain its integrity.
- Lubrication: While the hitch itself typically does not require lubrication, ensure that any accessories used with it (e.g., ball mount, hitch ball, coupler) are properly lubricated as per their respective instructions.
- Storage: If the hitch is removed for storage, store it in a dry place to prevent corrosion.

Image: Hitch components submerged in a liquid bath during the dual-coat finishing process, which provides superior resistance to rust and chipping.
Troubleshooting
This section addresses common issues you might encounter with your trailer hitch.
Common Issues and Solutions:
- Issue: Hitch appears loose after installation.
- Solution: Re-check all mounting bolts. Ensure they are tightened to the specified torque settings. If the issue persists, consult a professional installer.
- Issue: Difficulty inserting ball mount into receiver.
- Solution: Check for any debris or rust inside the receiver tube. Clean if necessary. Ensure the ball mount is the correct size (2-inch shank) and is not bent or damaged.
- Issue: Excessive sway or instability when towing.
- Solution: This is often related to improper tongue weight or trailer loading. Ensure tongue weight is 10-15% of GTW. Distribute trailer cargo evenly. Consider using a weight distribution hitch if appropriate for your setup and vehicle.
- Issue: Rust or corrosion appearing on the hitch.
- Solution: While the hitch has a protective coating, prolonged exposure to harsh elements (e.g., road salt) can cause surface rust. Clean the affected area and apply a rust-inhibiting paint or coating designed for automotive use.
Safety Information
Your safety and the safety of others are paramount. Adhere to all safety guidelines when installing, operating, and maintaining your trailer hitch.
- Weight Limits: NEVER exceed the lowest-rated towing component's capacity. This includes the vehicle's towing capacity, the hitch's GTW/TW rating, the ball mount's rating, and the hitch ball's rating.
- Proposition 65 Warning: This product may expose you to chemicals including lead, which is known to the State of California to cause cancer and birth defects or other reproductive harm. For more information go to www.P65Warnings.ca.gov.
- Professional Installation: If you are not confident in your ability to install the hitch correctly, seek professional installation.
- Regular Inspections: Always perform a pre-trip inspection of your entire towing setup before each use.
- Safety Chains: Always use safety chains, crossing them under the trailer tongue to prevent the tongue from dropping to the ground if the primary coupling fails.
- Proper Lighting: Ensure all trailer lights are functional and visible.
- Driving Safely: Adjust your driving style when towing. Increase following distance, reduce speed, and avoid sudden braking or steering.

Image: A CURT trailer hitch undergoing rigorous testing on specialized equipment to ensure it meets SAE J684 standards for safety and durability.
Warranty and Support
CURT Manufacturing, LLC provides a limited lifetime warranty on its trailer hitches to the original purchaser, covering defects in material and workmanship. Specific warranty terms and conditions may apply.
For warranty claims, technical support, or additional product information, please contact CURT customer service directly. You can typically find contact information on the official CURT website or on the product packaging.
- Online Resources: Visit the official CURT website for FAQs, installation videos, and product registration.
- Customer Service: Refer to your product packaging or the CURT website for current customer service contact details (phone, email).


