Introduction
Thank you for purchasing the i-box Stylus N10 Record Player. This manual provides essential information for setting up, operating, and maintaining your new turntable. Please read it thoroughly before use to ensure optimal performance and longevity of your device. The i-box Stylus N10 combines vintage aesthetics with modern features, offering a high-quality audio experience for your vinyl collection and seamless Bluetooth connectivity for digital music.

Image: The i-box Stylus N10 Record Player, showcasing its elegant design in a home environment.
Important Safety Information
- Read all instructions before operating the unit.
- Keep this manual for future reference.
- Do not expose the unit to rain, moisture, or direct sunlight.
- Ensure proper ventilation; do not block any ventilation openings.
- Use only attachments/accessories specified by the manufacturer.
- Unplug the unit during lightning storms or when unused for long periods.
- Refer all servicing to qualified service personnel.
Package Contents
Please check that all items listed below are included in your package:
- i-box Stylus N10 Record Player
- Power Cord & Adapter
- User Manual (this document)
- Slipmat (pre-installed on platter)
Product Overview
Familiarize yourself with the components of your i-box Stylus N10 Record Player:
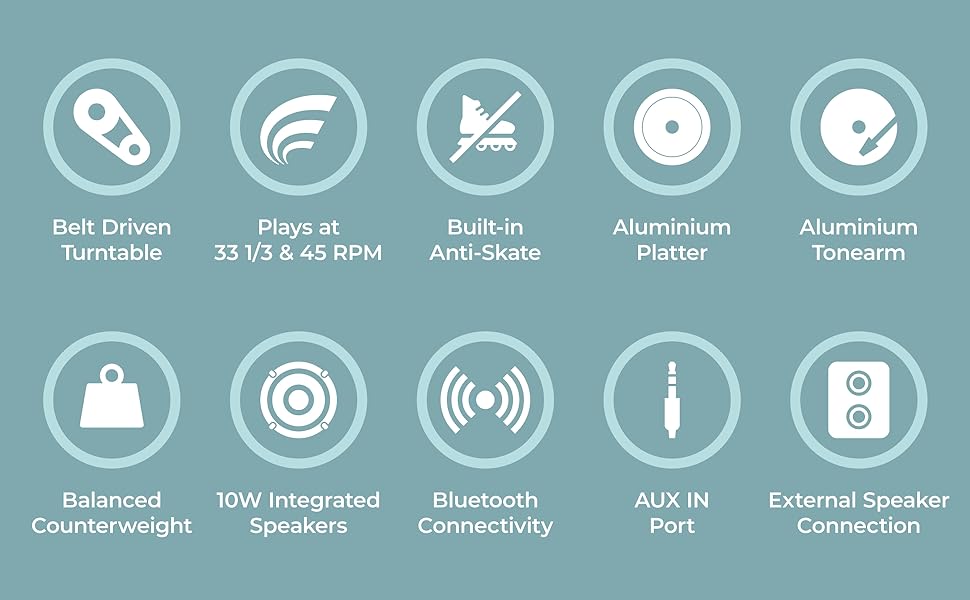
Image: Detailed diagram showing the various parts of the i-box Stylus N10, including the dust cover, spindle, counterweight, tonearm, lift lever, auto-off control, speed & Bluetooth selector, volume control, headshell, stylus & cartridge, slipmat, aluminum platter, power switch, line out ports, and AUX in port.
- 1. Dust Cover: Protects the platter and tonearm from dust.
- 2. Spindle: Holds the record in place.
- 3. Counterweight: Balances the tonearm and adjusts tracking force.
- 4. Lift Lever: Raises and lowers the tonearm.
- 5. Tonearm: Holds the headshell and stylus.
- 6. Auto Off Control: Enables or disables automatic platter stop at the end of a record.
- 7. Speed & BT Selector: Selects playback speed (33/45 RPM) or Bluetooth mode.
- 8. Volume Control: Adjusts the output volume of the built-in speakers.
- 9. Headshell: Holds the stylus and cartridge.
- 10. Stylus & Cartridge: Reads the grooves of the record. (Audio-Technica integrated)
- 11. Slipmat: Provides a soft surface for records and reduces static.
- 12. Aluminum Platter: The rotating surface on which records are placed.
- 13. Power Switch: Turns the unit on/off.
- 14. Phono Line Out Switch: (Not explicitly labeled in diagram but implied by Line Out Ports) Switches between Phono and Line output levels if applicable.
- 15. Line Out Ports (RCA): For connecting to external amplifiers or powered speakers.
- 16. AUX In Port: For connecting external audio devices via a 3.5mm cable.
- 17. 10W Integrated Speakers: Built-in stereo speakers for direct audio playback.
Setup
1. Unpacking and Placement
- Carefully remove the turntable from its packaging.
- Place the unit on a flat, stable surface away from direct sunlight, heat sources, or excessive dust.
- Ensure there is adequate space around the unit for ventilation.
2. Platter and Belt Installation
The aluminum platter and drive belt are typically pre-installed. If not, follow these steps:
- Gently place the aluminum platter onto the spindle.
- Locate the drive belt, usually found around the inner rim of the platter.
- Carefully stretch the belt around the motor pulley, which is a small brass cylinder located near the spindle.
- Place the slipmat on top of the platter.
3. Counterweight Adjustment
Proper counterweight adjustment is crucial for optimal sound and to prevent damage to your records and stylus.

Image: The adjustable counterweight on the tonearm, used for precise pressure.
- Remove the stylus protector.
- Gently hold the tonearm and release the tonearm clamp.
- Rotate the counterweight at the rear of the tonearm until the tonearm is balanced horizontally and floats freely.
- Once balanced, hold the counterweight steady and rotate the numbered ring to '0'.
- Rotate the counterweight (including the numbered ring) counter-clockwise to the recommended tracking force, typically between 2.0 and 3.0 grams for the integrated Audio-Technica cartridge. Refer to the cartridge manufacturer's specifications for the exact recommended force.
4. Anti-Skate Adjustment
The i-box Stylus N10 features built-in anti-skating to minimize distortion and ensure optimal tracking accuracy. No manual adjustment is typically required for this feature.
5. Dust Cover Installation
Insert the hinges of the dust cover into the slots at the back of the turntable. The dust cover protects the unit when not in use.
6. Power Connection
- Connect the power adapter to the DC IN port on the back of the turntable.
- Plug the power adapter into a suitable wall outlet.
Operating Instructions

Image: A close-up view of the control dials on the i-box Stylus N10, including volume, speed, and auto-off controls.
1. Playing a Vinyl Record

Image: The i-box Stylus N10 Record Player with its dust cover open, ready for playing a record.
- Turn on the unit using the Power Switch.
- Place a record on the platter.
- Select the appropriate speed (33 RPM or 45 RPM) using the Speed & BT Selector. For 45 RPM records, place the included 45 RPM adapter on the spindle if needed.
- Lift the tonearm using the Lift Lever.
- Manually move the tonearm over the desired starting groove of the record.
- Gently lower the tonearm using the Lift Lever. The stylus will descend onto the record and playback will begin.
- Adjust the volume using the Volume Control dial.
- At the end of the record, if Auto Off Control is enabled, the platter will stop spinning. You will need to manually return the tonearm to its rest. If Auto Off Control is disabled, the platter will continue to spin.
- When finished, lift the tonearm, return it to its rest, and secure it with the tonearm clamp. Turn off the unit.
2. Bluetooth Connectivity

Image: A couple enjoying music, demonstrating the Bluetooth connectivity feature of the i-box Stylus N10, allowing wireless streaming from a smartphone.
The i-box Stylus N10 can receive audio wirelessly from your Bluetooth-enabled devices.
- Turn on the unit.
- Set the Speed & BT Selector to the 'BT' position. The unit will enter Bluetooth pairing mode, indicated by a flashing light (refer to indicator light section if available).
- On your Bluetooth device (e.g., smartphone, tablet), enable Bluetooth and search for available devices.
- Select "i-box Stylus N10" from the list of devices.
- Once paired, the indicator light will become solid (refer to indicator light section if available), and you can play audio from your device through the turntable's speakers.
- Adjust volume using the Volume Control on the turntable or on your connected device.
3. Auxiliary Input (AUX IN)
Connect external audio sources like MP3 players or CD players using the AUX IN port.
- Connect a 3.5mm audio cable (not included) from your external audio device's headphone or line-out jack to the AUX IN port on the turntable.
- The turntable will automatically switch to AUX IN mode when a cable is connected.
- Play audio from your external device.
- Adjust volume using the Volume Control on the turntable or on your connected device.
4. Connecting to External Speakers (Line Out)

Image: The i-box Stylus N10 Record Player connected to an external speaker, demonstrating its versatility for enhanced audio output.
For enhanced audio, you can connect the i-box Stylus N10 to external powered speakers or an amplifier using the RCA Line Out ports.
- Ensure both the turntable and your external audio system are turned off.
- Connect an RCA cable (not included) from the Line Out ports (red for right, white for left) on the turntable to the corresponding audio input jacks on your amplifier or powered speakers.
- Turn on your external audio system, then turn on the turntable.
- Play a record. The audio will now be routed through your external speakers.
- Adjust the volume using the controls on your external audio system. The turntable's volume control will not affect the Line Out audio.
Maintenance
1. Cleaning the Unit
- Always unplug the unit from the power outlet before cleaning.
- Use a soft, dry cloth to wipe the exterior surfaces. Do not use abrasive cleaners, waxes, or solvents.
- The dust cover can be cleaned with a soft, damp cloth.
2. Cleaning the Stylus

Image: A close-up view of the Audio-Technica stylus and cartridge, highlighting its precision component.
- Use a soft brush designed for stylus cleaning, brushing gently from back to front.
- Avoid touching the stylus with your fingers.
3. Stylus Replacement
The stylus has a limited lifespan (typically 300-500 hours of playback) and should be replaced when sound quality deteriorates or the stylus is visibly damaged. The i-box Stylus N10 uses an Audio-Technica cartridge, and replacement styli for this type are widely available.
- Gently pull the old stylus assembly downwards and forwards to remove it from the cartridge body.
- Align the new stylus assembly with the cartridge body and push it upwards and backwards until it clicks into place.
- Ensure the new stylus is securely seated before use.
Troubleshooting
| Problem | Possible Cause | Solution |
|---|---|---|
| No power | Power adapter not connected; Power outlet not active. | Ensure power adapter is securely connected. Try a different power outlet. |
| No sound from speakers | Volume too low; Incorrect mode selected (e.g., BT when playing record); Stylus protector still on; Stylus damaged. | Increase volume. Ensure correct mode is selected. Remove stylus protector. Inspect stylus for damage; replace if necessary. |
| Sound distorted or skipping | Record is dirty or scratched; Stylus is dirty or worn; Tracking force incorrect; Turntable not level. | Clean record. Clean or replace stylus. Re-adjust counterweight. Place turntable on a level surface. |
| Bluetooth not connecting | Turntable not in BT mode; Device too far; Device already connected to another Bluetooth unit. | Ensure Speed & BT Selector is in 'BT' position. Move device closer to turntable. Disconnect device from other Bluetooth units. |
| Platter not spinning | Drive belt dislodged or broken; Auto Off Control activated at end of record. | Check and re-seat the drive belt. If at end of record, this is normal behavior; manually return tonearm. |
Specifications
- Model Name: Stylus N10
- Item Model Number: 79339PI/1
- Brand: i-box
- Connectivity Technology: Bluetooth, Auxiliary
- Included Components: Power Cord & Adapter
- Special Features: Built-in Bluetooth, Belt Driven Turntable, Precise Counterweight, Built-in Anti-Skating, RCA/Phono Sockets for External Speaker Connection
- Material: Wood (Walnut Veneer)
- Style: Modern
- Color: Walnut
- Compatible Devices: Speaker
- Motor Type: DC Motor
- Output Power: 10W (Integrated Speakers)
- Playback Speeds: 33 1/3 RPM, 45 RPM
- Platter Material: Aluminum
- Tonearm Material: Aluminum
- Cartridge Type: Audio-Technica (Moving Magnet)
- Power Consumption (On-mode): 20 watts
- Item Weight: 14.62 pounds
- Package Dimensions: 20.4 x 19.2 x 11.6 inches
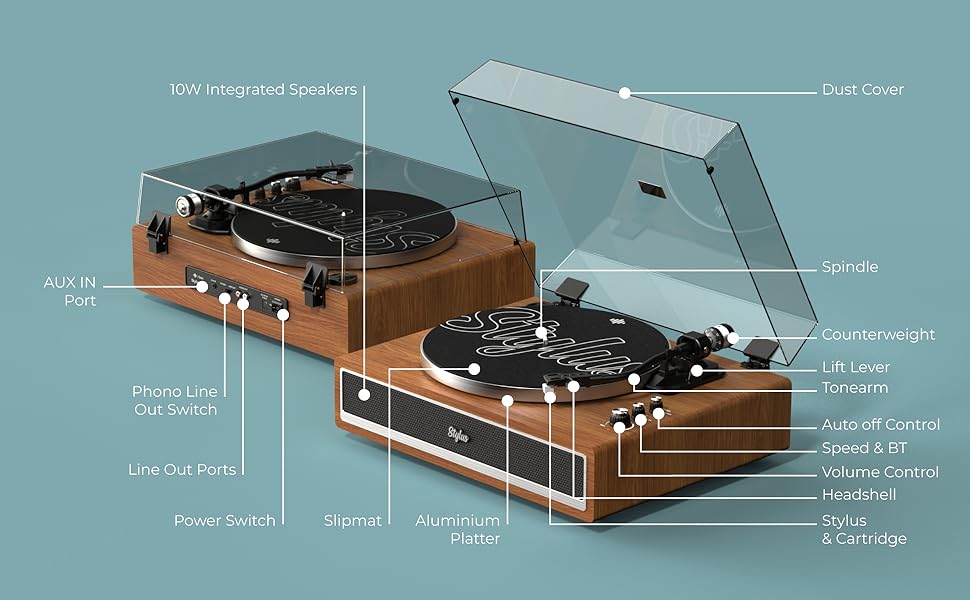
Image: Visual representation of key features including belt-driven, 33/45 RPM, built-in anti-skate, aluminum platter, aluminum tonearm, balanced counterweight, 10W integrated speakers, Bluetooth connectivity, AUX in port, and external speaker connection.
Warranty and Support
i-box is a proud British brand committed to quality. This product comes with a 3-year warranty. For any support inquiries, troubleshooting assistance, or warranty claims, please contact our friendly UK-based customer service team.
Please visit the official i-box website for the most up-to-date contact information and support resources.Visit the i-box Store on Amazon


