1. Introduction
This manual provides detailed instructions for the safe and proper installation, operation, and maintenance of your Maclean MC-459 Gas Spring Monitor Mount. Please read this manual thoroughly before installation and retain it for future reference. Incorrect installation or use may result in damage to the product or injury.

Figure 1: Maclean MC-459 Gas Spring Monitor Mount
2. Safety Information
- Weight Capacity: Do not exceed the maximum load capacity of 7 kg (15.4 lbs). Overloading can cause serious injury or product damage.
- Monitor Size: This mount is designed for monitors between 17 and 27 inches.
- Pole/Tube Diameter: Ensure the mounting pole or tube has a diameter between 28mm and 60mm.
- Assembly: Follow all assembly instructions carefully. If you have any doubts, consult a qualified professional.
- Moving Parts: The gas spring mechanism contains high-pressure gas. Do not attempt to disassemble the gas spring cylinder.
- Children: Keep small parts away from children to prevent choking hazards.
3. Package Contents
Please verify that all components are present and undamaged before proceeding with installation. If any parts are missing or damaged, contact customer support.
- Monitor Arm Assembly (with gas spring)
- Pole/Tube Clamp
- VESA Plate
- Mounting Hardware Kit (screws, washers, spacers)
- Hex Keys (for adjustments)
- Instruction Manual (this document)
4. Specifications
| Model | MC-459 |
| Material | Steel, Aluminum, Plastic |
| Color | Black |
| Screen Size Compatibility | 17" - 27" |
| Weight Capacity | Up to 7 kg (15.4 lbs) |
| VESA Compatibility | 75x75mm, 100x100mm |
| Pole/Tube Diameter | 28mm - 60mm |
| Tilt Range | +90° to -45° |
| Swivel Range | ±90° (at VESA plate), ±135° (at arm joint) |
| Rotation | 360° (portrait to landscape) |
| Height Adjustment | Gas spring assisted |
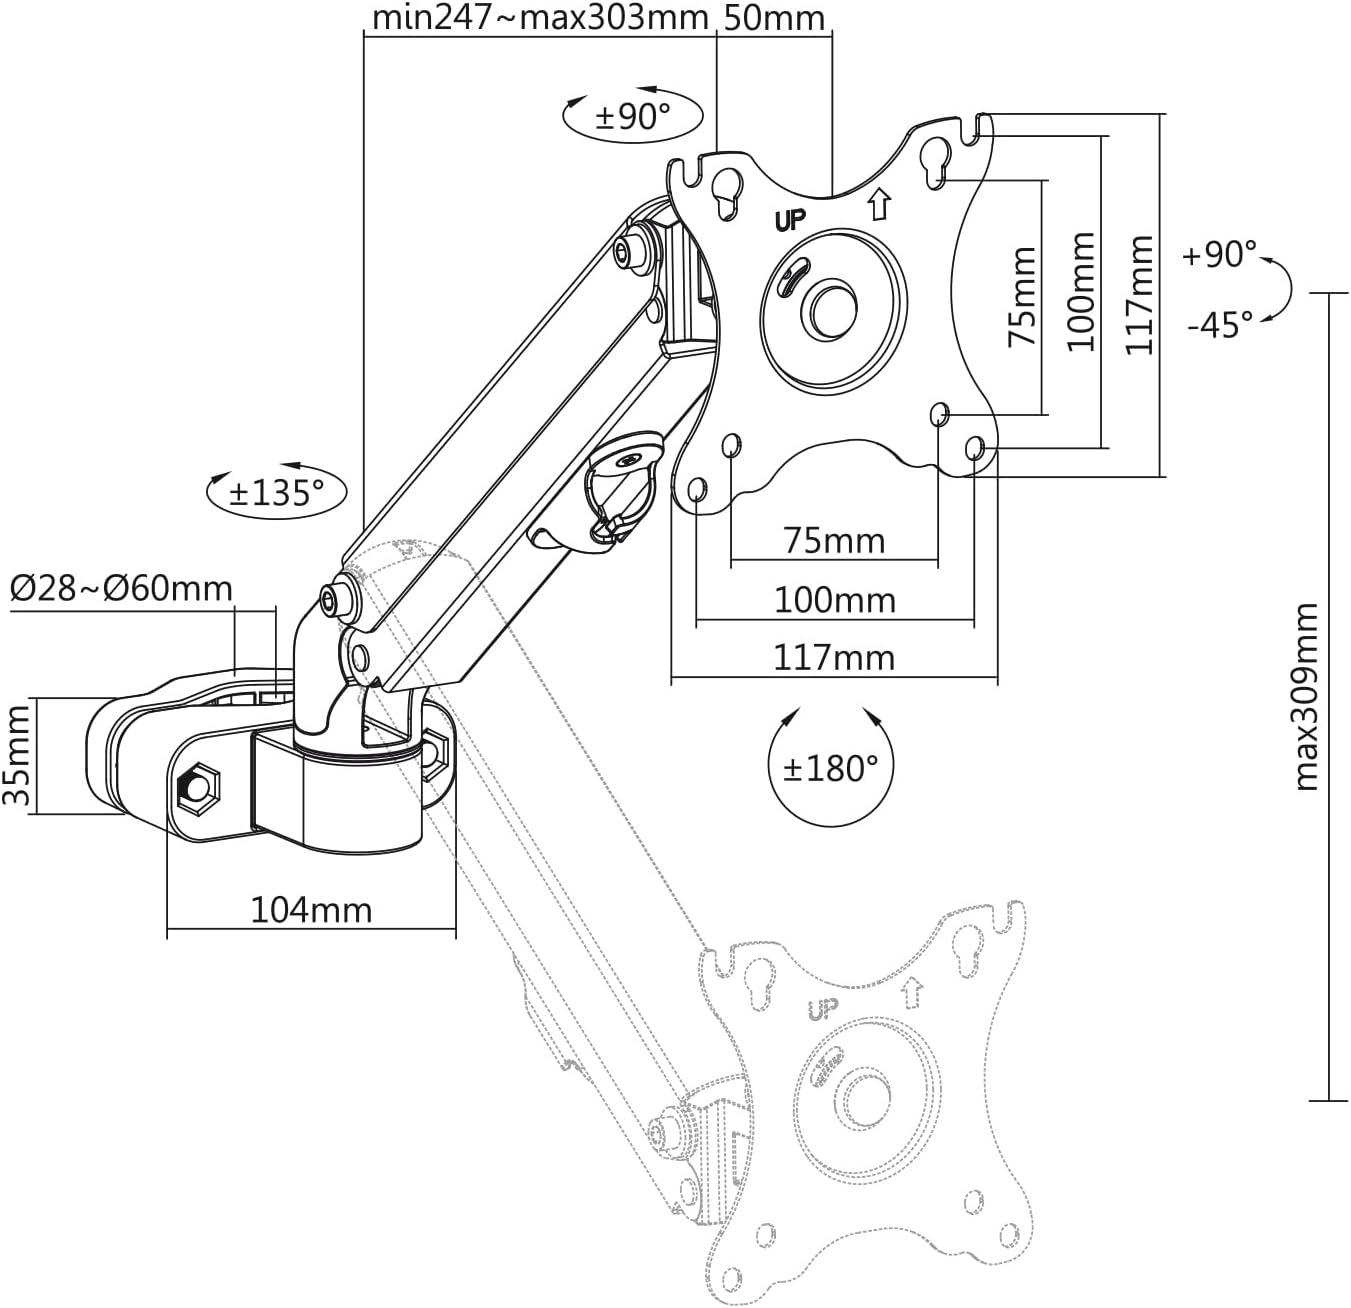
Figure 2: Technical Dimensions
5. Setup and Installation
5.1 Pre-Installation Check
- Ensure your monitor's weight and size are within the specified limits.
- Verify your monitor has VESA 75x75mm or 100x100mm mounting holes.
- Confirm the pole or tube you intend to use has a diameter between 28mm and 60mm and is securely fixed.
5.2 Attaching the Clamp to the Pole/Tube
- Loosen the bolts on the pole/tube clamp using the provided hex key.
- Position the clamp around the desired pole or tube.
- Tighten the bolts securely to ensure the clamp is firmly attached and does not slip.

Figure 3: Clamp Installation on Pole
5.3 Attaching the VESA Plate to the Monitor
- Carefully place your monitor face down on a soft, clean surface.
- Align the VESA plate with the mounting holes on the back of your monitor.
- Select the appropriate screws (M4 or M5) and washers from the hardware kit. Use spacers if necessary to ensure a flush fit and prevent overtightening.
- Secure the VESA plate to the monitor using a screwdriver. Do not overtighten.
5.4 Mounting the Monitor to the Arm
- Slide the VESA plate (with the attached monitor) onto the mounting head of the monitor arm. Ensure it clicks securely into place.
- Tighten any safety screws on the VESA plate connection point if present, as indicated in the detailed diagram in the package.

Figure 4: Monitor Attached to Mount
6. Operating and Adjustment
The Maclean MC-459 features a gas spring for smooth adjustments and multiple articulation points for optimal viewing.
- Height Adjustment: Gently push or pull the monitor to the desired height. The gas spring will hold it in position. If the monitor drifts up or down, adjust the gas spring tension screw (refer to the detailed diagram in your package for location). Turn clockwise to increase tension for heavier monitors, counter-clockwise for lighter monitors.
- Tilt Adjustment: The monitor can be tilted from +90° to -45°. Loosen the tilt joint screw, adjust the angle, and then re-tighten the screw.
- Swivel Adjustment: The monitor arm can swivel ±135° at the pole connection and the VESA plate can swivel ±90°. Simply rotate the monitor to your preferred angle.
- Rotation: The VESA plate allows for 360° rotation, enabling easy switching between landscape and portrait orientations.

Figure 5: Range of Motion
6.1 Cable Management
Integrated cable management clips are provided along the arm to keep your cables organized and out of sight. Route your monitor and power cables through these clips for a tidy setup.
7. Maintenance
- Periodically check all screws and bolts to ensure they remain tight. Re-tighten if necessary.
- Clean the mount with a soft, damp cloth. Avoid abrasive cleaners or solvents.
- Do not lubricate the gas spring mechanism.
8. Troubleshooting
- Monitor drifts up/down: The gas spring tension needs adjustment. Refer to section 6 for instructions on adjusting the gas spring tension screw.
- Monitor is difficult to move: Check if any adjustment screws are overtightened. Loosen them slightly to allow for smoother movement. Ensure the gas spring tension is not too high for a light monitor.
- Mount feels unstable: Ensure the pole/tube clamp is securely tightened to the pole/tube. Also, verify that the VESA plate is properly attached to the monitor and the arm.
- Missing parts: If any parts are missing from the package, contact Maclean customer support immediately.
9. Warranty and Support
Maclean products are designed for durability and performance. For specific warranty information, please refer to the warranty card included with your product or visit the official Maclean website. For technical support or assistance with installation, please contact Maclean customer service through their official channels.
You can find more information and contact details on the Maclean Brand Store.


