Introduction
This manual provides detailed instructions for the installation, operation, and maintenance of your Zomolither Android 13 Car Stereo, model 2G+64G, designed for Hyundai Sonata vehicles from 2010 to 2015. Please read this manual thoroughly before use to ensure proper functionality and safety.
Setup and Installation
Before beginning installation, ensure your vehicle's ignition is off and the battery is disconnected. Professional installation is recommended. This unit is designed for basic version car models. If your vehicle has a factory amplifier or large screen navigation system, additional wiring harnesses or CANbus adapters may be required. Consult the seller for compatibility.
Package Contents:
- Android Car Stereo (with Frame)
- AHD Backup Camera
- External Microphone
- Power Cable
- Installation Tool
- GPS Antenna
- USB Cable
- RCA Cable
- User Manual
Installation Steps:
- Verify Compatibility: Confirm your car's dashboard matches the "Can Install" image. If your car has a factory amplifier or large screen, contact support for specific wiring needs.
- Connect Wiring Harness: Connect the main power cable and other necessary wiring harnesses to the car stereo. Ensure all connections are secure.
- GPS Antenna Installation: Connect the GPS antenna to the designated port on the stereo. Position the antenna in a location with a clear view of the sky for optimal signal reception.
- USB Cable Connection: Connect the provided USB cables for data transfer and charging.
- Backup Camera Installation:
- Connect the yellow RCA video cable from the backup camera to the "Camera Input" port on the car stereo.
- Connect the red wire from the camera's power cable to the positive pole of the car's reversing light.
- Connect the black wire from the camera's power cable to the negative pole (ground) of the car's reversing light.
- Connect the "BACK" line (usually a pink or brown wire) from the main wiring harness to the positive pole of the car's reversing light. This signal triggers the stereo to display the camera feed when reverse gear is engaged.
- External Microphone Connection: Plug the external microphone into its dedicated input for improved call quality.
- Secure the Unit: Carefully place the car stereo into the dashboard opening and secure it using the provided installation tools and screws.
- Reconnect Battery: Once all connections are verified, reconnect the vehicle's battery.
- Initial Power On: Turn on the vehicle's ignition and power on the car stereo. Perform initial setup and testing of all functions.
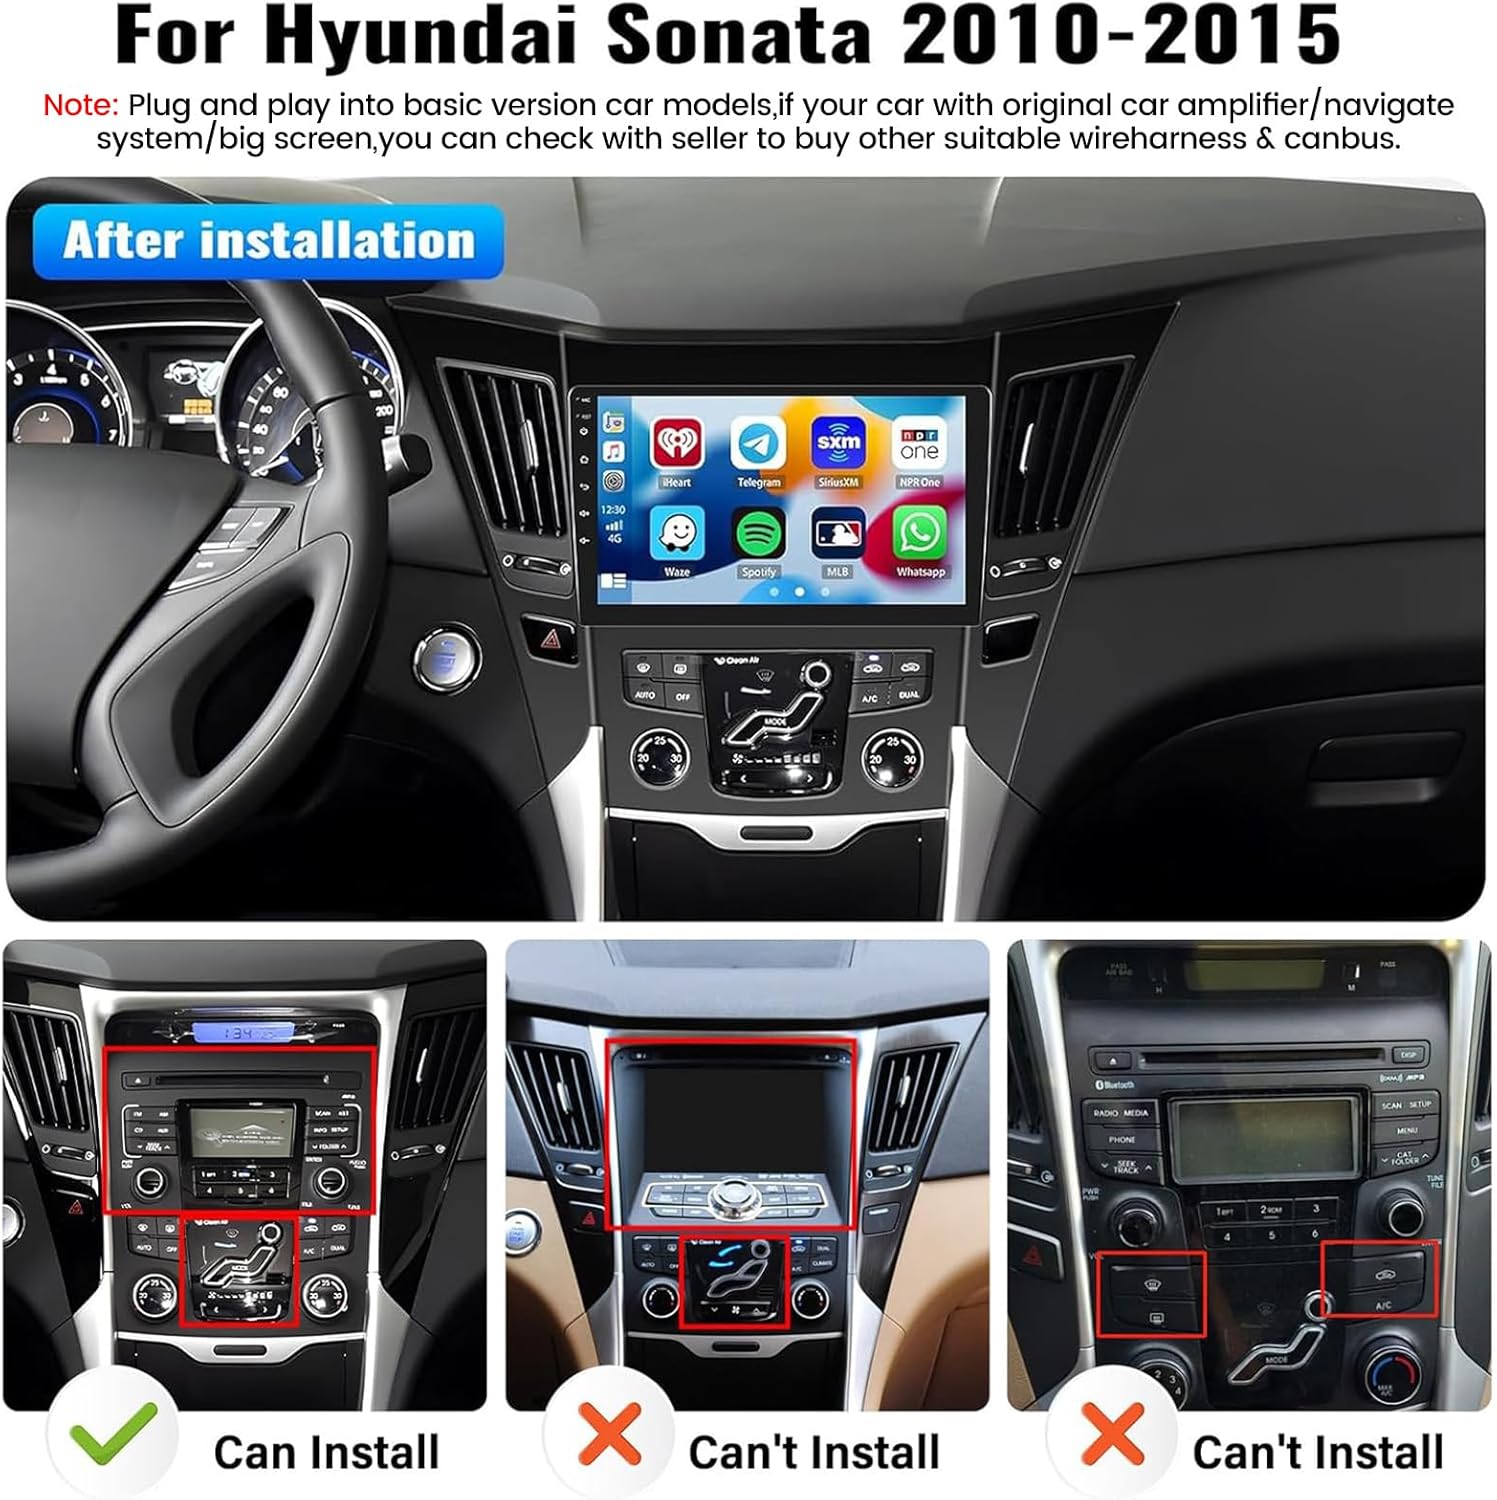
Image: Dashboard compatibility guide. The top image shows the car stereo installed. The bottom row shows three dashboard types: left (Can Install), middle (Can't Install), right (Can't Install). Ensure your vehicle's dashboard matches the 'Can Install' configuration.
Video: This video demonstrates the wiring process for connecting the backup camera to the car stereo. It shows how to connect the video input, power, and trigger wires for proper functionality.
Operating Instructions
Basic Navigation:
The 9-inch HD touchscreen provides access to all functions. Swipe left/right to navigate between app screens. Tap icons to launch applications.
Wireless Apple CarPlay & Android Auto:
This unit supports wireless Apple CarPlay and Android Auto via the Zlink App. This allows seamless integration of your smartphone for navigation, calls, messages, and music.
- Ensure Bluetooth and Wi-Fi are enabled on your smartphone.
- On the car stereo, open the "Zlink" application.
- Go to your phone's Bluetooth settings and search for "Car BT" (or similar name displayed on the stereo).
- Pair your phone with the car stereo via Bluetooth. Confirm the pairing code if prompted.
- Once connected, the system may automatically prompt to use CarPlay/Android Auto. Select "Use CarPlay" or "Use Android Auto".
- Your phone's interface will then be displayed on the car stereo screen.
Video: This video demonstrates the steps to wirelessly connect your smartphone to the car stereo using Apple CarPlay, showing the pairing process via Bluetooth and the subsequent activation of CarPlay.
GPS Navigation & Wi-Fi:
The unit supports online and offline navigation. Connect to a Wi-Fi hotspot (e.g., from your phone) to download maps and access real-time traffic information via Google Maps or other navigation apps from the Play Store.

Image: The car stereo displaying a navigation map with various app icons around it, illustrating GPS navigation and Wi-Fi hotspot capabilities.
Bluetooth & FM Radio:
- Bluetooth: Pair your phone for hands-free calling and audio streaming. Access contacts and call history directly from the stereo.
- FM Radio: Tune into FM stations. The unit supports 18 preset stations for quick access to news, music, and sports.

Image: The car stereo screen showing Bluetooth connection interface and FM radio interface with a graphic of a radio.
Mirror Link:
Mirror Link allows you to display your phone's screen on the car stereo. For iOS phones, this is a one-way projection via Wi-Fi. For Android phones, it supports two-way operation via Wi-Fi or USB.

Image: The car stereo screen mirroring a smartphone display, illustrating the Mirror Link feature for both iOS (Wi-Fi) and Android (USB/Wi-Fi).
Steering Wheel Control:
The unit supports steering wheel controls, allowing you to manage volume, change radio channels, and switch songs safely while driving. The system can learn and map your vehicle's steering wheel buttons.

Image: The car stereo displaying the steering wheel control interface and a separate section showing the backup camera view with parking lines.
Maintenance
- Screen Cleaning: Use a soft, lint-free cloth to clean the touchscreen. Avoid abrasive cleaners or solvents that could damage the screen.
- Software Updates: Periodically check for software updates to ensure optimal performance and access to new features. Updates can typically be found on the manufacturer's website or through the device's settings when connected to Wi-Fi.
- General Care: Keep the unit free from dust and extreme temperatures. Avoid spilling liquids on the device.
Troubleshooting
| Problem | Possible Cause | Solution |
|---|---|---|
| Unit does not power on. | Incorrect wiring, blown fuse, disconnected battery. | Check power cable connections. Verify vehicle fuses. Ensure battery is properly connected. |
| No sound. | Volume too low, incorrect audio source, speaker wiring issues. | Increase volume. Select correct audio source. Check speaker connections. |
| Backup camera not displaying. | Incorrect camera wiring, faulty camera, "BACK" line not connected. | Verify all camera connections (video, power, trigger). Ensure the "BACK" line is connected to the reverse light positive. |
| Bluetooth/CarPlay/Android Auto not connecting. | Bluetooth/Wi-Fi off on phone, incorrect pairing, Zlink app issue. | Ensure phone's Bluetooth/Wi-Fi is on. Re-pair device. Restart Zlink app and phone. |
| GPS signal weak or inaccurate. | GPS antenna obstruction, poor antenna placement. | Relocate GPS antenna to a position with a clear view of the sky. Ensure antenna cable is securely connected. |
If you encounter issues not listed here or require further assistance, please contact Zomolither customer support.
Specifications
- Model: 2G+64G
- Operating System: Android 13
- Display Size: 9 Inches
- Resolution: 1024 x 600
- Memory: 2GB RAM, 64GB ROM
- Connectivity: Bluetooth, USB, Wi-Fi, Wireless
- Special Features: Wireless Apple CarPlay, Wireless Android Auto, Mirror Link, GPS Navigation, FM Radio, Touchscreen, Backup Camera Input, Steering Wheel Control
- Vehicle Service Type: Car (Hyundai Sonata 2010-2015)
- Included Components: Android Car Stereo (with Frame), AHD Backup Camera, External Microphone, Power Cable, Installation Tool, GPS Antenna, USB Cable, RCA Cable, User Manual
- Product Dimensions: Approximately 0.39 x 0.39 x 0.39 inches (Unit dimensions, frame adds to overall size)
- Item Weight: Approximately 3.74 pounds
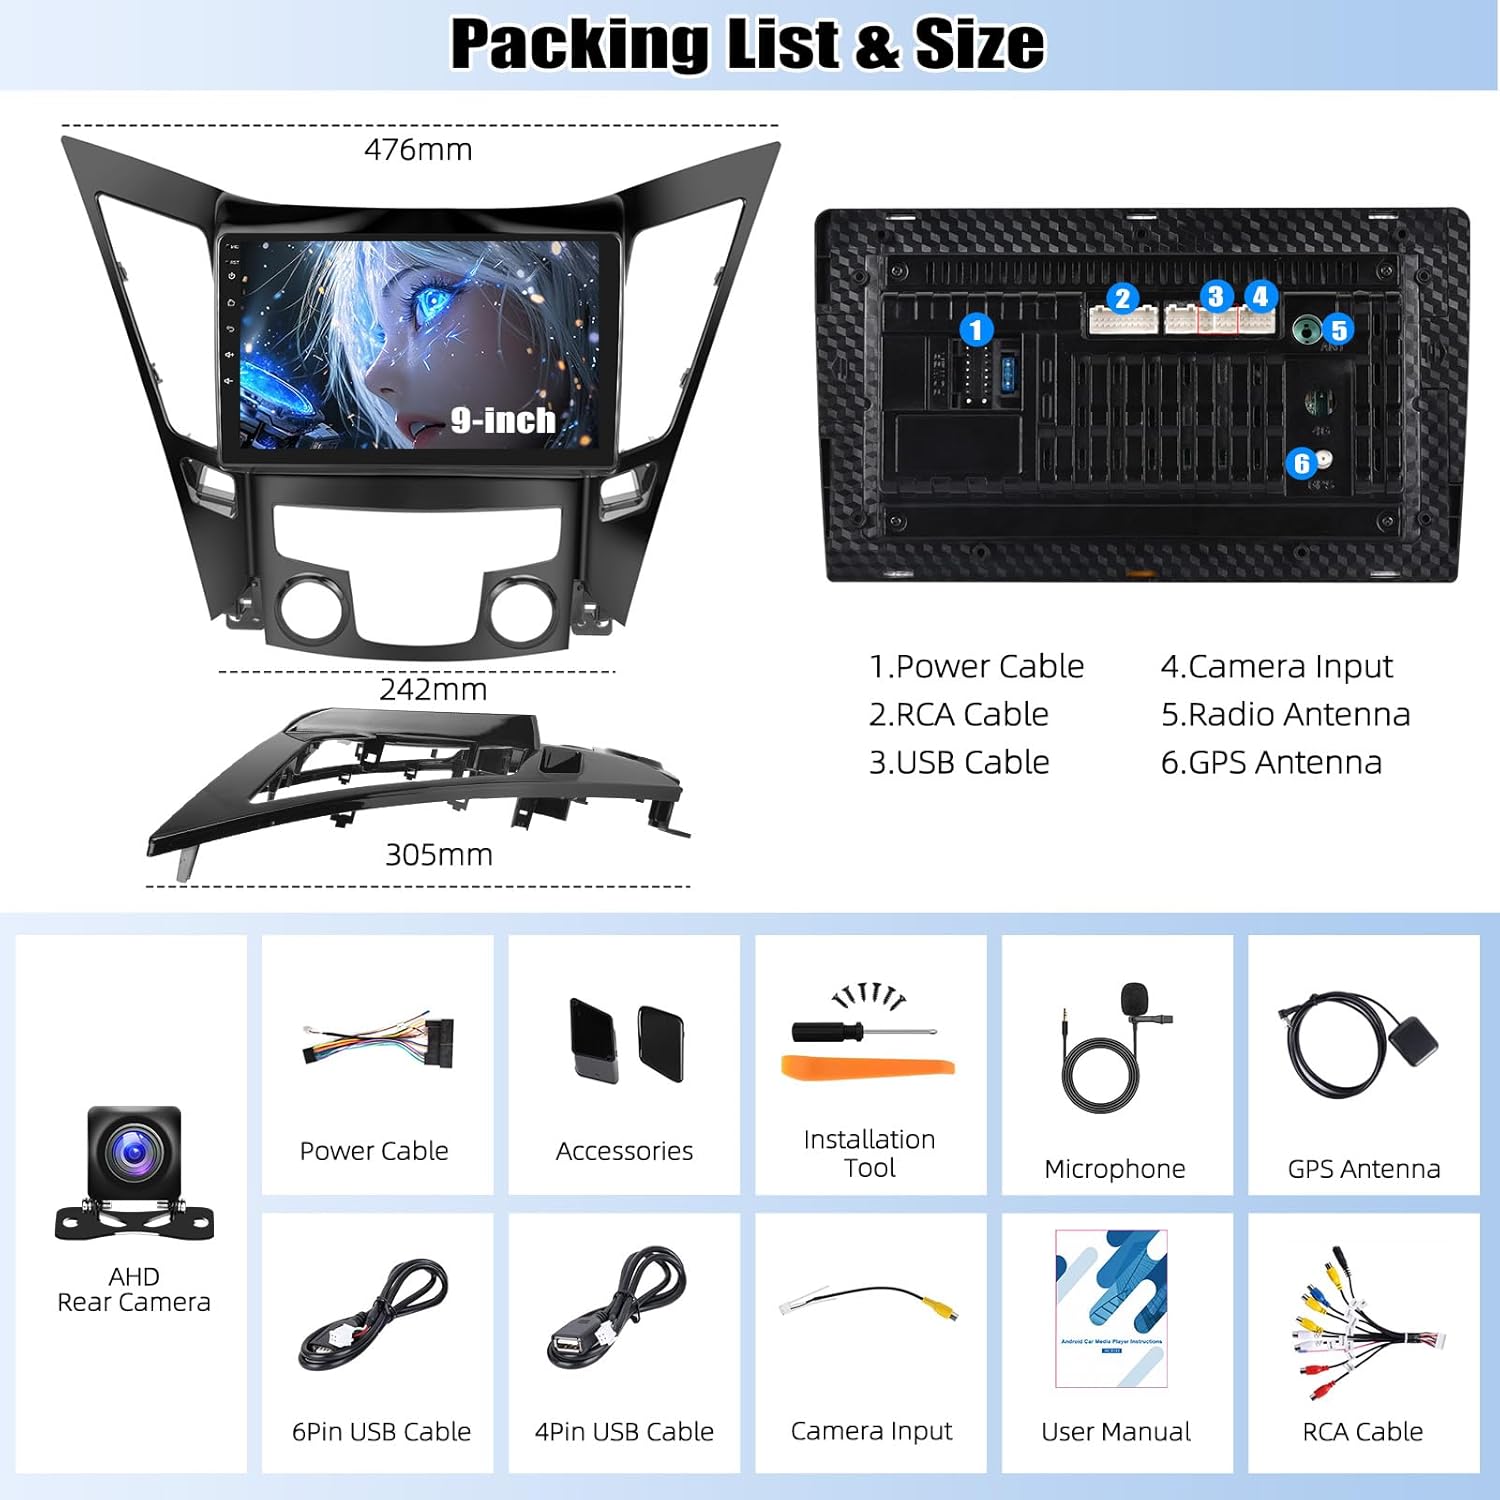
Image: Diagram showing the dimensions of the 9-inch car stereo and a detailed list of included components and their connections (Power Cable, RCA Cable, USB Cable, Camera Input, Radio Antenna, GPS Antenna).
Warranty and Support
Zomolither offers a 1-year warranty on this product. For warranty claims, technical support, or any questions regarding installation and operation, please contact Zomolither customer service. Refer to your purchase documentation for specific contact details or visit the official Zomolither store on Amazon.
- Warranty Period: 1 Year
- Return Policy: 30-day refund, 12-month replacement
- Online Support: Zomolither@126.com
- Amazon Store: Visit the Zomolither Store