
1. Introduction
Thank you for choosing the Golpart Heavy Duty Clothes Rack. This robust and versatile storage solution is designed to help you organize your wardrobe efficiently. Crafted from sturdy black-coated steel, this rack offers significant storage capacity and features adjustable wire shelves and multiple hanging rods to suit various needs. Please read this manual carefully before assembly and use to ensure proper installation and safe operation.

Figure 1: Fully assembled Golpart Heavy Duty Clothes Rack, showcasing its storage capabilities.
2. Safety Information
- Always assemble the rack on a flat, stable surface to prevent tipping.
- Do not exceed the maximum load capacity of 800 lbs for the entire unit, or 80 lbs per hanging rod.
- Ensure all connections are securely tightened before placing items on the rack.
- Keep small parts away from children during assembly to prevent choking hazards.
- Utilize the included anti-tip device to secure the rack to a wall, especially if placed in an area with heavy traffic or if children are present.
- Avoid climbing on the rack or allowing children to play on or around it.
3. Package Contents
Please verify that all components are present before beginning assembly:
- 1-Pack Assembly Accessories (includes plastic clips, screws, wall anchors)
- 1-Pcs User Manual
- 3-Pcs Hanging Rods
- 6-Pcs Wire Shelves
- 20-Pcs Connection Pipes (poles)
4. Setup and Assembly
Assembly typically takes 20-30 minutes and is recommended for two people. Follow these steps for a smooth setup:
4.1. Watch the Installation Video
Video: Official installation guide for the Golpart Heavy Duty Clothes Rack. This video provides a visual step-by-step walkthrough of the assembly process, demonstrating how to connect components and secure the structure.
4.2. Step-by-Step Assembly
- Install Plastic Clips: Attach the plastic clips to the poles at your desired shelf height. Ensure the arrows on the clips point upwards and the flange fits into the groove. Slide them up or down until you hear a click, securing them firmly in place.
- Assemble Wire Shelves: Carefully slide the wire shelves down onto the poles until the sleeves fit snugly onto the plastic clips. Use a rubber mallet to gently tap the shelves into place for a secure fit.
- Connect Poles: For taller sections, connect the upper and lower pole segments by screwing them together. Ensure they are tightly joined.
- Install Hanging Rods and Hooks: Attach the hanging rods and side hooks to the designated points on the frame. These can be adjusted to different heights as needed.
- Secure with Anti-Tip Device: For added stability and safety, especially in homes with children or pets, use the provided anti-tip device to secure the rack to a wall. Follow the instructions included with the anti-tip kit.
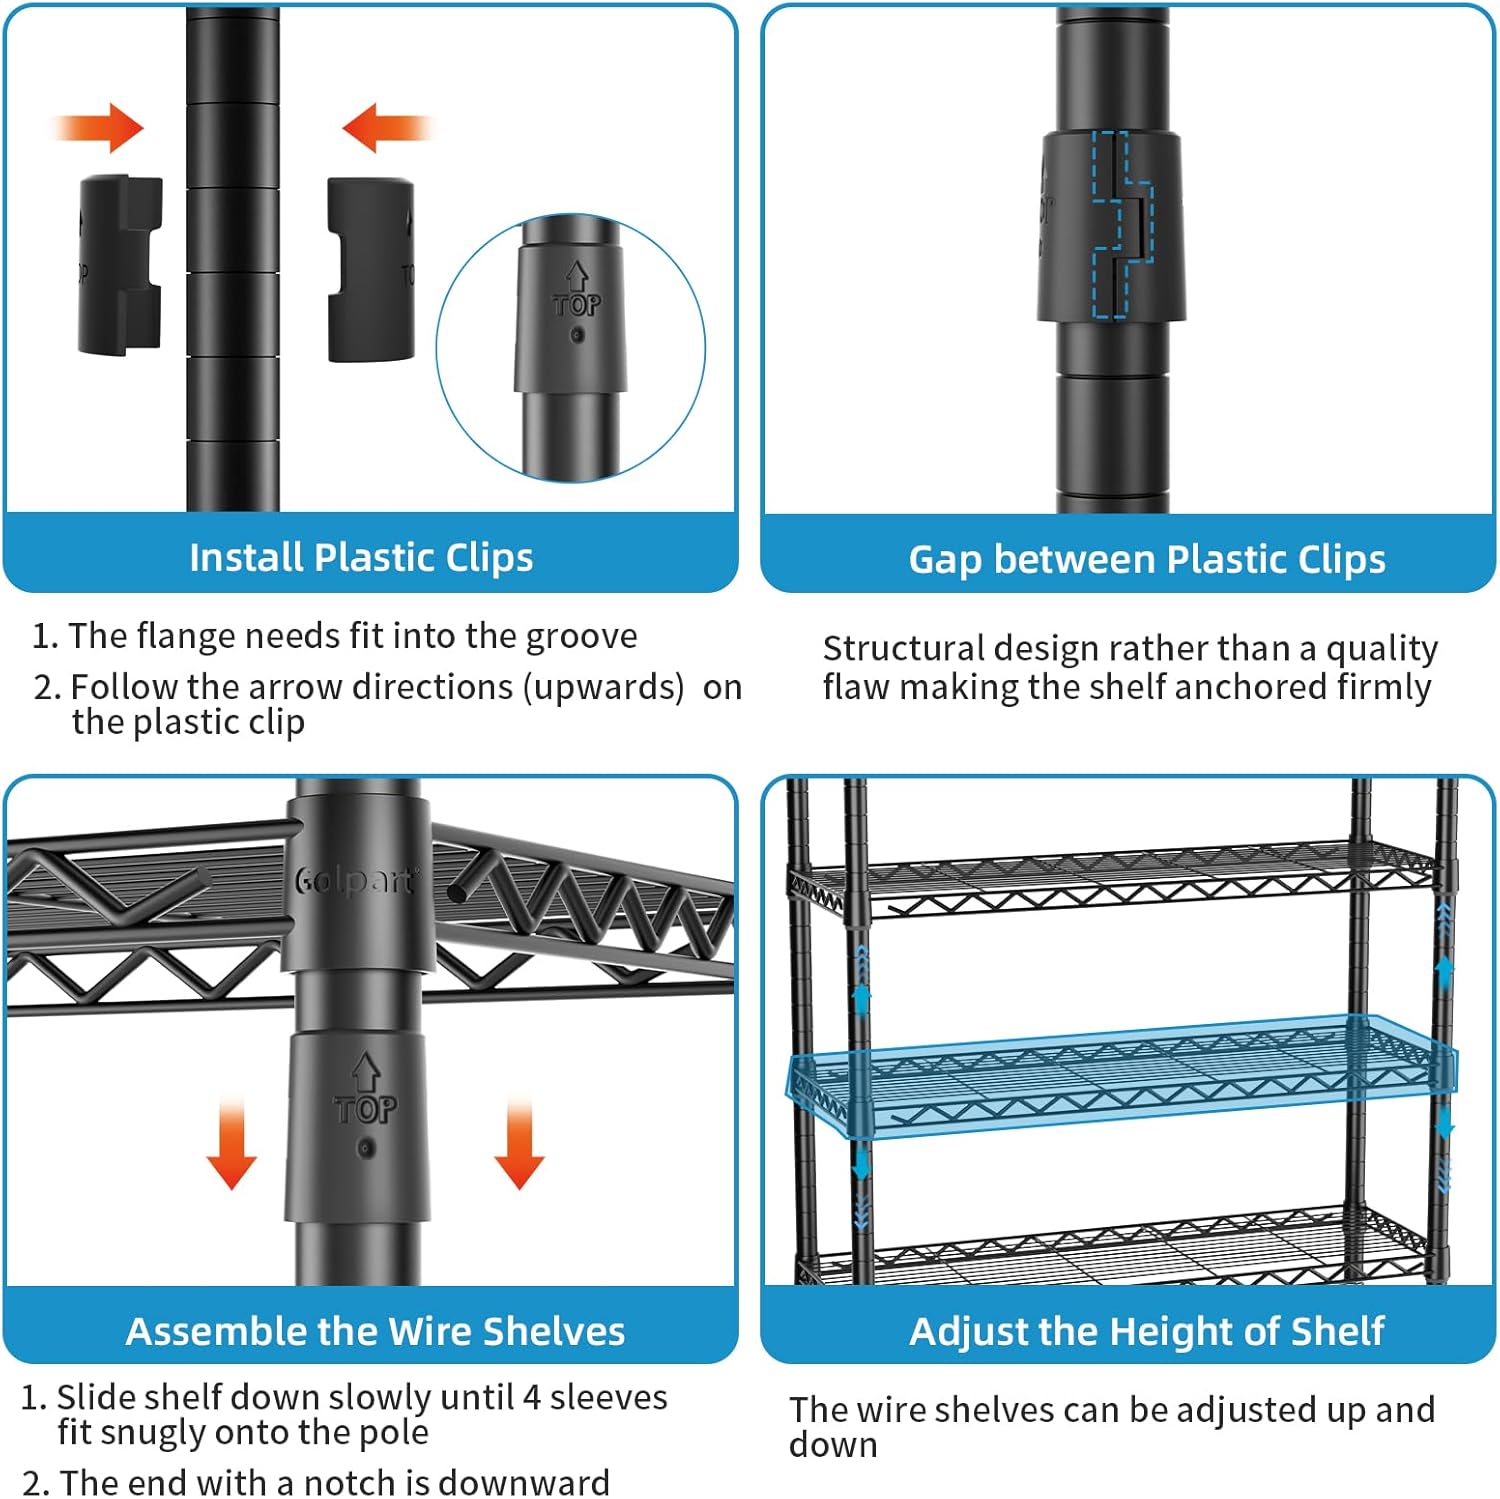
Figure 2: Visual guide for installing plastic clips and assembling wire shelves onto the poles.
5. Operating Instructions
The Golpart Heavy Duty Clothes Rack is designed for versatile use:
- Adjustable Shelves: The 4 wire shelves can be adjusted in 1-inch increments. To adjust, simply remove the shelf, reposition the plastic clips to the desired height, and re-install the shelf. This allows for customized storage of folded clothes, boxes, or shoes.
- Hanging Rods: Utilize the 3 hanging rods for suits, coats, dresses, shirts, and other hanging garments. The rods are designed to support heavy clothing.
- Side Hooks: The 2 side hooks provide convenient spots for hanging bags, hats, scarves, or other accessories.
- L-shaped Configuration: The modular design allows for an L-shaped setup, optimizing space in corners or specific room layouts.

Figure 3: Overview of the free-standing clothes rack, highlighting different storage sections.

Figure 4: Example of the clothes rack configured into an L-shape to fit a corner space.
6. Maintenance and Care
- Cleaning: Wipe down the rack with a soft, damp cloth. Avoid abrasive cleaners or harsh chemicals that could damage the finish.
- Inspection: Periodically check all connections and fasteners to ensure they remain tight and secure. Re-tighten if necessary.
- Load Management: Distribute weight evenly across shelves and hanging rods to maintain stability and prevent deformation.
7. Troubleshooting
- Rack is Wobbly:
- Ensure all poles are fully inserted into their connectors and all shelves are securely seated on the plastic clips.
- Verify that the plastic clips are correctly installed with the flange fitting into the groove and the arrows pointing upwards.
- Check if the rack is on a level surface. Adjust the leveling feet if necessary.
- Difficulty Adjusting Shelves:
- Ensure the plastic clips are properly aligned with the grooves on the poles.
- Apply gentle, even pressure when sliding shelves down onto the clips. A rubber mallet can assist in seating the shelves.
- Missing Parts:
- Refer to the "Package Contents" section. If any parts are missing, please contact Golpart customer support.
8. Specifications
| Brand | Golpart |
| Model Number | EA_419B |
| Color | Black |
| Material | Carbon Steel |
| Product Dimensions | 15.75"D x 62.25"W x 76.75"H |
| Load Capacity | 800 Pounds (Overall) |
| Number of Shelves | 4 |
| Installation Type | Free Standing |
| Assembly Required | Yes |
| Item Weight | 28.4 Pounds |

Figure 5: Key dimensions and maximum weight capacity of the Golpart Clothes Rack.
9. Warranty and Support
For any questions, concerns, or assistance with your Golpart Heavy Duty Clothes Rack, please contact our customer support. While specific warranty details are not provided in this manual, additional protection plans may be available for purchase. Please refer to your purchase documentation or contact your retailer for more information regarding product warranty and support services.

