1. Introduction
The Stetsom EQX764-7 Band Equalizer is a high-performance car audio graphic equalizer designed to provide precise control over your vehicle's sound system. This unit features a pre-amplifier and a 10V line driver, which helps to minimize noise and deliver a strong, clear audio signal to your amplifiers. With 7 adjustable equalization bands, dedicated subwoofer controls, and multiple input/output options, the EQX764 allows for detailed sound customization to suit your preferences.
2. Safety Information
- Professional Installation Recommended: For optimal performance and safety, installation by a qualified car audio technician is highly recommended.
- Disconnect Battery: Always disconnect the vehicle's negative battery terminal before beginning any electrical installation to prevent short circuits and damage.
- Proper Fusing: Ensure the power connection includes an appropriate fuse (1A maximum, within 1 foot of the battery) to protect the unit and your vehicle's electrical system.
- Avoid Moisture: Do not expose the unit to water or excessive moisture.
- Secure Mounting: Mount the equalizer securely to prevent it from becoming a projectile in the event of sudden stops or accidents.
- Ventilation: Ensure adequate ventilation around the unit to prevent overheating.
3. Package Contents
Please check the package for the following items:
- Stetsom EQX764-7 Band Equalizer Unit
- Mounting Brackets
- High Input Connector (Wire)
- Mounting Screws
4. Product Overview
The Stetsom EQX764 features a user-friendly layout with clearly labeled controls and connections. Understanding each component is essential for proper setup and operation.
Front Panel Controls
The front panel provides access to all audio adjustment controls, illuminated by blue LEDs for visibility.
- SUB LEVEL: Adjusts the output level of the subwoofer channel.
- SUB FREQ: Adjusts the crossover frequency for the subwoofer output.
- HIGH/MAIN Input Switch: Selects between High-Level input and RCA (Main) input.
- HIGH LEVEL: Adjusts the input sensitivity for the High-Level input.
- MAIN LEVEL: Adjusts the input sensitivity for the RCA (Main) input.
- FADER FRONT/REAR: Balances the audio output between the front and rear channels.
- 7-Band Equalization Controls: Individual rotary controls for adjusting the gain (+/-12dB) at specific frequencies: 50Hz, 125Hz, 315Hz, 750Hz, 2.2KHz, 6KHz, and 16KHz.
Rear Panel Connections
The rear panel houses all input and output connections.
- R SUB L OUT: Left and Right RCA outputs for the subwoofer amplifier.
- HIGH-IN: High-level input for connecting to factory head units without RCA outputs.
- R MAIN L IN: Left and Right RCA inputs for the main audio source.
- R REAR L OUT: Left and Right RCA outputs for the rear full-range amplifier.
- R FRONT L OUT: Left and Right RCA outputs for the front full-range amplifier.
- REM +: Remote turn-on input and power input terminals.


5. Setup & Installation
Follow these steps for proper installation of your EQX764 equalizer.
5.1 Mounting the Unit
Use the provided mounting brackets and screws to secure the EQX764 in a suitable location within your vehicle. Ensure the location allows for easy access to controls and adequate ventilation.

5.2 Power and Remote Activation
Connect the EQX764 to your vehicle's electrical system as follows:
- Connect the +12V terminal to the vehicle's positive battery terminal using a 20AWG cable. Install a 1A fuse within 1 foot of the battery.
- Connect the GND terminal to a clean chassis ground point.
- Connect the REM (remote) terminal to the remote output of your car radio/player using a 20AWG cable. This will turn the equalizer on and off with your head unit.

5.3 Audio Connections
The EQX764 supports both RCA and High-Level inputs and provides dedicated outputs for front, rear, and subwoofer channels.
- Input Source:
- For head units with RCA outputs, connect the RCA cables from your head unit to the R MAIN L IN ports on the EQX764.
- For factory head units or those without RCA outputs, use the provided High Input Connector to connect speaker-level wires from your head unit to the HIGH-IN terminals.
- Output to Amplifiers:
- Connect RCA cables from the R FRONT L OUT ports to your front full-range amplifier.
- Connect RCA cables from the R REAR L OUT ports to your rear full-range amplifier.
- Connect RCA cables from the R SUB L OUT ports to your subwoofer amplifier.

6. Operating Instructions
Once installed, the EQX764 allows for fine-tuning of your audio system.
6.1 Input Selection and Level Adjustment
- Select Input: Use the HIGH/MAIN switch to select the appropriate input source (High-Level or RCA).
- Adjust Input Level: Use the HIGH LEVEL or MAIN LEVEL knobs to match the output voltage of your head unit. Start with these controls at their minimum and slowly increase until a clear, undistorted sound is achieved at a moderate volume from your head unit.
6.2 Fader Control
The FADER FRONT/REAR knob allows you to adjust the balance of sound between your front and rear speakers. Turn it towards 'FRONT' to emphasize front speakers or towards 'REAR' for rear speakers.
6.3 7-Band Equalization
Each of the seven rotary knobs corresponds to a specific frequency band, allowing you to boost or cut frequencies by up to 12dB. Adjust these controls to shape the sound to your preference:
- 50Hz: Controls the deepest bass frequencies.
- 125Hz: Affects mid-bass and warmth.
- 315Hz: Influences the lower midrange, body of vocals and instruments.
- 750Hz: Controls the central midrange, clarity of vocals.
- 2.2KHz: Affects upper midrange, presence of instruments.
- 6KHz: Controls lower treble, brightness of cymbals and higher frequencies.
- 16KHz: Adjusts the highest treble frequencies, airiness and sparkle.
6.4 Subwoofer Controls
The dedicated subwoofer controls provide precise management of your bass output:
- SUB LEVEL: Adjust the overall volume of the subwoofer output.
- SUB FREQ: Set the low-pass crossover frequency for the subwoofer. This determines the highest frequency that will be sent to your subwoofer amplifier. Adjust this to blend seamlessly with your main speakers.
7. Specifications
| Feature | Specification |
|---|---|
| Inputs | MAIN (RCA) and HIGH IN (Wire) |
| Outputs | SUB OUT, FRONT and REAR |
| SUB Level and Frequency Control | Yes |
| Input Selector | MAIN and HIGH |
| Level Controls | MAIN and HIGH |
| Fader Control | FRONT and REAR |
| Equalizer Bands | 7-band (-12dB = +12dB) |
| SUB Frequency Control Range | 60Hz - 90Hz |
| V OUT @ 14.4V (Subwoofer) | 10V RMS |
| V OUT @ 14.4V (Front & Rear) | 8.5V RMS (Line Driver) |
| Input Sensitivity (Main RCA) | 3.3V RMS @ 14.4V |
| Input Sensitivity (High Wire) | 25V RMS @ 14.4V |
| Input Impedance (Main RCA) | 20K Ohms |
| Input Impedance (High Wire) | 1K Ohms |
| Output Impedance | 47 Ohms |
| Frequency Response | 5Hz - 140KHz |
| THD | < 0.1% |
| SNR | > 100dB |
| Crosstalk | > 85dB |
| Supply Voltage | 9V - 16V DC |
| Max Consumption @ 12.6V | 290mA |
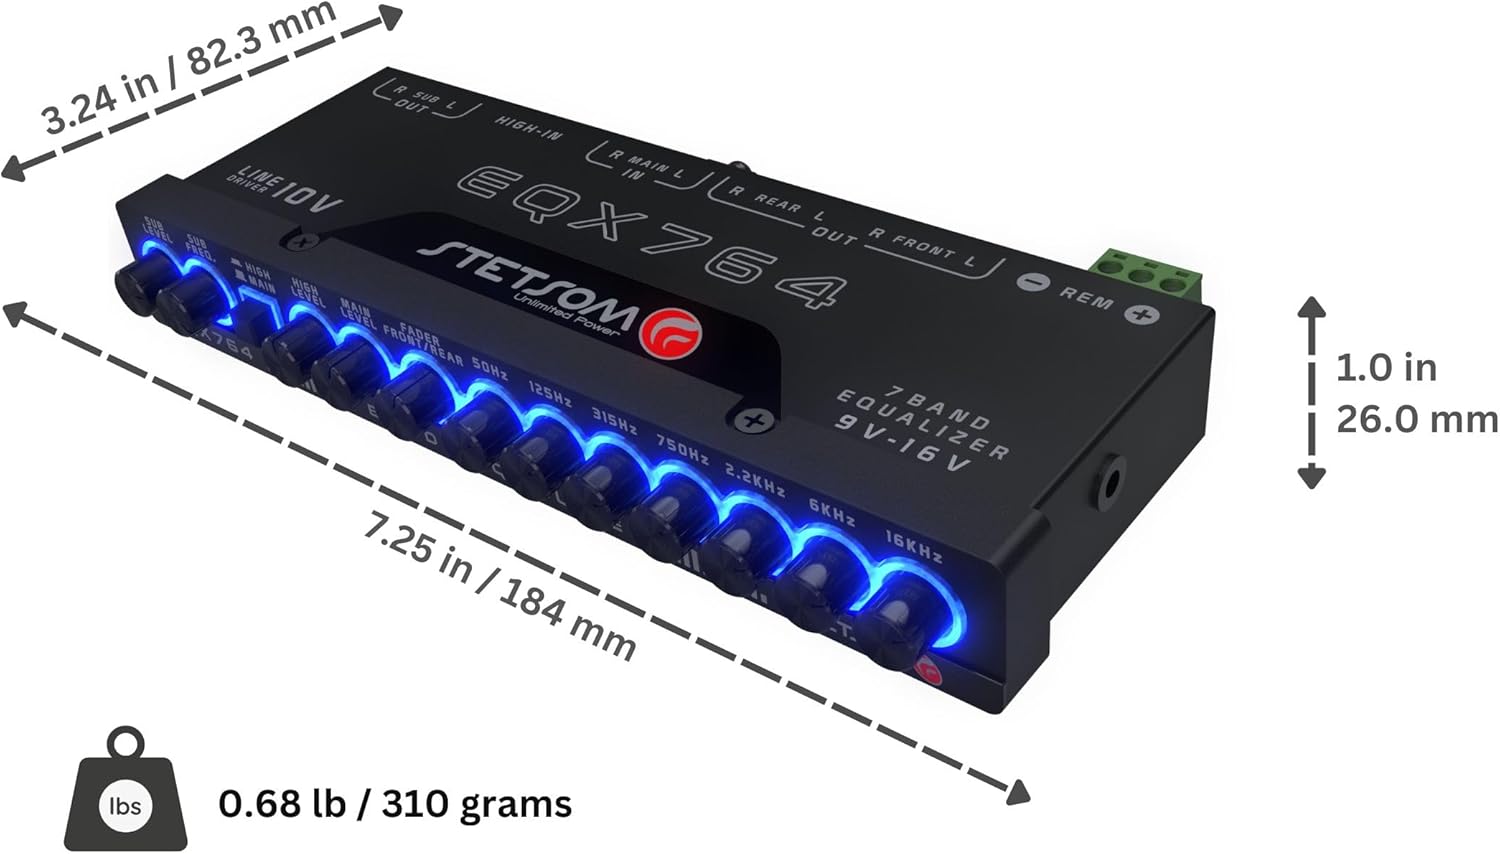
| Dimensions (L x W x H) | 7.25" x 3.24" x 1" (184 x 82.3 x 26 mm) |
| Weight | 0.68 lb / 310 grams |
8. Troubleshooting
If you encounter issues with your EQX764, refer to the following common problems and solutions:
- No Power:
- Check all power connections (+12V, GND, REM) for secure contact.
- Verify the 1A fuse near the battery is intact. Replace if blown.
- Ensure the remote wire from the head unit is providing a +12V signal when the head unit is on.
- No Sound Output:
- Confirm the correct input source (HIGH or MAIN) is selected via the switch.
- Check all RCA and High-Level input/output connections for proper seating.
- Ensure the HIGH LEVEL and MAIN LEVEL controls are not set to minimum.
- Verify that connected amplifiers are powered on and receiving a signal.
- Distorted Sound:
- Reduce the HIGH LEVEL or MAIN LEVEL input sensitivity.
- Lower the gain settings on your amplifiers.
- Ensure none of the equalization bands are boosted excessively.
- Hissing or Engine Noise:
- Ensure the EQX764 and all amplifiers have a solid, clean ground connection.
- Route RCA cables away from power cables to prevent interference.
- Check for proper grounding of the head unit.
9. Maintenance
The Stetsom EQX764 is designed for durability and requires minimal maintenance.
- Cleaning: Use a soft, dry cloth to clean the unit. Avoid abrasive cleaners or solvents.
- Connections: Periodically check all wiring connections to ensure they remain secure and free from corrosion.
10. Warranty and Support
Stetsom products are manufactured to high-quality standards. For warranty information, technical support, or service inquiries, please refer to the warranty card included with your product or visit the official Stetsom website. Keep your purchase receipt as proof of purchase for any warranty claims.
For additional assistance, you may contact Stetsom customer support through their official channels.


