
1. Introduction
Thank you for choosing the Vector Optics Forester 6x21 OLED Rangefinder GenII 1600 Yards (SCRF-16). This device is designed for precise distance measurement, offering a 6x magnification and an OLED display for clear readings in various lighting conditions. It is suitable for a range of outdoor activities, including golf and hunting. This manual provides essential information for the safe and effective use of your rangefinder.
2. Safety Information
WARNING: LASER RADIATION
This product emits Class 1 laser radiation (905nm, invisible). Avoid direct eye exposure to the laser beam. Do not look directly into the sun through the rangefinder. Always use the device responsibly and in accordance with local regulations.
- Do not disassemble or modify the device.
- Keep out of reach of children.
- Use only the specified battery type (CR2).
3. Package Contents
Upon opening the package, please verify that all items are present and in good condition:
- Vector Optics Forester 6x21 OLED Rangefinder GenII 1600 Yards (SCRF-16)
- Protective Carrying Case (typically included)
- Cleaning Cloth (typically included)
- User Manual (this document)
Note: A CR2 battery is required for operation and is not included in the package.

Image 3.1: Product packaging for the Vector Optics Forester 6x21 OLED Rangefinder.
4. Product Overview
Familiarize yourself with the components of your rangefinder:

Image 4.1: Front view of the rangefinder, showing the objective lens and laser emitter/receiver.
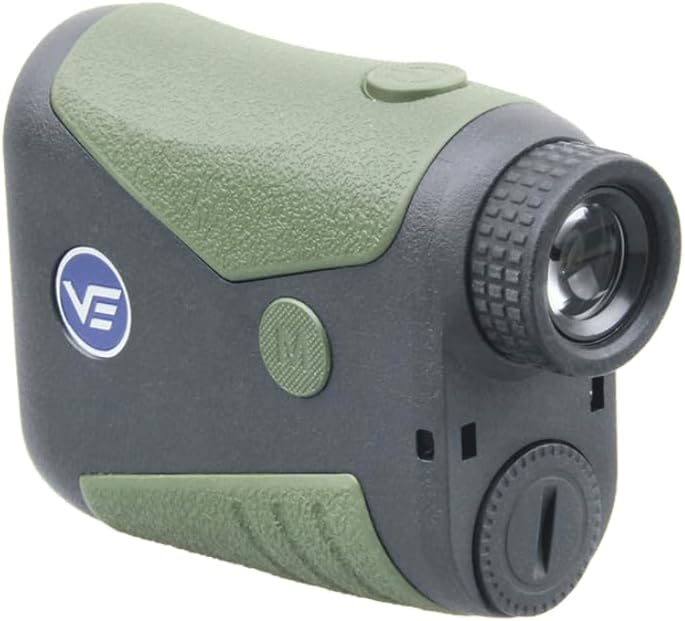
Image 4.2: Rear view, highlighting the eyepiece with diopter adjustment and the 'M' (Mode) button.

Image 4.3: Side view, illustrating the main power/measurement button.

Image 4.4: Bottom view, showing the battery compartment cap.
5. Setup
5.1 Battery Installation
- Locate the battery compartment cap on the bottom of the rangefinder (refer to Image 4.4).
- Rotate the cap counter-clockwise to open.
- Insert one CR2 3V battery, ensuring the positive (+) and negative (-) terminals are correctly aligned as indicated inside the compartment.
- Replace the cap and rotate it clockwise to secure.
5.2 Power On/Off
Press the main power/measurement button (refer to Image 4.3) once to power on the device. The OLED display will activate. The device will automatically power off after 20 seconds of inactivity to conserve battery life.
5.3 Diopter Adjustment
To ensure a clear view of the display and target, rotate the eyepiece (refer to Image 4.2) until the reticle and measurements appear sharp and in focus for your vision.
6. Operating Instructions
6.1 Basic Measurement
- Power on the device by pressing the main power/measurement button.
- Aim the reticle at your desired target.
- Press the main power/measurement button again. The distance will be displayed on the OLED screen within approximately 0.2 seconds.
6.2 Mode Selection
Press the 'M' (Mode) button (refer to Image 4.2) to cycle through different measurement modes. The available modes typically include:
- Standard Measurement: Displays direct line-of-sight distance.
- Pin Lock Mode: Designed for golf, this mode helps to lock onto the flagstick, ignoring background objects. It can lock onto targets up to 450 yards.
- Angle Measurement: Provides the angle of inclination/declination to the target.
- Horizontal Distance (Slope Compensation): Calculates the true horizontal distance to the target, compensating for uphill or downhill slopes.
6.3 Unit Switching (Yards/Meters)
To switch between yards and meters, press and hold the 'M' (Mode) button for a few seconds while the device is powered on. The unit displayed on the OLED screen will change.
6.4 Quick Scan Feature
For continuous measurement, press and hold the main power/measurement button. The device will continuously scan and display distances as you pan across multiple targets. Release the button to stop scanning.
7. Maintenance
7.1 Cleaning
- Use the provided cleaning cloth or a soft, lint-free cloth to gently wipe the lenses. Avoid using abrasive materials or harsh chemicals.
- For the body of the rangefinder, a damp cloth can be used. Ensure no moisture enters the battery compartment or other openings.
7.2 Storage
- When not in use, store the rangefinder in its protective carrying case.
- Store in a cool, dry place, away from direct sunlight and extreme temperatures.
- Remove the battery if the device will not be used for an extended period to prevent leakage.
8. Troubleshooting
| Problem | Possible Cause | Solution |
|---|---|---|
| Device does not power on. | Battery is dead or incorrectly installed. | Replace the CR2 battery or ensure it is inserted with correct polarity. |
| Inaccurate or inconsistent readings. |
|
|
| Display is blurry. | Diopter not adjusted correctly. | Rotate the eyepiece to adjust the diopter until the display is clear. |
| Cannot lock onto flag (Pin Lock Mode). | Flag is beyond the maximum pin lock range (450 yards) or too small. | Ensure the flag is within range and try to hold the device steady. |
9. Specifications
| Feature | Specification |
|---|---|
| Magnification | 6x |
| Objective Lens Diameter | 21mm |
| Exit Pupil | 15mm |
| Lens Coating | Fully Multi-Coated |
| Measurement Range | 5m-1500m / 5yards-1600yards |
| Angle Measurement Range | -70° to 70° |
| Field of View | 6° |
| Reticle | 12MOA |
| Response Time | 0.2 seconds |
| Pin Lock Range | Max 450 yards (Golf Flag) |
| Angle Accuracy | 1° |
| Battery Type | CR2 (not included) |
| Dimensions | 98.5x77x37mm / 3.8x3x1.4in |
| Weight | 130g / 4.6oz |
| Housing Material | Rubberized Plastic |
| Power Saving | 20 seconds auto shut-off |
| Waterproof Rating | IPX4 |
| Laser Class | Class 1, 905nm (Invisible) |
| Reflective Target Range | 1600 Yards (1500 m) |
| Building (Concrete) Target Range | 1200 Yards (1100 m) |
| Large Tree Target Range | 900 Yards (825 m) |
| Deer Target Range | 700 Yards (640 m) |
10. Warranty and Support
Vector Optics products are designed for durability and performance. For specific warranty details, please refer to the warranty card included with your product or visit the official Vector Optics website. For technical support, troubleshooting assistance, or service inquiries, please contact Vector Optics customer service through their official channels.
Please retain your purchase receipt as proof of purchase for any warranty claims.
