
1. Introduction
Thank you for choosing the AMOROM Indoor Security Camera. This manual provides detailed instructions for setting up, operating, and maintaining your camera to ensure optimal performance and security for your home. This camera offers 360° pan and tilt functionality, 1080P HD video with infrared night vision, two-way audio, smart AI motion detection, and flexible storage options.

Image 1.1: Overview of the AMOROM Indoor Security Camera highlighting key features like 2.4G WiFi, Pan&Tilt, Night Vision, 2-Way Talk, 1080P, 2MP, Privacy Mode, AI Detection, Cloud & Memory Card Storage.
2. What's Included
Please check the package contents to ensure all items are present:
- Indoor Camera × 3
- Power Adapter × 3
- Type-C Charging Cable × 3
- Screw Bags × 3
- Camera Mount × 3
- Instruction Manual
3. Product Overview
Familiarize yourself with the camera's components before installation.

Image 3.1: Front view of the AMOROM Indoor Security Camera, showing the lens, base, and brand logo.
Camera Components
- Camera Lens: Captures video footage.
- Infrared LEDs: Provide night vision capabilities.
- Microphone: For two-way audio communication.
- Speaker: For two-way audio communication and alerts.
- Micro SD Card Slot: For local video storage (supports up to 128GB, SD card not included).
- Power Port (Type-C): Connects to the power adapter.
- Reset Button: Used for resetting the camera to factory settings.
4. Setup Guide
4.1 App Installation
Download the AMOROM app from your smartphone's app store (iOS or Android). Search for "AMOROM" and install the application.

Image 4.1: Smartphone screens displaying the AMOROM app icon and its main interface, indicating easy access from anywhere.
4.2 Device Pairing
- Plug in the camera using the provided power adapter and Type-C cable. Wait for the camera to power on and indicate readiness for pairing (usually a blinking LED).
- Open the AMOROM app and create an account or log in.
- Tap the "+" icon or "Add Device" to begin the pairing process.
- Follow the on-screen instructions in the app to connect the camera to your 2.4GHz Wi-Fi network. Ensure your phone is connected to the same 2.4GHz Wi-Fi network during setup.
- Scan the QR code displayed on your phone with the camera lens, or follow alternative pairing methods if prompted.
- Once connected, name your camera and complete the setup.
4.3 Mounting the Camera
The camera can be placed on a flat surface or mounted to a wall or ceiling using the included mount and screws.
- Choose a suitable location with a clear view and within Wi-Fi range.
- Use the camera mount as a template to mark screw positions on the wall or ceiling.
- Drill pilot holes and insert wall anchors if necessary.
- Secure the camera mount with screws.
- Attach the camera to the mount, ensuring it is securely fastened.

Image 4.2: An AMOROM Indoor Security Camera shown mounted on a wall, demonstrating installation flexibility.
5. Operation
5.1 Live View and Pan/Tilt Control
Access the live feed through the AMOROM app. Use the on-screen controls to remotely pan (355° horizontal) and tilt (130° vertical) the camera lens to view different areas of your room.

Image 5.1: The camera demonstrating its 355° horizontal and 130° vertical rotation capabilities for comprehensive coverage.
5.2 Two-Way Audio
The built-in microphone and speaker allow for real-time two-way communication. Tap the microphone icon in the app to speak, and listen through the camera's speaker.
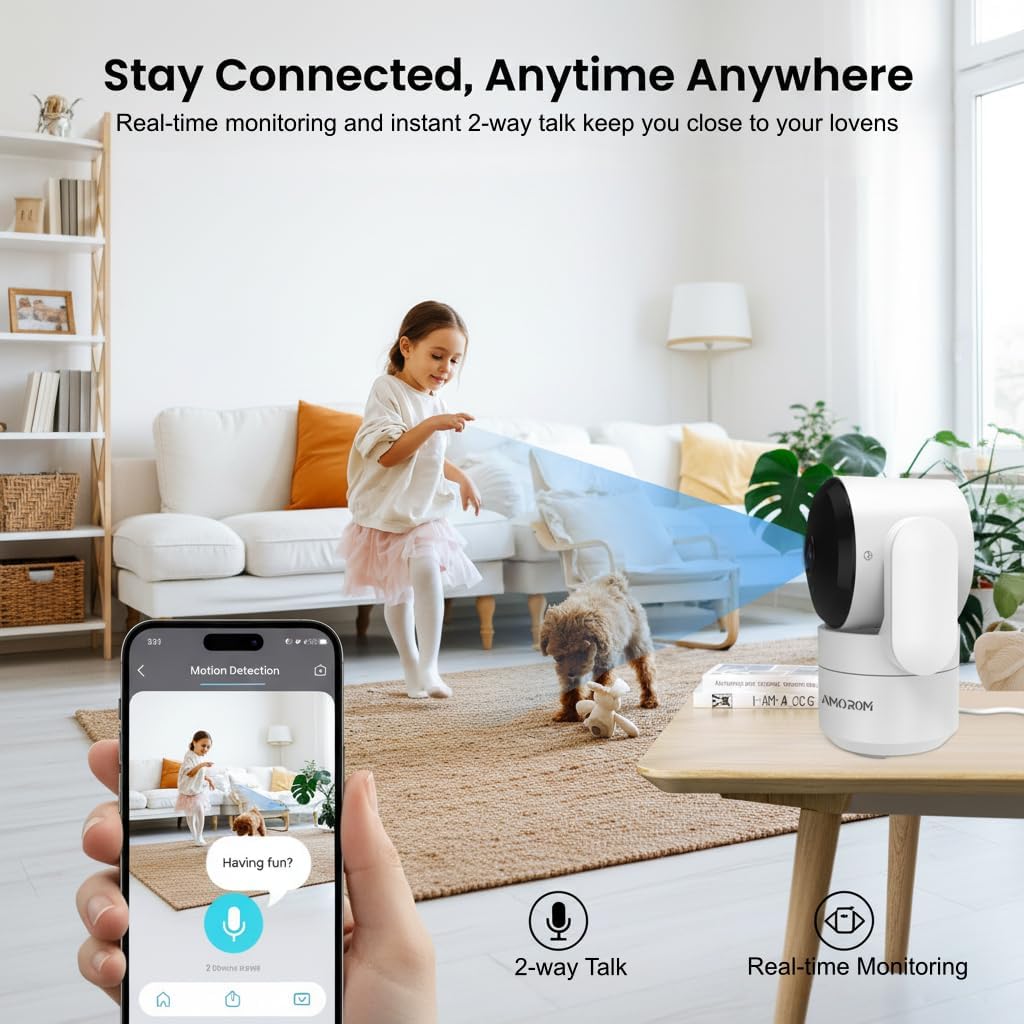
Image 5.2: A child playing in a living room, with a smartphone displaying the camera's live feed and indicating two-way talk functionality.
5.3 Motion Detection and Alerts
The camera features smart AI human detection to minimize false alarms. When motion is detected, the camera will record footage and send instant alerts to your smartphone.

Image 5.3: A smartphone displaying a motion detection alert, indicating the camera's ability to notify users of activity.
5.4 Night Vision
Equipped with infrared night vision, the camera provides clear footage up to 30 feet in low-light or complete darkness, ensuring 24/7 surveillance without visible light pollution.

Image 5.4: A smartphone showing a clear black-and-white night vision feed of a baby sleeping, demonstrating the camera's low-light performance.
5.5 Privacy Mode
Activate Privacy Mode with a single tap in the app. The camera lens will automatically rotate downwards, physically blocking the view for enhanced privacy.

Image 5.5: The camera shown with its lens rotated down, illustrating the privacy mode feature, alongside a smartphone screen showing the privacy mode activated.
5.6 Storage Options (Cloud & SD Card)
The camera supports two storage methods:
- Micro SD Card: Insert a Micro SD card (up to 128GB, not included) into the designated slot for local storage.
- Cloud Storage: Utilize AWS encrypted cloud storage for secure remote access to your recordings. A 7-day free trial is available.

Image 5.6: The camera with an inserted Micro SD card and a smartphone displaying the cloud storage interface, highlighting dual storage options.
5.7 Smart Home Integration (Alexa & Google Home)
The camera is compatible with Amazon Alexa and Google Assistant. Follow these steps to connect:
- Ensure your camera is already added to the AMOROM app.
- In the AMOROM app, navigate to "Me" > "Third-Party Voice Services".
- Select either Google Assistant or Alexa.
- Log in with your respective smart home account credentials.
- Select the AMOROM camera(s) you wish to link.

Image 5.7: A smartphone showing the AMOROM app's integration with Alexa and Google Assistant, alongside an Echo Show displaying the camera feed.
5.8 Multi-User Sharing & Multi-Camera Monitoring
Share camera access with family members and monitor multiple cameras simultaneously.
- Multi-User Sharing: In the app, you can invite other users to view your camera feed.
- Multi-Camera Monitoring: The app allows you to add multiple AMOROM cameras and view up to 16 live feeds on a single screen for comprehensive home security management.

Image 5.8: A laptop displaying multiple camera feeds, illustrating the multi-camera monitoring and multi-user sharing features.
6. Maintenance
To ensure the longevity and optimal performance of your AMOROM Indoor Security Camera, follow these maintenance guidelines:
- Cleaning: Gently wipe the camera lens and body with a soft, dry cloth. Avoid using harsh chemicals or abrasive cleaners.
- Software Updates: Regularly check the AMOROM app for firmware updates. Keeping your camera's software up-to-date ensures you have the latest features and security enhancements.
- Power Supply: Use only the provided power adapter and cable to prevent damage to the camera.
- Placement: Ensure the camera is placed in a stable location to prevent accidental falls. Avoid direct exposure to extreme temperatures or moisture.
7. Troubleshooting
If you encounter issues with your camera, refer to the following table for common problems and solutions.
| Problem | Possible Cause | Solution |
|---|---|---|
| Camera fails to connect to Wi-Fi | Incorrect Wi-Fi password; Camera too far from router; Only 5GHz Wi-Fi network available. | Verify Wi-Fi password; Move camera closer to router; Ensure you are connecting to a 2.4GHz Wi-Fi network. |
| No live feed or offline status | No power; Wi-Fi disconnected; App issue. | Check power connection; Restart camera and router; Re-add camera in the app if necessary. |
| Motion alerts not received | Motion detection disabled; App notifications turned off; Incorrect sensitivity settings. | Enable motion detection in app; Check phone notification settings; Adjust motion sensitivity. |
| Two-way audio not working | Microphone/speaker permissions denied; Volume too low. | Check app permissions for microphone; Adjust volume settings in app and on phone. |
| SD card not recording | SD card full or corrupted; Incorrect recording settings. | Format or replace SD card; Check recording schedule/settings in app. |
8. Specifications
Detailed technical specifications for the AMOROM Indoor Security Camera.
| Feature | Detail |
|---|---|
| Brand | AMOROM |
| Model Name | wifi security camera |
| Connectivity Technology | Wired (Power), Wi-Fi (Data) |
| Special Features | 2-Way Audio, Local Recording, Motion Sensor, Night Vision, PTZ Technology |
| Indoor/Outdoor Usage | Indoor |
| Compatible Devices | Desktop, Laptop, Smartphone, Tablet |
| Controller Type | Amazon Alexa, Google Assistant |
| Mount Type | Wall Mount |
| Color | White |
| Form Factor | Dome |
| Enclosure Material | Plastic |
| Alert Type | Audio and Motion |
| Effective Still Resolution | 2 MP |
| Waterproof Rating | IP65 (Note: Product is for indoor use, IP65 rating indicates dust and water jet resistance) |
| Control Method | App |
| Power Source | Corded Electric |
| Video Capture Resolution | 1080p |
| Frame Rate | 15 frames_per_second |
| Viewing Angle | 360 Degrees (Pan/Tilt combined) |
| Night Vision Range | 33 Feet |
| Item Dimensions | 6 x 4 x 5 inches |
9. Warranty and Support
AMOROM is committed to providing excellent customer service. If you have any questions, encounter issues, or require assistance with your product, please do not hesitate to contact our support team.
- 24/7 Customer Support: Our dedicated customer service team is available around the clock to assist you.
- Contact Information: Please refer to the AMOROM app or the product packaging for the most up-to-date contact details for support.
Image 9.1: A customer service representative ready to assist, symbolizing AMOROM's 24/7 customer support.
10. Product Video
Watch this official product video for a visual guide on key features and functionalities of the AMOROM Indoor Security Camera.
Video 10.1: An official video demonstrating the AMOROM Indoor Camera for Home Security, showcasing its 360-degree view, motion detection, and smart following features.