1. Introduction
Thank you for choosing the Member's Mark Extending Tilt TV Wall Mount. This manual provides detailed instructions for the safe and proper installation, operation, and maintenance of your TV wall mount. Please read all instructions carefully before beginning installation to ensure optimal performance and safety.
This wall mount is designed to securely hold flat-panel televisions, offering tilt adjustment and post-installation leveling for an enhanced viewing experience.
2. Safety Information
- Weight Capacity: Do not exceed the maximum weight capacity of 150 lbs (68 kg). Exceeding this limit may result in serious injury or property damage.
- TV Size Compatibility: This mount is designed for TVs between 32 and 90 inches. Ensure your TV's VESA pattern is compatible with the mount.
- Wall Type: This mount is intended for installation on solid concrete walls, brick walls, or wood stud walls. Do not install on drywall alone.
- Professional Installation: If you are unsure about the installation process or the suitability of your wall, consult a qualified professional installer.
- Hardware: Use only the provided mounting hardware. Do not substitute with other hardware unless explicitly instructed.
- Children: Keep all small parts and packaging materials away from children, as they may pose a choking hazard.
- Regular Checks: Periodically check that the mount and all connections are secure and free from damage.
3. Package Contents
Verify that all components are present and undamaged before installation. If any parts are missing or damaged, do not proceed with installation and contact customer support.
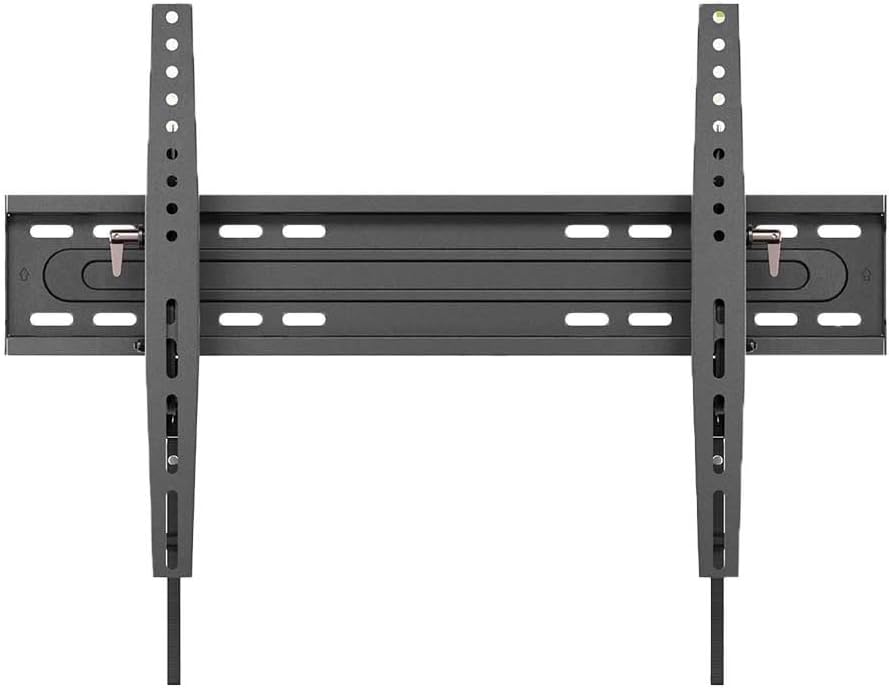
An overview of the main components of the Member's Mark Extending Tilt TV Wall Mount, including the wall plate and the two vertical TV brackets.
- Wall Plate Assembly
- TV Bracket (x2)
- Mounting Hardware Kit (screws, anchors, washers, spacers)
- Instruction Manual
4. Tools Required (Not Included)
- Pencil
- Stud Finder (for wood stud installation)
- Drill with appropriate drill bits
- Level
- Phillips Head Screwdriver
- Socket Wrench or Adjustable Wrench
- Measuring Tape
5. Setup and Installation
Step 5.1: Determine TV Compatibility and Capacity
Ensure your television meets the size and weight requirements for this mount. This mount supports TVs from 32 to 90 inches and up to 150 lbs.

This image illustrates the Member's Mark Extending Tilt TV Wall Mount, highlighting its compatibility with 32-90 inch televisions and a maximum weight capacity of 150 pounds.
Step 5.2: Attach TV Brackets to TV
- Carefully place your TV face down on a soft, clean surface to prevent screen damage.
- Identify the VESA mounting holes on the back of your TV.
- Select the appropriate screws, washers, and spacers from the hardware kit that fit your TV's mounting holes.
- Attach the two vertical TV brackets to the back of your TV, ensuring they are centered and level. Do not overtighten.
Step 5.3: Mark and Drill Pilot Holes on Wall
- Determine the desired height for your TV. Use a pencil to mark the center of where the wall plate will be mounted.
- For wood stud installation: Use a stud finder to locate the edges of the wood studs. Mark the center of the studs. The wall plate must be mounted to at least two wood studs.
- For concrete/brick wall installation: Mark the desired drill points.
- Hold the wall plate against the wall, aligning it with your marks, and use a level to ensure it is perfectly horizontal. Mark the drill points through the wall plate holes.
- Drill pilot holes at the marked locations using the appropriate drill bit size for your wall type and chosen hardware.
Step 5.4: Mount Wall Plate to Wall
- Align the wall plate with the drilled pilot holes.
- Insert the appropriate wall anchors (if using for concrete/brick) and then secure the wall plate to the wall using the lag bolts and washers.
- Tighten all bolts firmly, but do not overtighten.
Step 5.5: Hang TV on Wall Plate
- With assistance, carefully lift the TV with the attached brackets.
- Hook the TV brackets onto the top edge of the wall plate.
- Gently lower the TV until the brackets are fully seated on the wall plate.
- Engage the safety locking mechanisms on the bottom of the TV brackets to secure the TV to the wall plate. Refer to the specific locking mechanism design on your mount.
6. Operating Instructions
This mount features both tilt adjustment and post-installation leveling.
6.1 Tilt Adjustment
The mount allows for tilting the TV up to 15 degrees downwards. This feature helps reduce glare and optimize viewing angles.

A diagram demonstrating the multi-view angle adjustment of the TV mount, showing a distance from the wall ranging from 2.76 to 6.06 inches and a tilt capability of up to 15 degrees.

A detailed view of the tilt locking mechanism on the Member's Mark TV mount, indicating a tilt range of +0 to -15 degrees for comfortable viewing.
- To adjust the tilt, loosen the tilt locking knobs or bolts located on the side of the TV brackets.
- Carefully tilt the TV to your desired angle.
- Once the desired angle is achieved, firmly tighten the tilt locking knobs or bolts to secure the TV in place.
6.2 Post-Installation Leveling
The mount allows for minor horizontal adjustments (+/- 1 degree) after installation to ensure your TV is perfectly level.

An illustration of the post-installation leveling feature of the TV mount, allowing for fine adjustments of +/- 1 degree to ensure the television is perfectly level after mounting.
- If your TV appears slightly unlevel after installation, locate the leveling adjustment screws on the TV brackets.
- Using a screwdriver or wrench, turn the adjustment screws incrementally to raise or lower one side of the TV until it is perfectly level.
- Use a level tool to verify the TV's horizontal position.
7. Maintenance
- Cleaning: Wipe the mount with a soft, dry cloth. Do not use abrasive cleaners or solvents.
- Periodic Checks: Every few months, check all screws and bolts to ensure they remain tight and secure. Re-tighten if necessary.
- Damage: If any part of the mount becomes damaged, discontinue use and contact customer support for replacement parts or advice.
8. Troubleshooting
- TV is not level: Use the post-installation leveling feature as described in Section 6.2. Ensure the wall plate was installed level initially.
- Mount feels loose: Re-check all mounting bolts on the wall plate and TV brackets. Ensure they are securely tightened. If the issue persists, consult a professional.
- Difficulty tilting TV: Ensure the tilt locking knobs/bolts are sufficiently loosened before attempting to adjust the tilt.
- Missing parts: Do not proceed with installation. Contact customer support for assistance.
9. Specifications
| Feature | Specification |
|---|---|
| Brand | MEMBER'S MARK |
| Model | Extending Tilt TV Wall Mount |
| Mounting Type | Wall Mount |
| Movement Type | Tilt |
| Material | Alloy Steel |
| Compatible TV Sizes | 32 - 90 inches |
| Maximum Weight Capacity | 150 lbs (68 kg) |
| Maximum Tilt Angle | 15 Degrees (downward) |
| Distance to Wall | 2.76 - 6.06 inches |
| Post-Installation Leveling | +/- 1 Degree |
| Item Weight | 10 pounds |
| UPC | 193968335045 |
10. Warranty and Support
For warranty information or technical support, please refer to the product packaging or contact Member's Mark customer service. Keep your purchase receipt for warranty claims.
Customer Service: Please visit the official Member's Mark website or refer to the contact information provided with your product for support.


