
Bennett Read KMW130
Bennett Read Microwave User Manual
Model: KMW130 | Capacity: 42 Liters
1. Introduction
Thank you for choosing the Bennett Read 42 Liter Microwave. This appliance is designed to provide efficient and convenient cooking for a wide variety of meals. With its robust design, advanced features like a 99-minute timer, digital LED display, one-touch preset functions, and multi-stage cooking, it aims to simplify your culinary tasks. Please read this manual thoroughly before operating your new microwave to ensure safe and optimal performance.
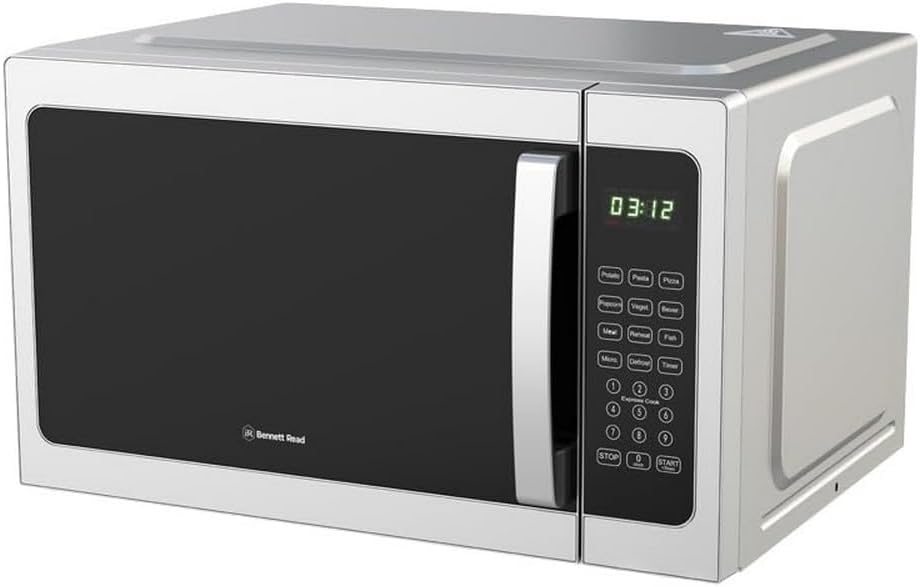
Figure 1.1: Front-right view of the Bennett Read 42 Liter Microwave.
2. Important Safety Instructions
WARNING: To reduce the risk of fire, electric shock, injury to persons, or exposure to excessive microwave energy, observe the following basic precautions:
- Read all instructions before using the appliance.
- Read and follow the specific "PRECAUTIONS TO AVOID POSSIBLE EXPOSURE TO EXCESSIVE MICROWAVE ENERGY" found on page 1 of this manual (Note: This is a placeholder for a real manual's cross-reference, assuming it would be on page 1).
- This appliance must be grounded. Connect only to properly grounded outlets. See "GROUNDING INSTRUCTIONS" section.
- Install or locate this appliance only in accordance with the provided installation instructions.
- Do not operate the microwave oven if it has a damaged cord or plug, if it is not working properly, or if it has been dropped or damaged.
- Do not cover or block any openings on the appliance.
- Do not immerse cord or plug in water.
- Do not allow cord to hang over edge of table or counter.
- Do not use this appliance for commercial purposes. It is intended for household use only.
- Always ensure the turntable and roller ring are correctly positioned before operation.
- Do not heat liquids or other foods in sealed containers as they are liable to explode.
- Do not use corrosive chemicals or vapors in this appliance.
- Close supervision is necessary when the appliance is used by or near children.
- Only use utensils that are suitable for use in microwave ovens.
- Clean the microwave regularly and remove any food deposits.
- Do not attempt to service or repair this appliance yourself. Contact qualified service personnel for examination, repair, or adjustment.

Figure 2.1: Overview of key features including Child Lock for safety.
3. Product Overview
3.1 Components
- Microwave Cavity: The interior cooking space.
- Glass Turntable: Rotates food for even cooking.
- Roller Ring: Supports the glass turntable.
- Control Panel: Digital display and function buttons.
- Door Assembly: Includes the door handle and safety interlock system.
- Ventilation Openings: For air circulation.
3.2 Control Panel
The control panel features an easy-to-read digital LED display and various buttons for different functions.

Figure 3.1: Front view highlighting the control panel.
- Digital LED Display: Shows time, power level, and cooking status.
- Number Buttons (0-9): Used to set cooking time or weight.
- START Button: Begins cooking or confirms settings.
- STOP Button: Stops cooking, clears settings, or cancels a program.
- Express Cook Buttons: Quick start for common cooking times.
- Preset Function Buttons: Dedicated buttons for specific food types (e.g., Potatoes, Pizza, Popcorn, Beverage, Meal, Reheat, Fish).
- Menu/Defrost Button: Selects defrost mode or other menu options.
- Timer Button: Sets the kitchen timer.
4. Setup and Installation
4.1 Unpacking
Carefully remove the microwave oven and all packing materials from the carton. Check the oven for any damage, such as dents or a broken door. Do not install if the oven is damaged. Retain the carton and packing materials for future use or dispose of them properly.
4.2 Placement
- Place the microwave on a flat, stable surface strong enough to support its weight.
- Ensure adequate ventilation: Leave a minimum of 10 cm (4 inches) clearance at the rear, 20 cm (8 inches) at the top, and 5 cm (2 inches) on each side.
- Do not block the air vents.
- Keep the microwave away from heat sources and strong magnetic fields.
4.3 Turntable Assembly
- Place the roller ring in the center of the microwave cavity floor.
- Place the glass turntable on top of the roller ring, ensuring it sits securely in the center hub.
- Verify that the turntable rotates freely.
4.4 Electrical Connection
Plug the power cord into a standard, grounded 220-240V AC, 50Hz electrical outlet. Ensure the outlet is dedicated to the microwave and is properly grounded to prevent electrical shock.
5. Operating Instructions
5.1 Setting the Clock
- Press the "Clock" button (if available, otherwise consult specific model instructions for time setting).
- Use the number buttons to enter the current time (e.g., 12:30).
- Press "Clock" or "START" to confirm.
5.2 Basic Microwave Cooking
- Place food in a microwave-safe container on the glass turntable.
- Close the door securely.
- Press the "Power Level" button repeatedly to select the desired power level (e.g., P100 for 100% power, P80 for 80% power).
- Use the number buttons to enter the desired cooking time (e.g., 1 for 1 minute, 30 for 30 seconds).
- Press "START" to begin cooking.
5.3 One-Touch Preset Functions
The microwave features convenient one-touch preset functions for common food items:
- Potatoes: Press "Potatoes" button, then select quantity if prompted.
- Pizza: Press "Pizza" button, then select quantity if prompted.
- Popcorn: Press "Popcorn" button.
- Beverage: Press "Beverage" button, then select quantity if prompted.
- Meal: Press "Meal" button, then select quantity if prompted.
- Reheat: Press "Reheat" button, then select quantity if prompted.
- Fish: Press "Fish" button, then select quantity if prompted.
Follow the display prompts for specific weight or quantity selections. The microwave will automatically set the appropriate cooking time and power level.

Figure 5.1: Examples of meals that can be prepared using the microwave's various functions.
5.4 Multi-Stage Cooking
This feature allows you to program two or three cooking stages, for example, defrosting followed by cooking at a specific power level.
- Press "Menu/Defrost" to select the defrost stage (e.g., Defrost by Weight).
- Enter the weight using the number buttons.
- Then, set the second cooking stage: Press "Power Level" and enter the desired power level and cooking time.
- Press "START" to begin the multi-stage program. The microwave will automatically switch from defrost to cooking.
5.5 Child Lock Function
To activate the child lock, press and hold the "STOP" button for 3 seconds. The display will show "LOCK" or an indicator. To deactivate, press and hold the "STOP" button again for 3 seconds.
6. Maintenance and Cleaning
Regular cleaning of your microwave oven is essential to maintain its performance and extend its lifespan. Always unplug the appliance before cleaning.
6.1 Interior Cleaning
- Wipe the interior cavity with a damp cloth after each use to remove food splatters.
- For stubborn stains, place a bowl of water with a few slices of lemon inside and microwave on high for 5-7 minutes. The steam will loosen the grime, making it easier to wipe away.
- Do not use abrasive cleaners, steel wool, or harsh chemicals.
6.2 Exterior Cleaning
- Clean the exterior surfaces with a soft, damp cloth.
- For the mirror glass door, use a glass cleaner applied to a cloth (not directly to the door) to avoid streaks.
- Ensure no water enters the ventilation openings.
6.3 Turntable and Roller Ring
- Remove the glass turntable and roller ring. Wash them in warm, soapy water or in the dishwasher.
- Dry thoroughly before placing them back in the microwave.
7. Troubleshooting
Before contacting customer service, please refer to the following table for common issues and their solutions.
| Problem | Possible Cause | Solution |
|---|---|---|
| Microwave does not start. | Power cord not plugged in; Door not closed properly; Fuse blown or circuit breaker tripped. | Ensure plug is firmly in outlet; Close door securely; Check household fuse/circuit breaker. |
| Food is not cooking or heating. | Door not closed properly; Cooking time/power level not set; Utensil not microwave-safe. | Close door firmly; Set appropriate time and power; Use microwave-safe cookware. |
| Turntable does not rotate. | Turntable or roller ring not positioned correctly; Food too large or heavy. | Reposition turntable and roller ring; Reduce food quantity or size. |
| Unusual noise during operation. | Turntable or roller ring not seated correctly; Food container touching cavity walls. | Adjust turntable/roller ring; Ensure container is centered and not touching sides. |
| Display shows "LOCK". | Child lock is activated. | Press and hold the "STOP" button for 3 seconds to deactivate. |
If the problem persists after trying these solutions, please contact customer support.
8. Specifications
| Brand: | Bennett Read |
| Model: | KMW130 |
| Capacity: | 42 Liters |
| Wattage: | 1000 watts |
| Installation Type: | Countertop |
| Product Dimensions (L x W x H): | 59.1 x 46.2 x 37.4 cm |
| Item Weight: | 18.18 kg |
| Material Type: | Glass, Stainless Steel |
| Special Features: | Programmable, Integrated 99-minute timer, Digital LED display, One-touch preset functions, Multi-stage cooking |
| Colour: | Silver |
9. Warranty and Support
For warranty information and customer support, please refer to the warranty card included with your purchase or visit the official Bennett Read website. Keep your proof of purchase for any warranty claims.
Customer Service Contact: Please refer to the contact details provided in your product packaging or on the manufacturer's official website for assistance with technical issues, repairs, or spare parts.
Spare Part Availability: Spare part information is not available or provided in the current product data. Please contact customer support for inquiries regarding spare parts.
Related documentsKMW130


Ask a question about this manual
Ask about setup, troubleshooting, compatibility, parts, safety, or missing instructions. Manuals+ will review the question and use this page’s manual context to help answer it.