1. Product Overview
The CPVAN Remote Control (2nd Generation), model CP10 Pro, is designed for wireless operation of compatible CPVAN home security systems. This remote provides convenient control over your alarm system's functions from a distance.
Compatibility: This remote control is compatible with CPVAN CP2, CP2 Pro, CP7R, CP8, and CP9 Home Security Systems.

Image 1: Front view of the CPVAN remote control.
2. Key Features
- Wireless Operation: Provides convenient control of your alarm system without physical interaction with the main unit.
- Broad Compatibility: Works with CPVAN CP2, CP2 Pro, CP7R, CP8, and CP9 alarm systems.
- Long-Distance Control: Enables control of the motion sensor detector alarm from a significant range.
- Ready to Use: Comes with a pre-installed battery for immediate functionality.
- Ergonomic Design: Features a comfortable and user-friendly form factor.
3. Package Contents
- CPVAN Remote Control (2nd Generation)
- 1 x CR2 Battery (pre-installed)
4. Setup and Pairing
Pairing with a New Remote Control
To integrate your new remote control with a CPVAN PIR motion sensor alarm, follow these steps:
- Ensure the PIR motion sensor alarm is powered ON.
- On the PIR motion sensor alarm, long press the Pairing button (often indicated by a signal icon) to enter pairing mode. The detector light will illuminate continuously.
- Press any button on your remote control. You will hear two beeps from the alarm to confirm successful pairing.
- Short press the Pairing button on the alarm again to exit pairing mode. Your remote has now been paired.

Image 2: Pairing process of the remote control with a motion sensor alarm.
5. Operation
Remote Control Functions
The CPVAN remote control features four distinct buttons for managing your alarm system:
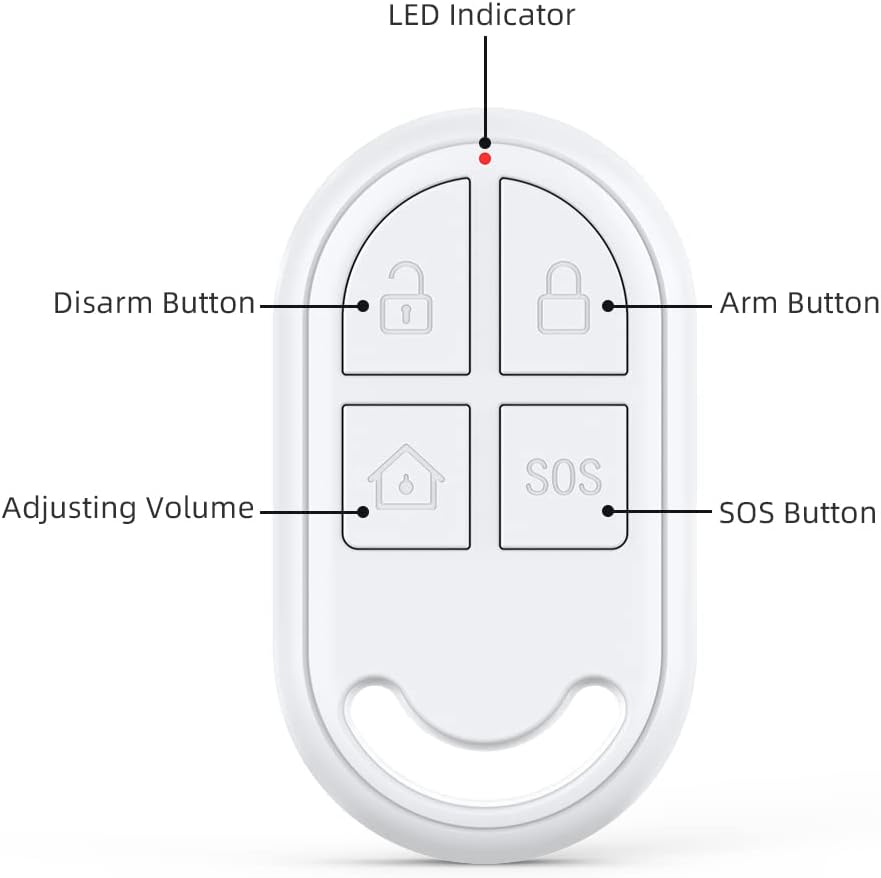
Image 3: Labeled buttons on the CPVAN remote control.
- Arm Button (Locked Padlock Icon): Activates the alarm system, placing it in armed mode.
- Disarm Button (Unlocked Padlock Icon): Deactivates the alarm system, turning off armed mode.
- Adjusting Volume Button (House Icon): Typically used to switch between different alarm modes or adjust volume settings on the connected alarm unit. Refer to your main alarm system manual for specific functions.
- SOS Button (SOS Text): Triggers an immediate emergency alarm. Use in situations requiring urgent attention.
- LED Indicator: A small light that illuminates to indicate button presses and operational status.
6. Maintenance
Battery Replacement
The remote control is powered by one CR2 battery. When the remote's performance degrades or the LED indicator fails to light up upon button press, it may be time to replace the battery.
- Locate the battery compartment on the remote control. This is typically on the back or side, secured by a small screw or clip.
- Carefully open the compartment.
- Remove the old CR2 battery.
- Insert a new CR2 battery, ensuring correct polarity (+ and -).
- Close the battery compartment securely.
Battery Type: 1 x CR2 (3 Volts, Lithium Manganese Dioxide)
7. Troubleshooting
- Remote not responding: Check the battery. Replace if necessary. Ensure the remote is within the operating range of the alarm system.
- Pairing failure: Ensure the alarm system is in pairing mode. Repeat the pairing steps carefully. Check if the remote's battery is charged.
- Accidental activation: The remote keys can be sensitive. Avoid placing the remote in pockets or areas where buttons might be pressed inadvertently.
8. Technical Specifications
| Brand | CPVAN |
| Model Number | CP10 Pro |
| Color | White |
| Power Source | Battery Powered |
| Compatible Devices | CPVAN CP2, CP2 Pro, CP7R, CP8, CP9 Home Security Systems |
| Dimensions (L x W x H) | 2.46 x 0.43 x 1.38 inches |
| Connectivity Technology | Wireless |
| Item Weight | 0.01 Kilograms (0.317 ounces) |
| Voltage | 3 Volts |
| Battery Type | 1 x CR2 (Lithium Manganese Dioxide) |
| Maximum Range | 100 Meters |
| Special Features | Ergonomic |

Image 4: Dimensions of the CPVAN remote control.
9. Customer Support
For further assistance, technical support, or warranty inquiries, please refer to the main manual of your CPVAN Home Alarm System or visit the official CPVAN website. You can also contact CPVAN customer service through the retailer where the product was purchased.
Manufacturer: CPVAN
Part Number: CP2-RC


