1. Important Safety Information
Please read and understand all safety instructions before assembling or using this product. Failure to follow these instructions may result in injury or damage to the product.
- Electrical Safety: Always unplug the charging station when not in use or before cleaning. Do not expose the charging station to liquids. Ensure the power cord is not pinched or damaged.
- Stability: Do not overload the nightstand with heavy items, especially on the top surface or in drawers, to prevent tip-over. Always place the nightstand on a flat, stable, and level surface.
- Heat Sources: Keep the nightstand away from direct heat sources, open flames, and excessive moisture.
- Pinch Points: Exercise caution when opening and closing drawers to avoid pinching fingers or other objects.
- Assembly: Always follow the assembly instructions carefully to ensure the nightstand's structural integrity and stability. Do not use power tools for assembly unless specifically instructed, as this may overtighten screws and damage components.
- Children and Pets: Keep small parts and packaging materials away from children and pets during assembly.
2. Product Overview
The Irontar Rattan Nightstand is a versatile piece of furniture designed for bedrooms, offering both storage and convenient charging capabilities. It features a blend of rattan-decorated drawers and a sturdy frame, providing a farmhouse aesthetic.
Key Features:
- Integrated Charging Station: Equipped with 2 AC outlets and 2 USB ports for convenient device charging.
- Spacious Storage: Features three large drawers with metal sliding rails for organized storage of personal items.
- Durable Construction: Made from EPA-grade Particleboard and natural rattan.
- Versatile Design: Suitable for use as a bedside table, end table, or small storage cabinet.

Figure 2.1: Front view of the Irontar Rattan Nightstand, showcasing its design and charging station.
Dimensions:
The overall dimensions of the nightstand are approximately 23.6 inches (L) x 15.7 inches (W) x 28.5 inches (H).
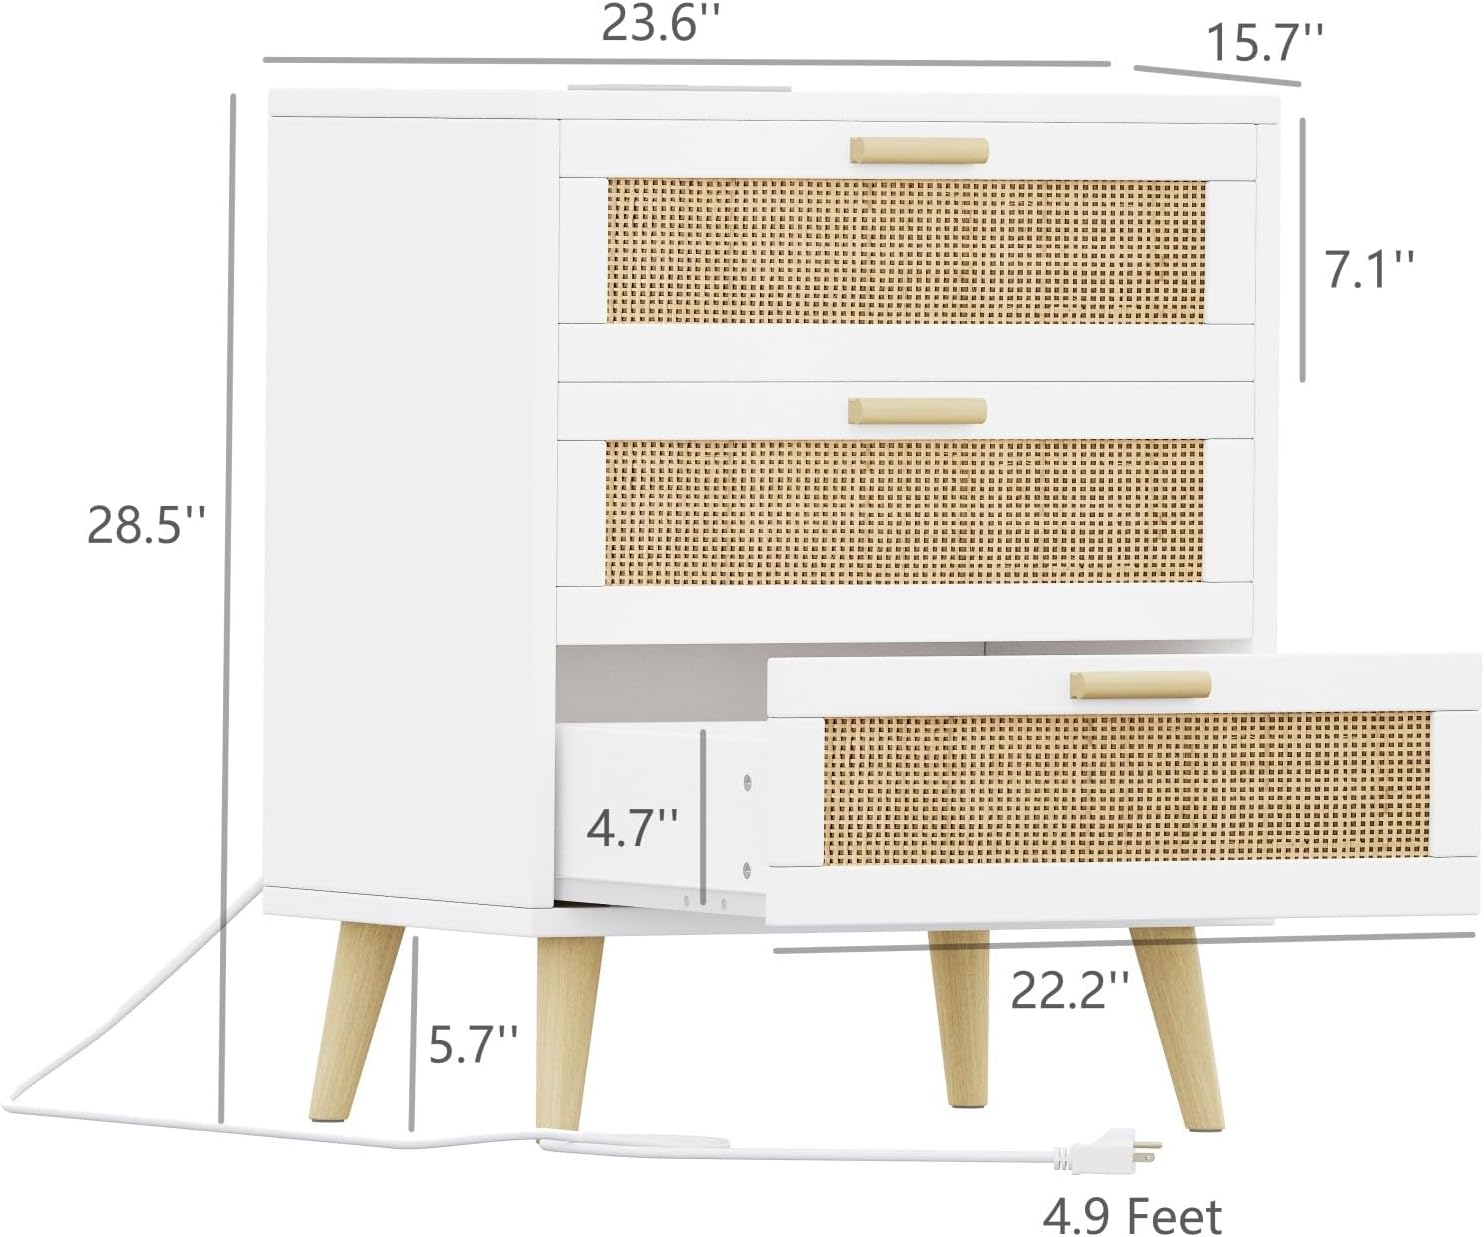
Figure 2.2: Detailed diagram showing the dimensions of the nightstand.
3. Setup and Assembly
The Irontar Rattan Nightstand requires assembly. It is recommended to assemble the unit in the room where it will be used to avoid moving it after completion. Ensure you have ample space and a clean, soft surface to prevent scratching the components.
Before You Begin:
- Check Contents: Unpack all components and hardware. Compare them with the parts list provided in your assembly manual to ensure nothing is missing or damaged. If any parts are missing or damaged, contact customer support immediately.
- Tools Required: Typically, a Phillips head screwdriver is needed. Some models may include an Allen wrench.
- Assistance: While assembly can often be done by one person, having a second person can make the process easier and safer.
Assembly Steps (General Guide):
- Attach Legs: Securely attach the four wooden legs to the base of the nightstand frame using the provided screws.
- Assemble Frame: Connect the side panels, back panel, and top panel to form the main frame of the nightstand. Ensure all connections are tight and stable.
- Install Drawer Slides: Attach the metal drawer slides to the inside of the nightstand frame according to the instructions. Pay attention to the orientation of the slides.
- Assemble Drawers: Construct each drawer by attaching the front, back, and side panels, then securing the bottom panel. Install the corresponding drawer slides onto the assembled drawers.
- Insert Drawers: Carefully slide the assembled drawers into the nightstand frame, ensuring they glide smoothly.
- Install Charging Station: Integrate the charging station unit into the designated slot on the top or back panel, securing it with screws if necessary.
- Final Check: Once assembled, gently shake the nightstand to ensure it is stable. Tighten any loose screws, but do not overtighten.

Figure 3.1: The nightstand fully assembled and placed in a bedroom environment.
4. Operating Instructions
Using the Charging Station:
The integrated charging station provides convenient power access for your electronic devices.
- Power Connection: Plug the nightstand's power cord (approximately 4.9 feet long) into a standard wall outlet.
- AC Outlets: Use the two 120V/12A AC outlets to power devices such as lamps, laptops, or other small appliances.
- USB Ports: Use the two 5V/2A USB ports to charge smartphones, tablets, e-readers, and other USB-powered devices.
- Device Placement: Place devices on the nightstand's surface while charging to ensure proper ventilation and prevent overheating.

Figure 4.1: Detail of the integrated charging station with AC outlets and USB ports.
Using the Drawers:
The three drawers offer ample storage space for various items.
- Opening/Closing: Gently pull the handles to open and push to close the drawers. The metal sliding rails ensure smooth operation.
- Storage Capacity: Utilize the drawers for storing books, personal accessories, electronics, or other bedside essentials.
- Weight Distribution: Distribute weight evenly within the drawers to maintain balance and prevent strain on the drawer slides.
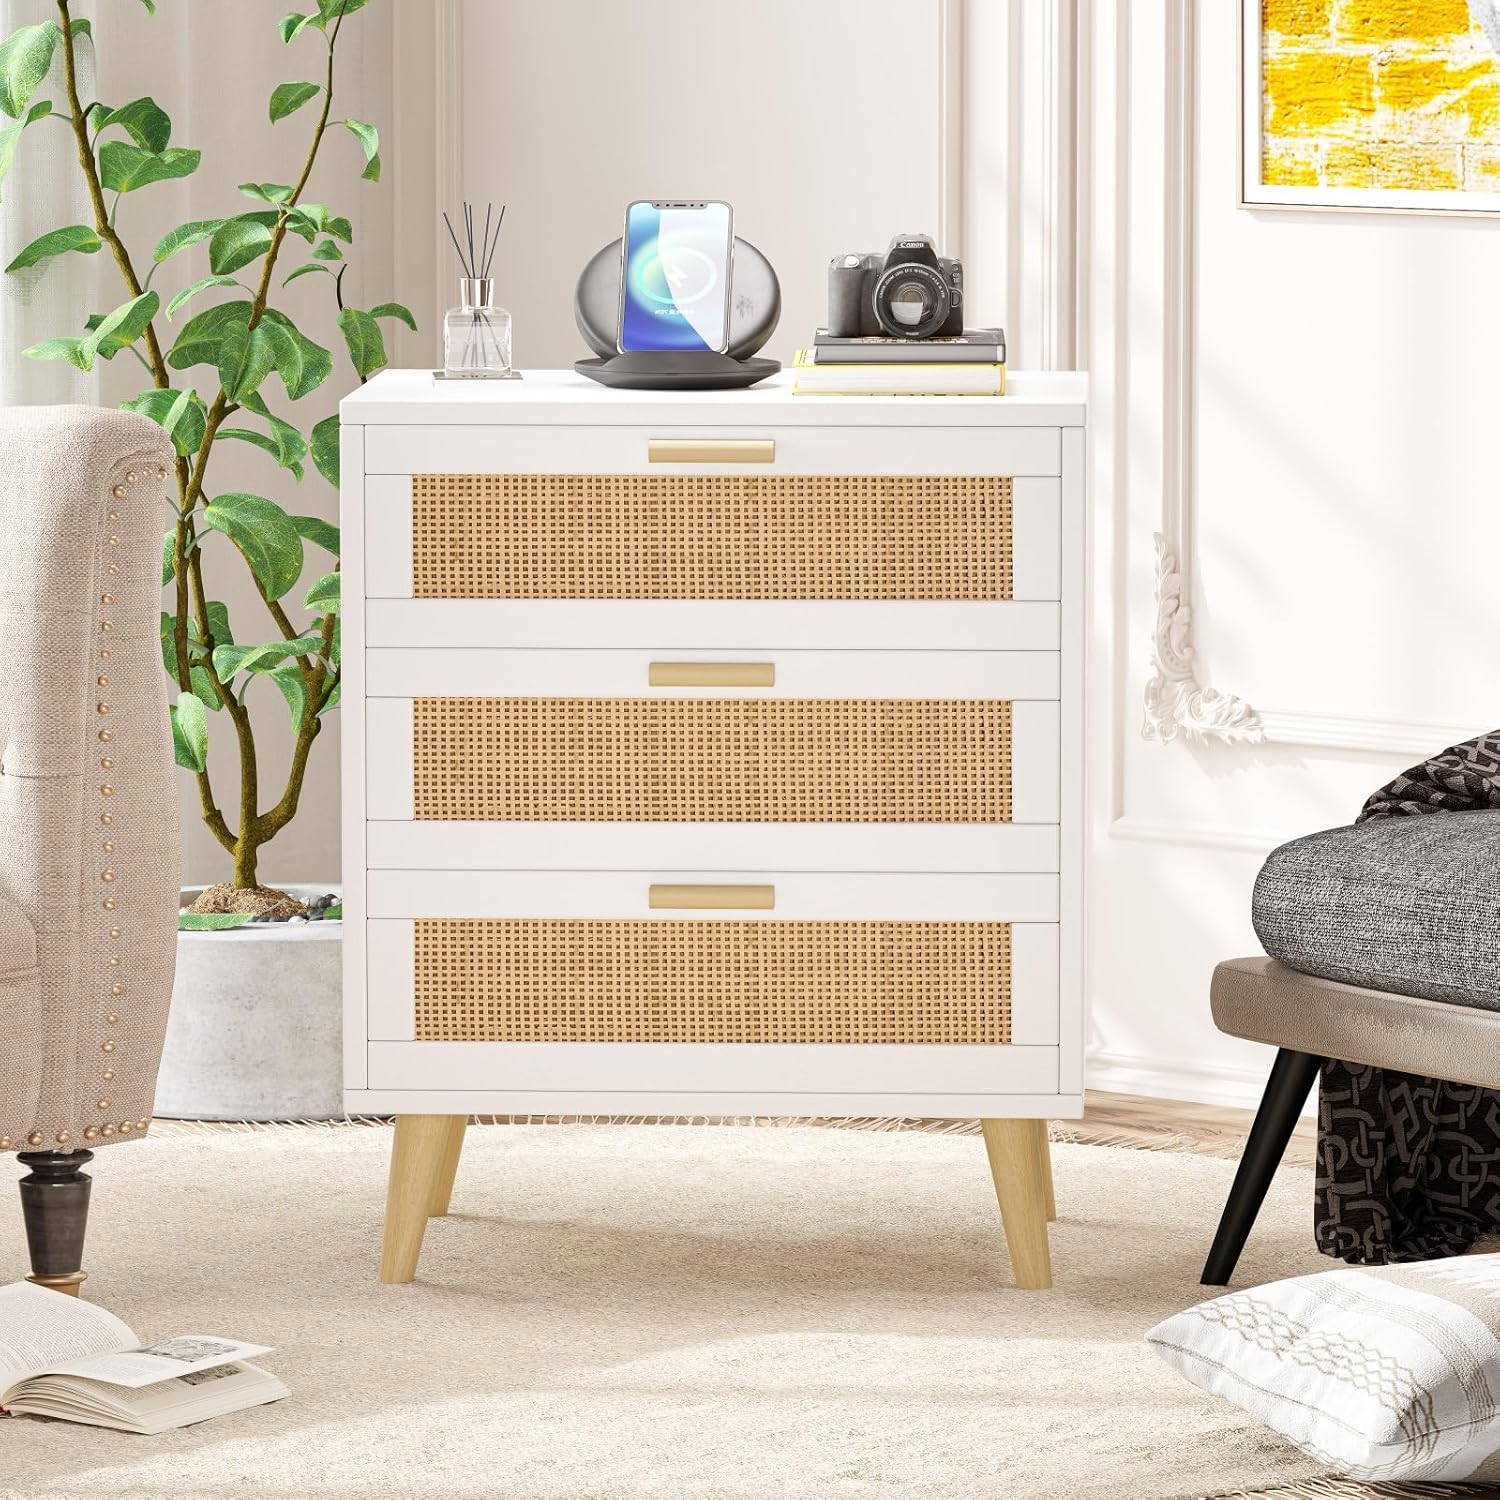
Figure 4.2: The nightstand with drawers partially open, illustrating the spacious interior.
5. Maintenance
Regular maintenance will help preserve the appearance and functionality of your Irontar Rattan Nightstand.
- Cleaning the Surface: Wipe the nightstand's surfaces with a soft, damp cloth. Avoid using abrasive cleaners, harsh chemicals, or polishes that may damage the finish.
- Rattan Care: For the rattan elements, gently dust with a soft brush or cloth. If necessary, wipe with a slightly damp cloth and dry immediately. Avoid excessive moisture.
- Drawer Rails: Periodically check the drawer slides for any debris or dust that might impede smooth operation. You may apply a small amount of silicone spray to the rails if they become stiff.
- Hardware Check: Every few months, check all screws and fasteners to ensure they are tight. Retighten if necessary, but do not overtighten.
- Spills: Immediately wipe up any spills to prevent staining or damage to the wood and rattan.
6. Troubleshooting
This section addresses common issues you might encounter with your nightstand.
| Problem | Possible Cause | Solution |
|---|---|---|
| Charging station not working. | Not plugged in; loose connection; power outage; overloaded circuit. | Ensure the nightstand's power cord is securely plugged into a working wall outlet. Check for loose connections at the charging station unit. Try plugging another device into the wall outlet to confirm power. Reduce the number of devices plugged into the charging station. |
| Drawers are difficult to open/close or stick. | Misaligned drawer slides; debris in rails; overtightened screws; uneven assembly. | Check if drawers are inserted correctly onto the slides. Inspect rails for any obstructions and clean them. Loosen screws on drawer slides slightly if they appear too tight. Verify that the nightstand frame is assembled squarely and is on a level surface. |
| Nightstand feels wobbly or unstable. | Loose fasteners; uneven floor; incorrect assembly. | Check and tighten all assembly screws. Ensure the nightstand is placed on a flat, level surface. If the floor is uneven, use furniture pads or shims under the legs to stabilize. Review assembly instructions to ensure all steps were followed correctly. |
| Rattan appears damaged or frayed. | Physical impact; excessive moisture/dryness. | Avoid sharp objects or excessive force on the rattan. Keep away from extreme humidity or dryness. For minor fraying, carefully trim loose strands with small scissors. For significant damage, contact customer support. |
7. Specifications
| Brand | Irontar |
| Model Number | BZZ006102 |
| Colour | White and Natural |
| Product Dimensions (L x W x H) | 59.94 x 39.88 x 70.1 cm (23.6 x 15.7 x 28.5 inches) |
| Item Weight | 17.96 kg (39.6 lbs) |
| Maximum Weight Recommendation | 75 Pounds (approx. 34 kg) |
| Material | EPA-grade Particleboard, Rattan |
| Special Features | Charging Station, Storage, USB Port |
| AC Outlets | 2 (120V/12A) |
| USB Ports | 2 (5V/2A) |
| Power Cord Length | 4.9 Feet |
8. Warranty and Support
For information regarding product warranty, please refer to the documentation included with your purchase or contact the manufacturer directly. Warranty terms and conditions may vary.
Customer Support:
If you have any questions, require assistance with assembly, or need to report missing/damaged parts, please contact Irontar customer support through their official website or the retailer from whom you purchased the product. Please have your model number (BZZ006102) and purchase details ready when contacting support.


