1. Product Overview
The ARPHA B25 is a dual-channel dash cam system designed to record both front and rear views of your vehicle. It features 5K resolution for the front camera and 1080P for the rear, ensuring clear video capture. Key functionalities include 5G WiFi for fast data transfer, Advanced Driving Assistant System (ADAS), built-in GPS for location and speed tracking, voice control for hands-free operation, Wide Dynamic Range (WDR) for enhanced night vision, a G-Sensor for emergency video locking, and 24-hour parking monitoring capabilities.

Figure 1: ARPHA B25 Dash Cam with accessories and app interface.
2. What's Included
Verify that all items listed below are present in your package:
- Front Camera Unit
- Rear Camera Unit
- 64GB TF Card (pre-installed or separate)
- Car Charger (12V adapter)
- Cable Clips / Pry Tool
- 3M Adhesive Pads
- Type-C Adapter Cable
- Type-C USB Power Cable (3.4M/12ft)
- Electrostatic Films
- User Manual

Figure 2: All components included in the ARPHA B25 Dash Cam package.
3. Setup and Installation
3.1 Preparation
- Clean Windshield: Ensure the area on your windshield where the dash cam will be mounted is clean and dry.
- Apply Electrostatic Film: Apply the provided electrostatic film to the desired mounting location on the windshield. This helps protect your windshield and makes removal easier.
- Insert SD Card: Insert the provided 64GB TF card into the dash cam's SD card slot. The device supports up to 256GB Class 10 U3 speed micro SD cards.
3.2 Mounting the Front Camera
- Attach the front camera to the electrostatic film using the 3M adhesive pad on the camera mount. Position it centrally, ideally behind the rearview mirror, to avoid obstructing your view.
- Adjust the camera lens to ensure it captures the road ahead clearly.
3.3 Connecting Power
- Connect the Type-C USB Power Cable to the dash cam's power input.
- Route the power cable along the edge of the windshield and dashboard, using the provided cable clips and pry tool to tuck it neatly out of sight.
- Plug the car charger into your vehicle's 12V power outlet.
3.4 Installing the Rear Camera
- Connect the rear camera cable to the main front camera unit.
- Route the rear camera cable from the front unit to the rear window, tucking it along the vehicle's headliner and side panels.
- Attach the rear camera to the upper center of your rear window using its adhesive pad.

Figure 3: Recommended cable routing for a clean installation.
4. Operating Instructions
4.1 Power On/Off
The dash cam will automatically power on and begin recording when your vehicle's ignition is turned on. It will power off automatically when the ignition is turned off.
4.2 Recording Modes
- Loop Recording: The dash cam continuously records video in 1, 3, or 5-minute segments. When the SD card is full, the oldest unlocked footage will be automatically overwritten.
- Emergency Lock Video (G-Sensor): In the event of a sudden impact or collision, the built-in G-Sensor will automatically detect the event and lock the current 1-minute video segment, preventing it from being overwritten.

Figure 4: Emergency Lock Video automatically saves critical footage during impacts.
4.3 5G WiFi Connectivity
The dash cam features 5G WiFi for high-speed wireless connection to your smartphone. Download the ARPHA Vision app from your device's app store.
- Enable Bluetooth on your smartphone.
- Open the ARPHA Vision app and follow the on-screen prompts to connect to the dash cam's WiFi network.
- Once connected, you can view live video, playback recorded footage, download files to your phone, and share them.
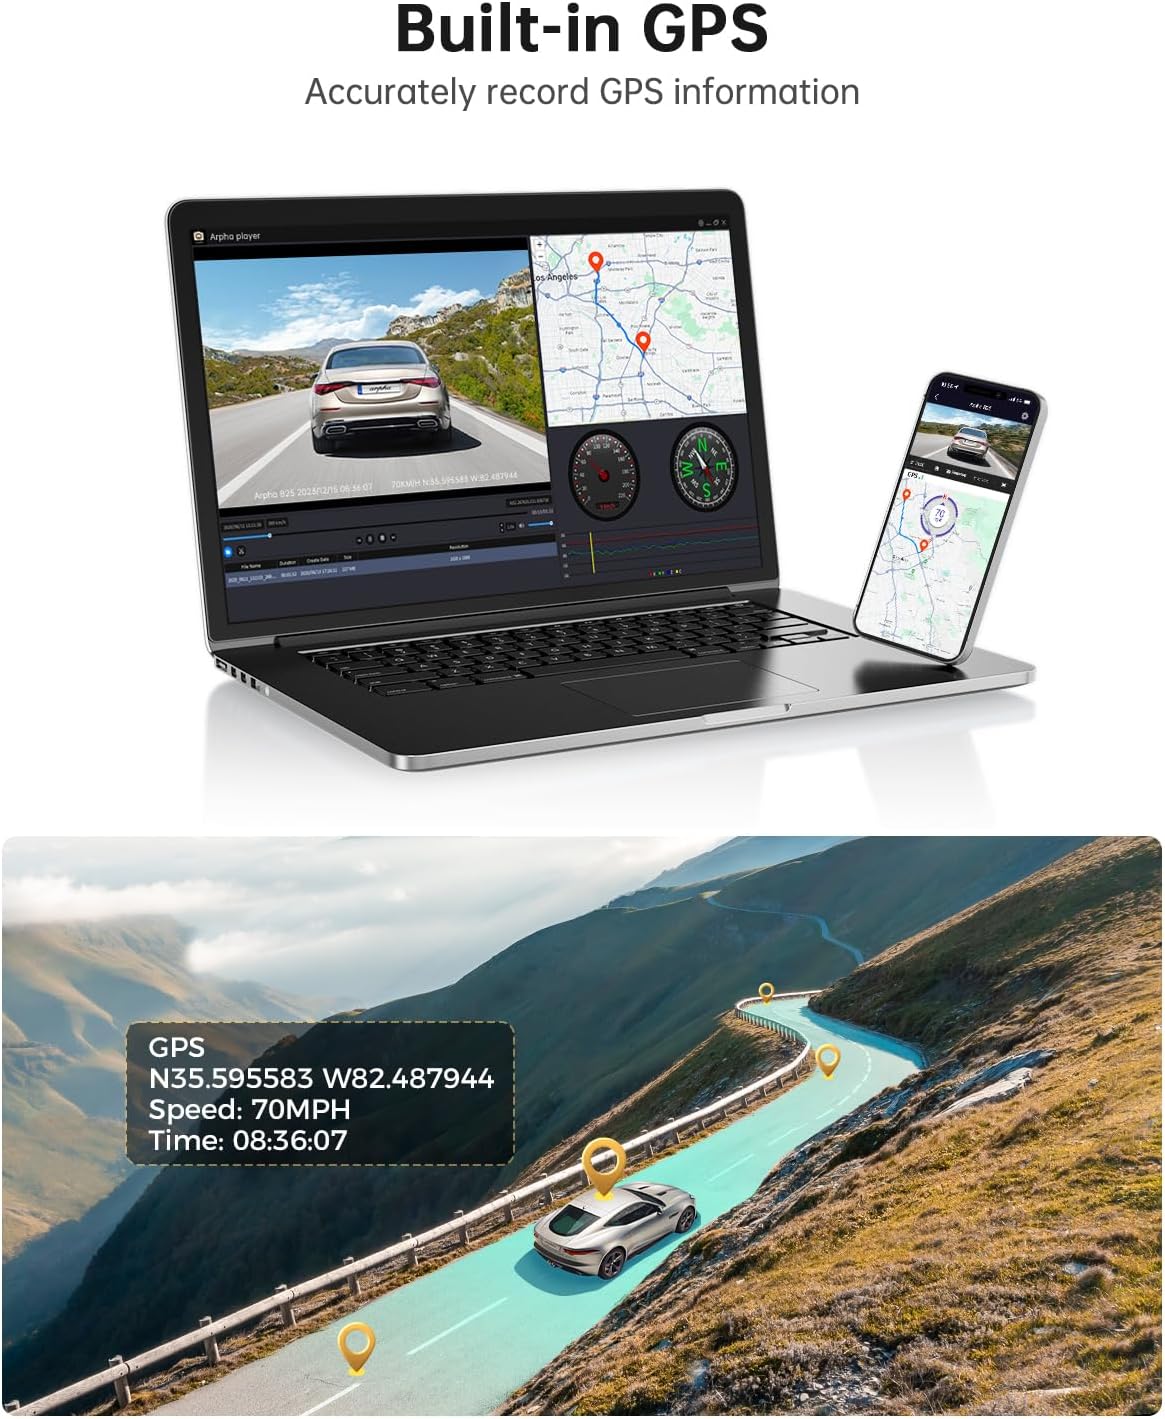
Figure 5: Connect to the ARPHA Vision app via 5G WiFi for seamless control and file management.
4.4 Built-in GPS
The integrated GPS module accurately records your vehicle's driving route, speed, and coordinates. This data can be viewed alongside your video footage using the ARPHA GPS Player software on a computer or within the mobile app.

Figure 6: GPS data provides detailed route and speed information.
4.5 Voice Control
Operate key functions hands-free using voice commands. Supported commands include:
- "Lock the video"
- "Take picture"
- "Open recording"
- "Turn off recording"
Figure 7: Hands-free operation with voice control for safety and convenience.
4.6 WDR Ultra Clear Night Vision
The Wide Dynamic Range (WDR) technology enhances video clarity in low-light conditions, ensuring that details are visible even at night or in tunnels.

Figure 8: WDR technology provides clear video recording in challenging lighting conditions.
4.7 Advanced Driving Assistant System (ADAS)
The ADAS feature provides real-time alerts to enhance driving safety:
- Lane Departure Reminder: Alerts you if your vehicle drifts out of its lane.
- Vehicle Approaching Warning: Notifies you of vehicles approaching too closely.
- Pedestrian Collision Warning: Provides alerts for potential pedestrian collisions.
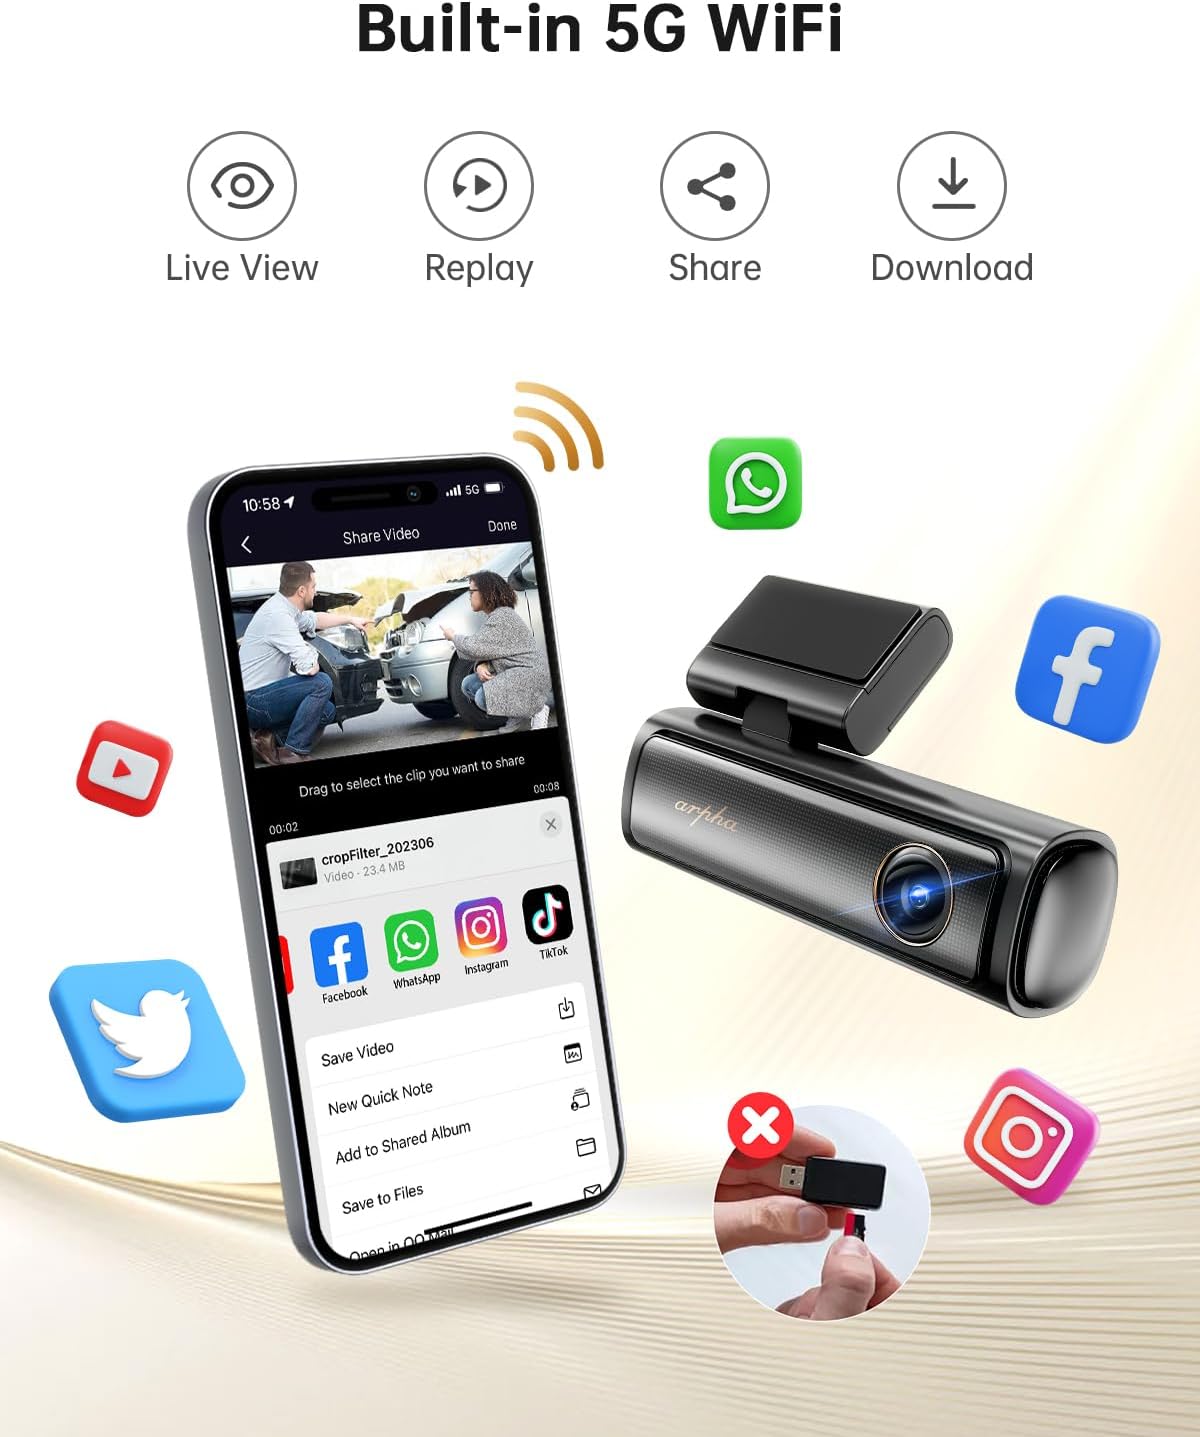
Figure 9: ADAS features assist in safer driving by providing timely warnings.
4.8 24-Hour Parking Monitor
To enable 24-hour parking monitoring, a 3-lead hardwire kit with an output current of 2.5A is required (search ASIN: BOBML1DK8W). This feature offers two modes:
- Collision Detection Parking Mode: The dash cam will automatically record if an impact is detected while parked.
- Time-Lapse Parking Mode: Records continuously at 1 frame per second, compressing 24 hours of footage into a short video.

Figure 10: 24-Hour Parking Monitor provides continuous surveillance when the vehicle is off.
5. Maintenance
- SD Card Management: Regularly format the SD card (at least once a month) to ensure optimal performance and prevent data corruption. Replace the SD card if it shows signs of wear or frequent errors.
- Lens Cleaning: Keep the front and rear camera lenses clean using a soft, lint-free cloth to ensure clear video quality. Avoid abrasive materials that could scratch the lens.
- Cable Connections: Periodically check all cable connections to ensure they are secure and free from damage. Loose connections can lead to intermittent power or recording issues.
- Temperature Considerations: The dash cam is designed to operate in temperatures from 4°F to 158°F (-20°C to 70°C) thanks to its supercapacitor. Avoid exposing the device to extreme temperatures outside this range for prolonged periods.
6. Troubleshooting
- Recording Stops Intermittently:
- Ensure your SD card is a Class 10 U3 speed or above. Lower speed cards may not keep up with the data rate.
- Format the SD card regularly within the dash cam's settings or via the app.
- The SD card may be faulty; try replacing it with a new, high-quality card.
- WiFi Connection Issues:
- Confirm you have downloaded the correct app: ARPHA Vision.
- Ensure Bluetooth is enabled on your phone for initial pairing.
- Restart both the dash cam and your smartphone, then attempt to reconnect.
- Camera Not Powering On:
- Check if the car charger is properly inserted into the 12V outlet and receiving power.
- Verify that the Type-C USB Power Cable is securely connected to both the dash cam and the car charger.
- Test the car charger with another device to ensure it is functional.
- Poor Night Vision Quality:
- Clean the camera lenses thoroughly.
- Ensure no obstructions (e.g., stickers, dirt) are blocking the lens.
- ADAS Features Not Functioning Correctly:
- Verify the front camera is mounted centrally and the lens is clean.
- Ensure the windshield area in front of the camera is clear of any obstructions or glare.
7. Specifications
| Product Dimensions | 6.3 x 5.51 x 2.36 inches |
| Item Weight | 1.6 pounds |
| Item Model Number | B25 |
| Connectivity Technology | Wi-Fi (5G) |
| Special Features | App Control, Built-In GPS, Built-In Microphone, Built-In WiFi, Loop Recording, Parking Monitor, Voice Control |
| Screen Size | 3 inches |
| Optical Sensor Technology | CMOS |
| Auto Part Position | Front |
| Display Type | LCD |
| Frame Rate | 30 FPS |
8. Warranty and Support
For warranty information, technical support, or any inquiries regarding your ARPHA B25 Dash Cam, please refer to the contact details provided in the original product packaging or visit the official ARPHA website. Keep your purchase receipt as proof of purchase for warranty claims.


