
West Biking B0CJ663X1N
Contents
West Biking Bike Stand Instruction Manual
Model: B0CJ663X1N
Brand: West Biking
Introduction
This manual provides detailed instructions for the assembly, operation, and maintenance of your West Biking Bike Stand. Designed for secure and stable mounting, this 2-in-1 stand can be used on a wall or a workbench, supporting bikes up to 88 lbs (40 kg). Its adjustable clamp and robust construction make it ideal for various bike maintenance and repair tasks.
Safety Information
- Ensure the stand is securely mounted to a stable surface (wall or workbench) capable of supporting the stand's weight plus the maximum bike weight (88 lbs / 40 kg).
- Use appropriate tools and follow all installation steps carefully.
- Do not exceed the maximum load capacity of 88 lbs (40 kg).
- Always double-check that the bike is firmly clamped before performing any maintenance.
- Keep hands and clothing clear of moving parts during operation.
- Store the stand in a dry, safe place when not in use.
Package Contents
- Clamp Arm Assembly
- Mounting Bracket
- Lever
- Expansion Screws (4x)
- Wrench

Image showing the main components included in the West Biking Bike Stand package: the clamp arm assembly, mounting bracket, lever, expansion screws, and a small wrench.
Setup and Installation
The West Biking Bike Stand offers versatile installation options: wall-mounted or workbench-mounted.
Official product video demonstrating the assembly of the clamp arm and lever to the main bracket, followed by the installation process for both workbench and wall mounting.
Step 1: Assemble the Clamp Arm and Lever to the Bracket
Insert the clamp arm into the main body of the bracket. Secure the lever by screwing it into the designated hole on the side of the main body.
Step 2: Mark the Location of the Punch Point
For workbench installation, place the bracket on your workbench and mark the screw holes. For wall installation, hold the bracket against the wall at the desired height and mark the screw holes. Ensure the surface is sturdy and can support the weight.
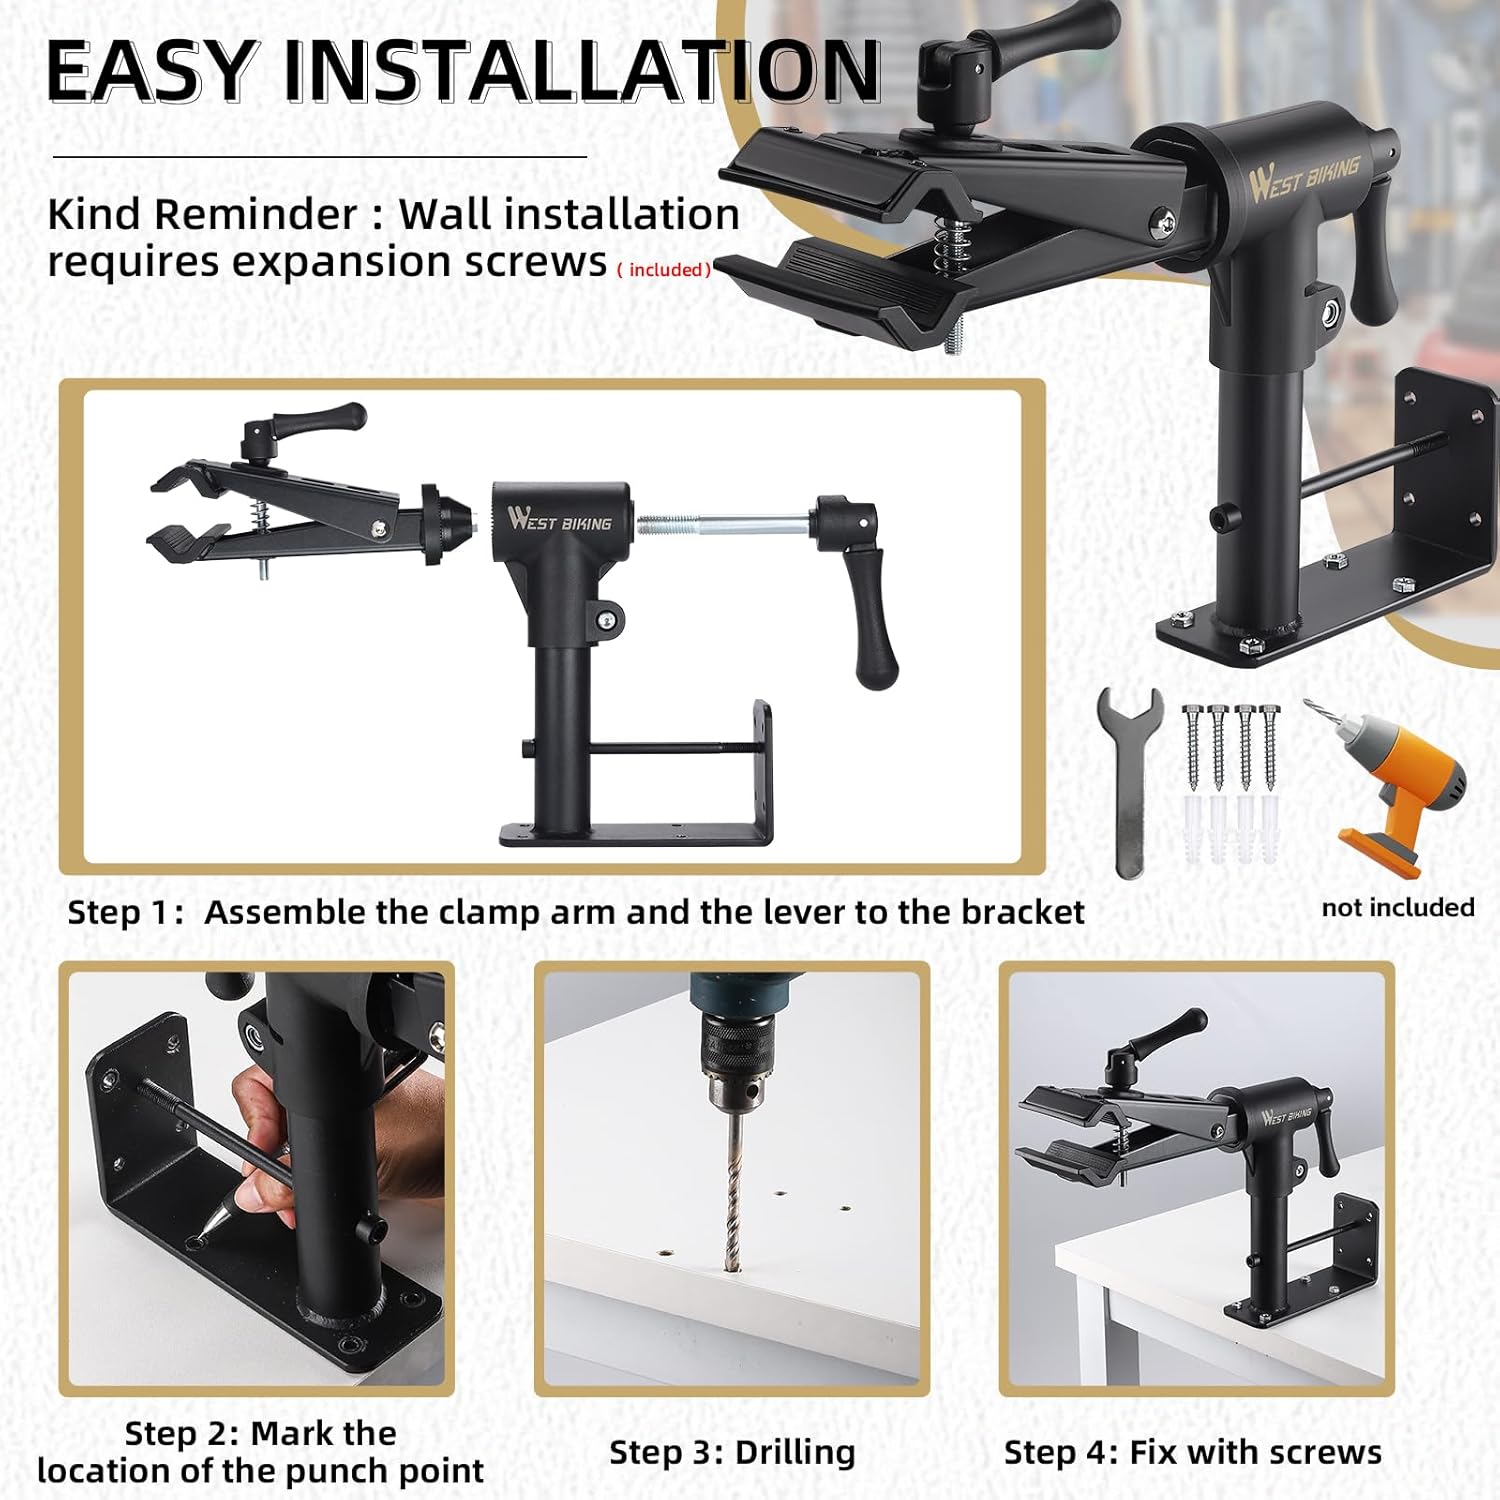
Image illustrating how to mark the drilling points on both a workbench and a wall using the stand's mounting bracket.
Step 3: Drilling
Use an appropriate drill bit to drill holes at the marked locations. For wall mounting, ensure the drill bit size matches the expansion screws.

Image demonstrating the drilling process for both workbench and wall mounting. For wall mounting, expansion screws are used.
Step 4: Fix with Screws
For workbench installation, align the bracket with the drilled holes and secure it using the provided screws. For wall installation, insert the expansion nuts into the drilled holes, then align the bracket and tighten the screws firmly.

Image showing the final step of securing the stand to the surface using screws. For wall mounting, expansion nuts are hammered into place before screwing.
Operating Instructions
Adjusting the Clamp Angle
The clamp features a 360-degree rotating mechanism. Loosen the adjustable knob to rotate the clamp to your desired angle, then tighten the knob to secure it.

Image highlighting the 360-degree rotation feature of the clamp, allowing for flexible positioning of the bike.
Securing Your Bike
Adjust the chuck by unscrewing the clamp to open the jaws. Carefully place your bike's frame (seat tube, down tube, or top tube) into the clamp. Ensure the rubber pads protect the frame. Tighten the chuck firmly until the bike is securely held.

Image displaying a bike securely mounted on the stand, demonstrating its stability and load capacity.

Close-up image of the clamp's rubber pads, designed to protect the bike frame from scratches and provide a secure grip.
Maintenance
- Regularly inspect all screws and connections to ensure they are tight.
- Clean the stand with a damp cloth after use to remove dirt and grime.
- Avoid using abrasive cleaners or solvents that could damage the finish.
- Periodically check the rubber pads on the clamp for wear and tear. Replace if necessary to ensure proper frame protection.
- Lubricate moving parts, such as the clamp screw mechanism, as needed to ensure smooth operation.
Troubleshooting
Bike is not stable on the stand.
- Ensure the mounting surface (wall or workbench) is robust and properly installed.
- Verify that all mounting screws are fully tightened.
- Make sure the clamp is securely tightened around the bike frame. The bike should not wobble or slip.
- Check if the bike's weight exceeds the 88 lbs (40 kg) load capacity.
Clamp is difficult to adjust or tighten.
- Apply a small amount of lubricant to the screw mechanism of the clamp.
- Ensure no debris is obstructing the clamp's movement.
Frame is getting scratched by the clamp.
- Verify that the rubber pads are correctly positioned and not worn out.
- Ensure the clamp is not overtightened, which can cause excessive pressure on the frame.
Specifications
| Feature | Detail |
|---|---|
| Brand | West Biking |
| Model | B0CJ663X1N |
| Material | Iron |
| Color | Black |
| Load Capacity | 88 Pounds (approx. 40 kg) |
| Mounting Type | Wall or Workbench |
| Clamp Rotation | 360 Degrees |
| Assembly Required | Yes |
| Item Weight | 5.5 pounds (2.5 Kilograms) |
| Country of Origin | China |
Warranty and Support
For warranty information and customer support, please refer to the product packaging or contact West Biking customer service directly through their official website or the retailer where the product was purchased.
Ask a question about this manual
Ask about setup, troubleshooting, compatibility, parts, safety, or missing instructions. Manuals+ will review the question and use this page’s manual context to help answer it.