
1. Introduction
Thank you for choosing the BUCKLOS 26 x 4.0 inch Fat Tire MTB Air Double Crown Suspension Fork. This manual provides essential information for the proper setup, operation, and maintenance of your new suspension fork. Please read this manual thoroughly before installation and use to ensure optimal performance and safety.
2. Product Overview
The BUCKLOS Air Double Crown Suspension Fork is designed for 26-inch fat tire bicycles, including snow bikes, beach bikes, and E-bikes. It features a lightweight magnesium and aluminum alloy construction, an air suspension system for adjustable damping, and a robust double crown design for enhanced stability and control.
Key Components and Features:
- Air Chamber: Allows for precise adjustment of suspension stiffness based on rider weight and terrain.
- ABS Adjustment: Provides lockout functionality for efficient climbing and varied riding conditions.
- Aluminum Alloy Construction: Ensures a lightweight yet durable structure.
- Fender Install Hole: Integrated mounting point for fenders.
- Brake Line Fixed Buckle: Secures the brake line for tidy routing and prevents interference.
- 9mm QR Dropouts: Compatible with standard 9mm quick-release axles.
- Removable Stickers: For customization.

Figure 1: Function Details of the BUCKLOS Suspension Fork. This image highlights key features such as the ABS adjustment, air chamber, aluminum alloy construction, fender install hole, brake line fixed buckle, and 9mm QR dropouts.
3. Specifications
| Feature | Specification |
|---|---|
| Wheel Size Compatibility | 26 inch |
| Tire Compatibility | 4.0 inch Fat Tire |
| Travel | 180mm |
| Hub Spacing | 135mm |
| Axle Type | 9mm Quick Release (QR) |
| Steerer Tube Diameter | 1 1/8" (28.6mm) Straight Tube |
| Brake Type | Disc Brake |
| Material | Magnesium + Aluminum Alloy |
| Weight | 2745g (± 50g) |

Figure 2: Fork Size Diagram. This image provides detailed measurements of the suspension fork, including steerer tube diameter (28.6mm), overall length (715mm), and hub spacing (135mm).

Figure 3: Air Fork vs. Oil Fork Weight Comparison. This image illustrates the lightweight nature of the BUCKLOS air fork, weighing 2745g, which is approximately 1.8 lbs lighter than a typical oil spring fork.
4. Setup and Installation
Proper installation is crucial for the safety and performance of your suspension fork. If you are unsure about any steps, it is recommended to seek assistance from a qualified bicycle mechanic.
4.1 Compatibility Check
Before installation, ensure your bicycle frame and components are compatible with this fork:
- Wheel Size: Designed for 26-inch wheels.
- Tire Width: Compatible with 4.0 inch fat tires.
- Hub Spacing: Requires a 135mm front hub.
- Axle Type: Designed for 9mm Quick Release (QR) axles.
- Steerer Tube: Compatible with 1 1/8" (28.6mm) straight steerer tubes.
- Brake System: Designed for disc brakes.
4.2 Installation Steps
- Remove Old Fork: Carefully remove your existing front fork, headset components, and front wheel.
- Prepare Steerer Tube: If necessary, cut the steerer tube of the new fork to the appropriate length for your frame and stem. Ensure sufficient length for headset stack height and stem clamping.
- Install Crown Race: Install the crown race from your headset onto the base of the fork's steerer tube.
- Insert Fork: Slide the fork's steerer tube through the head tube of your bicycle frame.
- Install Headset Components: Install the upper headset bearings, spacers, and stem onto the steerer tube.
- Install Star Nut and Top Cap: Insert the provided star nut into the steerer tube (if not pre-installed) and then place the headset top cap over the stem. Secure with the steel stem bolt. Tighten the bolt to remove play from the headset, then align the stem and tighten stem bolts.
- Install Front Wheel: Mount your front wheel into the 9mm QR dropouts. Ensure the quick release skewer is properly tightened according to manufacturer specifications.
- Install Disc Brake Caliper: Attach your disc brake caliper to the fork's brake mounts. Ensure proper alignment with the rotor and tighten mounting bolts to the manufacturer's torque specifications.
- Route Brake Line: Secure the brake line using the integrated brake line fixed buckle on the fork leg.

Figure 4: Installation Rendering. This image demonstrates the BUCKLOS suspension fork installed on a fat tire electric bicycle, providing a visual reference for the final setup.
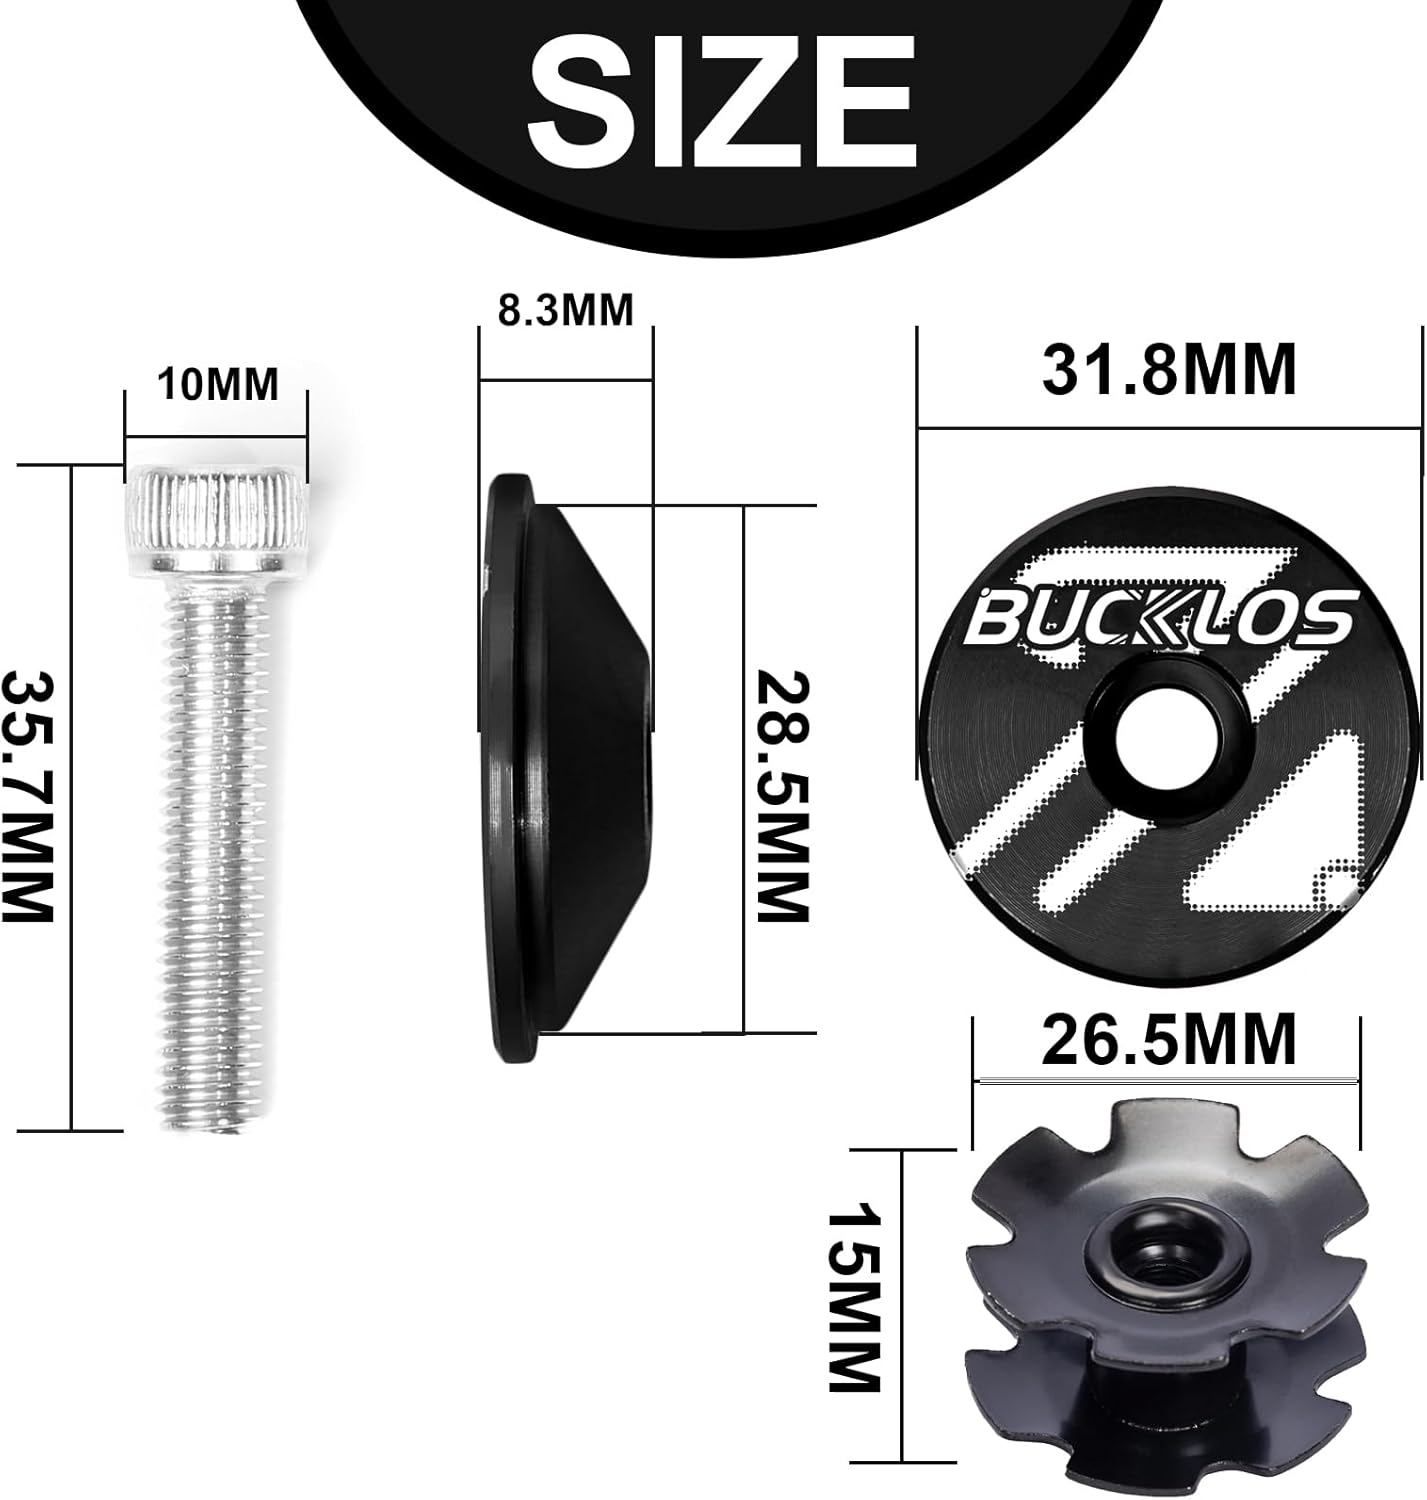
Figure 5: Headset Top Cap and Star Nut Dimensions. This image provides detailed measurements for the included headset top cap, steel stem bolt, and star nut, crucial for proper headset assembly.
5. Operating the Suspension Fork
Once installed, proper adjustment of your air suspension fork will enhance your riding experience.
5.1 Air Pressure Adjustment
The air chamber allows you to fine-tune the fork's stiffness. Use a high-pressure shock pump (not included) to adjust the air pressure. Refer to the fork manufacturer's recommendations or a general guide for initial pressure settings based on your weight and riding style. Increasing pressure makes the fork stiffer, while decreasing pressure makes it softer.
5.2 ABS Adjustment (Lockout)
The ABS adjustment knob, typically located on the top of one of the fork legs, controls the lockout function. Turning the knob to the 'lock' position will stiffen the fork, reducing suspension movement. This is beneficial for climbing or riding on smooth surfaces to improve pedaling efficiency. Turning it to the 'open' position allows the fork to absorb impacts freely.
5.3 Quick Release (QR) Operation
Ensure the 9mm quick release skewer for your front wheel is always securely closed and tightened before riding. An improperly secured wheel can lead to serious injury.
6. Maintenance
Regular maintenance will prolong the life and performance of your suspension fork.
- Cleaning: After each ride, especially in dirty or wet conditions, clean the outer surfaces of the fork, stanchions, and seals with mild soap and water. Avoid high-pressure washers directly on seals.
- Inspect for Damage: Periodically check the fork for any signs of damage, cracks, or excessive wear on the stanchions, lowers, or crown.
- Check Air Pressure: Verify air pressure regularly (e.g., monthly) as air can slowly leak over time. Adjust as needed.
- Bolt Torque: Periodically check the torque of all bolts, including those for the stem, brake caliper, and crown bolts, to ensure they are tightened to manufacturer specifications.
- Professional Service: For internal maintenance, such as seal replacement or damper service, it is recommended to consult a professional bicycle mechanic.
7. Troubleshooting
Here are some common issues and basic troubleshooting steps:
| Problem | Possible Cause | Solution |
|---|---|---|
| Fork feels too soft/bottoms out easily | Low air pressure | Add air using a high-pressure shock pump. |
| Fork feels too stiff/no travel | Too much air pressure; Lockout engaged | Release some air pressure; Disengage the ABS lockout. |
| Fork makes unusual noises | Loose components; Internal issue | Check all bolts (stem, crown, brake caliper). If noise persists, seek professional service. |
| Air leaks from valve | Loose valve core; Damaged valve seal | Tighten valve core. If leak continues, valve core or seal may need replacement by a professional. |
8. Warranty and Support
Specific warranty details for this BUCKLOS product are not provided in the available product information. For warranty claims, technical support, or service inquiries, please contact the BUCKLOS customer service directly or refer to their official website for the most current information.