Introduction
Thank you for choosing the Zimati 14-inch 63 LED Snowflake Window Light. This manual provides detailed instructions for the safe and effective use of your new decoration. Please read it thoroughly before installation and operation.

Image: The Zimati 14-inch 63 LED Snowflake Window Light, showcasing its cool white illumination and intricate design, ready for festive display.
What's Included
Your Zimati Snowflake Window Light package includes the following components:
- 1 x 14-inch Snowflake LED Light (with 63 cool white LEDs)
- 1 x Remote Control
- 1 x Suction Cup Hook
- 1 x USB Power Cable (10 feet long)

Image: A visual representation of all items included in the package: the snowflake light, remote control, suction cup, and USB power cable.
Specifications
| Feature | Detail |
|---|---|
| Model Number | 0202002 |
| Dimensions (L x W x H) | 14 x 0.2 x 14.4 inches |
| Item Weight | 11.7 ounces |
| Light Color | Cool White |
| Number of LEDs | 63 |
| Frame Material | Metal |
| Power Source | USB (5 Volts) |
| USB Cable Length | 10 feet |
| Remote Control Battery | 1 x CR2 battery (included) |
| Special Features | 8 Lighting Modes, Timer Function, Remote Control |
Setup
1. Battery Installation for Remote Control
- Locate the battery compartment on the back of the remote control.
- Open the compartment and insert 1 CR2 battery, ensuring correct polarity.
- Close the battery compartment securely.
2. Mounting the Snowflake Light
- Clean the desired surface (glass door, window, or ceramic wall) thoroughly to ensure the suction cup adheres properly.
- Press the suction cup firmly onto the clean surface.
- Hang the snowflake light using the top hanging hole on the suction cup hook.
- Alternatively, if not using the suction cup, the light can be hung from a pin or screw in a wall using the integrated hanging loop.
3. Power Connection
- Connect the USB power cable to any standard USB power source (e.g., USB charger, USB socket, power bank, computer).
- Note: A USB adapter is not included with this product.

Image: Illustration of the snowflake light's USB power compatibility with various devices like USB chargers, power banks, and computers.

Image: A snowflake light securely attached to a window using its suction cup hook, ready for illumination.
Video: This video demonstrates the installation process of the snowflake window lights, including battery insertion and mounting with the suction cup.
Operating Instructions
Remote Control Functions:
- ON/OFF: Press to turn the lights on or off.
- MODE (1-8): Select from 8 distinct lighting modes:
- Combination
- In Wave
- Sequential
- Slow Glow
- Flash
- Slow Fade
- Twinkle
- Steady On
- Brightness Adjustment (DIM +/-): Adjust the light intensity to your preference.
- TIMER: Activate the timer function. The lights will stay on for 6 hours and then automatically turn off for 18 hours, repeating the cycle daily.
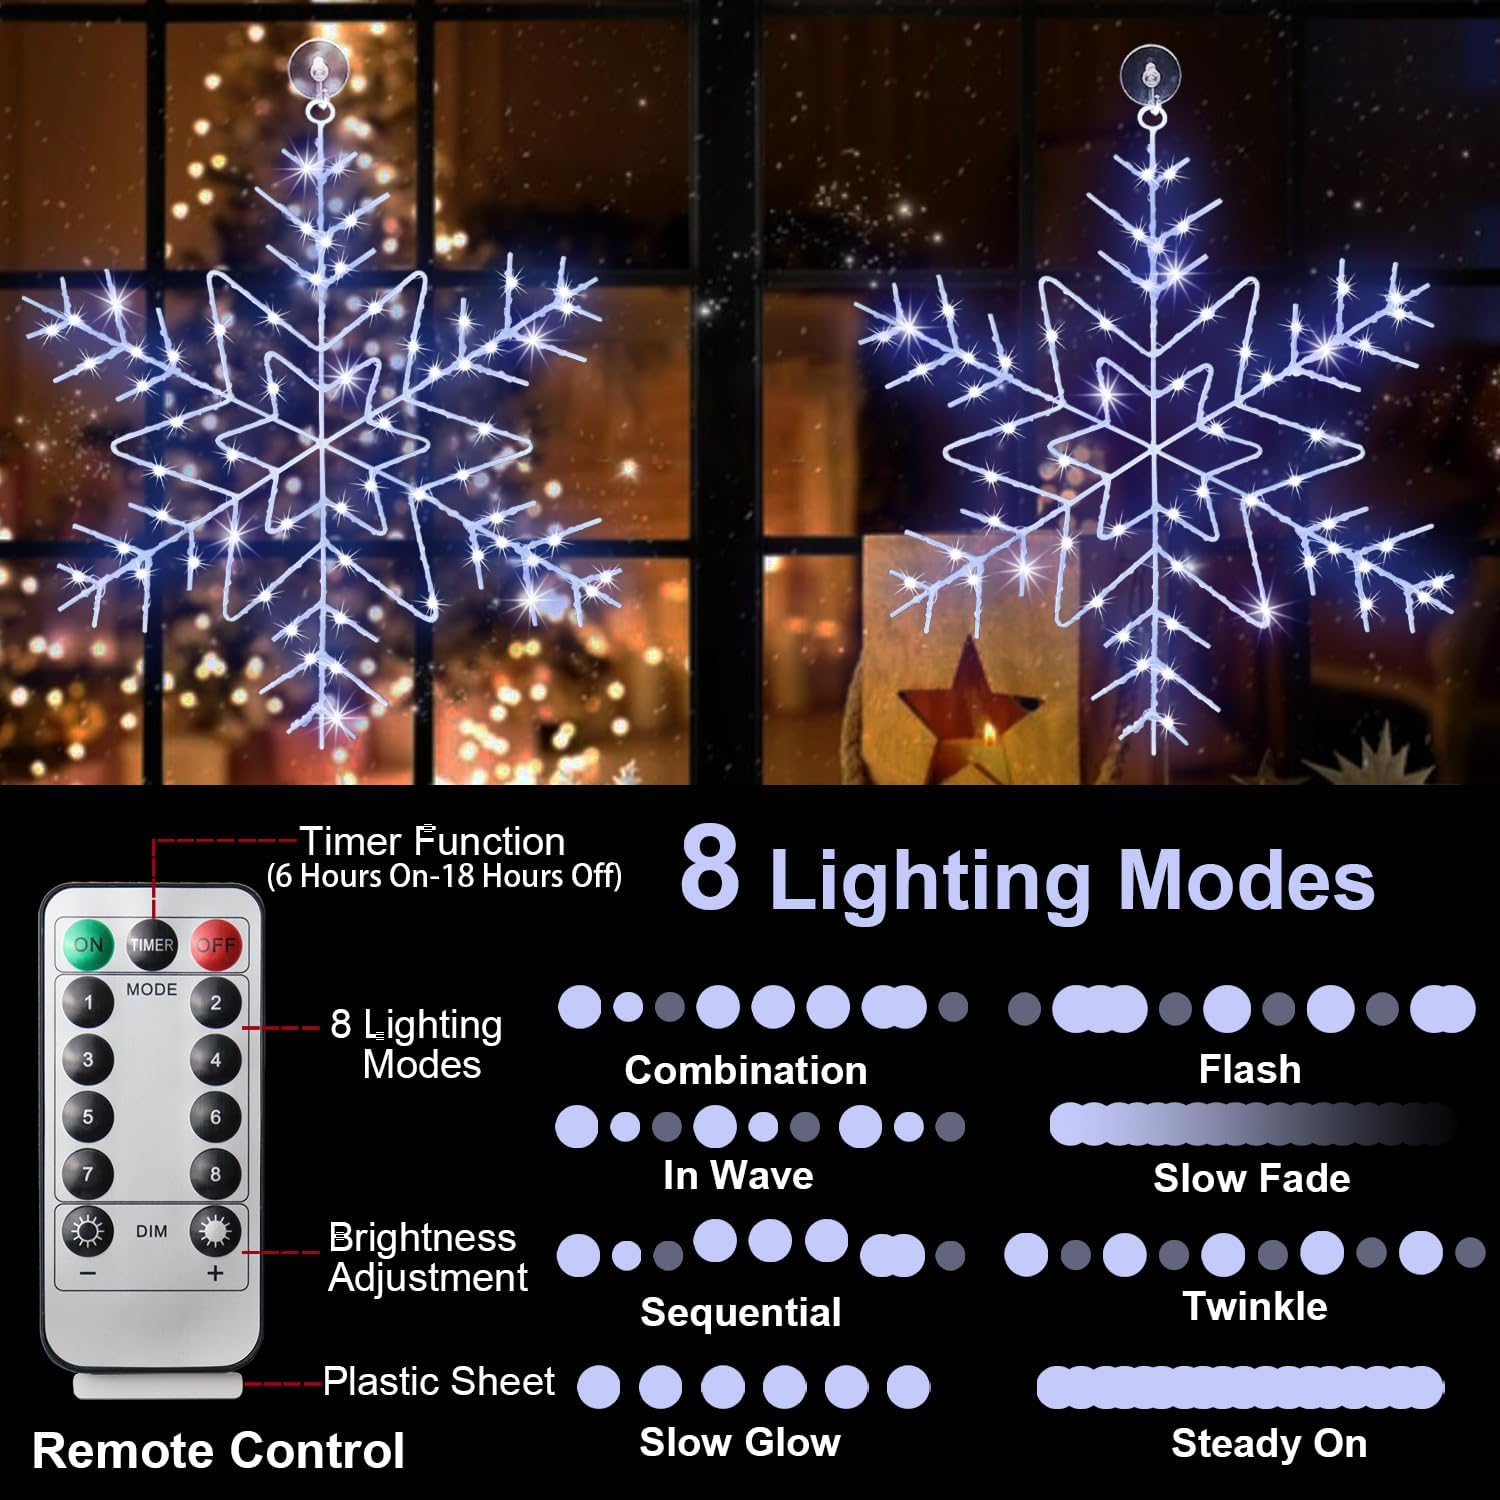
Image: The remote control displaying its various buttons for mode selection, brightness adjustment, and timer activation, alongside the illuminated snowflake lights.
Video: This video showcases the various lighting modes and effects of the Zimati snowflake window lights.
Maintenance
- Cleaning: Gently wipe the snowflake light with a soft, dry cloth. Avoid using abrasive cleaners or solvents.
- Storage: When not in use, store the light in its original packaging or a protective container in a cool, dry place to prevent tangling and damage.
- Battery Replacement: If the remote control's functionality diminishes, replace the CR2 battery.
Troubleshooting
| Problem | Possible Cause | Solution |
|---|---|---|
| Lights do not turn on. | No power to the USB connection. | Ensure the USB cable is securely plugged into a working power source. Try a different USB port or adapter. |
| Remote control is not working. | Remote battery is dead or incorrectly installed. | Replace the CR2 battery in the remote control, ensuring correct polarity. Remove any plastic tab if it's new. Ensure there are no obstructions between the remote and the light's receiver. |
| Timer function is inaccurate. | Internal clock deviation. | Reset the timer by turning the lights off and on, then reactivating the timer function at the desired time. |
Safety Information
For outdoor use, ensure the USB power source is suitable for outdoor conditions and protected from moisture. Keep the product away from flammable materials. Follow local guidelines for battery disposal.
Warranty and Support
For warranty information or technical support, please refer to the product packaging or contact Zimati customer service directly. Keep your purchase receipt for warranty claims.