1. Introduction
This manual provides detailed instructions for the installation, operation, and maintenance of your Redragon CA-604B WIDELOAD LITE Mid Tower Gaming Case. Please read this manual thoroughly before beginning assembly to ensure proper setup and to maximize the lifespan of your components. Keep this manual for future reference.
2. Product Overview
The Redragon CA-604B WIDELOAD LITE is a mid-tower gaming case designed for Micro ATX motherboards. It features a sleek black finish, a tempered glass side panel for showcasing your build, and a robust SGCC steel construction. This case is designed to provide ample space for components and efficient cooling solutions.

Figure 2.1: Front and side view of the Redragon CA-604B WIDELOAD LITE case, highlighting the tempered glass panel and overall design.

Figure 2.2: Top and side view of the case, showing the top ventilation and overall dimensions.
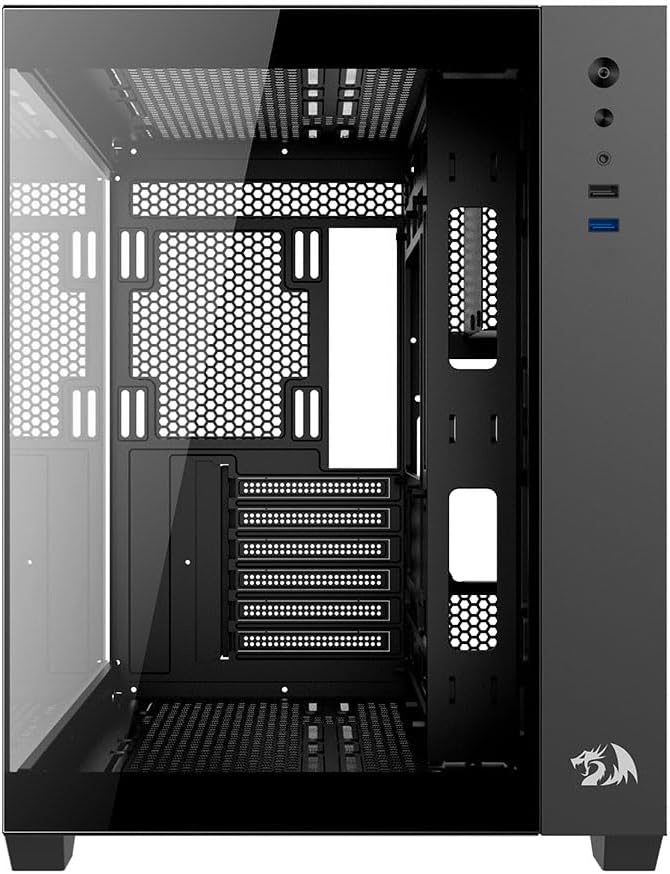
Figure 2.3: Internal front view of the case, illustrating the motherboard tray and cable routing options.

Figure 2.4: Rear and side view of the case, showing the rear fan mount and expansion slots.

Figure 2.5: Internal rear view of the case, detailing the power supply shroud and drive bays.
3. Setup and Installation
Before starting, ensure you have all necessary components and tools, including a screwdriver set, zip ties, and anti-static precautions.
3.1 Unpacking and Initial Inspection
- Carefully remove the case from its packaging.
- Inspect the case for any signs of damage during transit. Contact your retailer immediately if any damage is found.
- Locate the accessory box inside the case, which contains screws, standoffs, and other small parts.
3.2 Removing Side Panels
The Redragon CA-604B WIDELOAD LITE features a tempered glass side panel and a solid steel side panel. Both are typically secured with thumbscrews at the rear of the case.
- Unscrew the thumbscrews on the rear of the case for both side panels.
- Carefully slide the tempered glass panel backward and lift it away. Place it on a soft, flat surface to prevent scratches.
- Slide the steel side panel backward and lift it away.
3.3 Motherboard Installation
This case supports Micro ATX motherboards.
- Install the I/O shield that came with your motherboard into the rear opening of the case.
- Ensure that the motherboard standoffs are correctly aligned for your Micro ATX motherboard. Install any missing standoffs from the accessory kit.
- Carefully place your motherboard onto the standoffs, aligning the screw holes.
- Secure the motherboard with the appropriate screws from the accessory kit. Do not overtighten.
3.4 Storage Device Installation
The case provides bays for 2.5" SSDs and 3.5" HDDs.
- 2.5" SSDs: Locate the 2.5" drive mounts (usually on the back of the motherboard tray or dedicated brackets). Secure your SSDs with screws.
- 3.5" HDDs: Locate the 3.5" drive cage (often beneath the power supply shroud). Slide your HDDs into the trays and secure them with screws or tool-less clips if available.
3.5 Power Supply Installation
- Slide your power supply unit (PSU) into the PSU shroud area from the rear of the case.
- Align the PSU with the screw holes at the rear of the case.
- Secure the PSU with four screws.
3.6 Expansion Card (GPU, etc.) Installation
- Remove the necessary expansion slot covers from the rear of the case.
- Insert your expansion card (e.g., graphics card) into the appropriate PCIe slot on your motherboard.
- Secure the card with the provided screw or retention clip.
3.7 Connecting Front Panel I/O
Connect the front panel cables (USB 3.0, HD Audio, Power Switch, Reset Switch, Power LED, HDD LED) to the corresponding headers on your motherboard. Refer to your motherboard manual for exact header locations.
3.8 Cable Management
Utilize the cable routing cutouts and tie-down points behind the motherboard tray to manage cables. This improves airflow and aesthetics.
3.9 Reattaching Side Panels
Once all components are installed and cables are managed, carefully reattach both side panels and secure them with their respective thumbscrews.
4. Operating the System
After assembly, connect your monitor, keyboard, mouse, and power cable to the system. Press the power button on the front panel to turn on your computer.
4.1 Front Panel Ports
The front panel of the Redragon CA-604B WIDELOAD LITE includes:
- Power Button
- Reset Button
- USB 3.0 Port (x1)
- Headphone Jack
- Microphone Jack
5. Maintenance
Regular maintenance helps ensure optimal performance and longevity of your computer components.
5.1 Cleaning
- Exterior: Use a soft, damp cloth to wipe down the exterior surfaces. Avoid harsh chemicals. For the tempered glass, use a glass cleaner applied to a cloth, not directly to the panel.
- Dust Filters: The case may include removable dust filters (e.g., on the top or bottom). Periodically remove and clean these filters with compressed air or by washing them with water and allowing them to dry completely before reinstallation.
- Interior: Use compressed air to remove dust from inside the case, especially from fans, heatsinks, and other components. Perform this cleaning in a well-ventilated area.
5.2 Airflow Optimization
Ensure that fans are installed in a way that promotes good airflow (e.g., front intake, rear/top exhaust). Keep the area around your PC clear to allow for unrestricted air circulation.
6. Troubleshooting
If you encounter issues, refer to the following common troubleshooting steps:
- System does not power on:
- Check if the power cable is securely connected to both the PSU and the wall outlet.
- Ensure the PSU switch is in the "ON" position.
- Verify that the front panel power switch cable is correctly connected to the motherboard header.
- Confirm all internal power cables (24-pin ATX, CPU, GPU) are securely seated.
- Fans are not spinning:
- Check if the fan cables are properly connected to the motherboard fan headers or a fan controller.
- Ensure the PSU is providing power.
- Front panel USB ports not working:
- Verify that the USB 3.0 cable from the front panel is correctly connected to the corresponding header on your motherboard.
- Audio jacks not working:
- Ensure the HD Audio cable from the front panel is correctly connected to the HD Audio header on your motherboard.
7. Specifications
Below are the technical specifications for the Redragon CA-604B WIDELOAD LITE Mid Tower Gaming Case:
| Feature | Detail |
|---|---|
| Model Number | CA-604B |
| Brand | Redragon |
| Case Type | Mid Tower |
| Motherboard Compatibility | Micro ATX |
| Material | SGCC Steel, Tempered Glass |
| Color | Black |
| Dimensions (L x W x H) | 51 cm x 39 cm x 44 cm (approx. 20.1 x 15.4 x 17.3 inches) |
| Product Weight | 7.3 kg (approx. 16.1 lbs) |
| Front I/O Ports | 1x USB 3.0, Audio In/Out |
| Cooling Method | Water Cooling (support for liquid cooling solutions) |
| Recommended Use | Gaming |
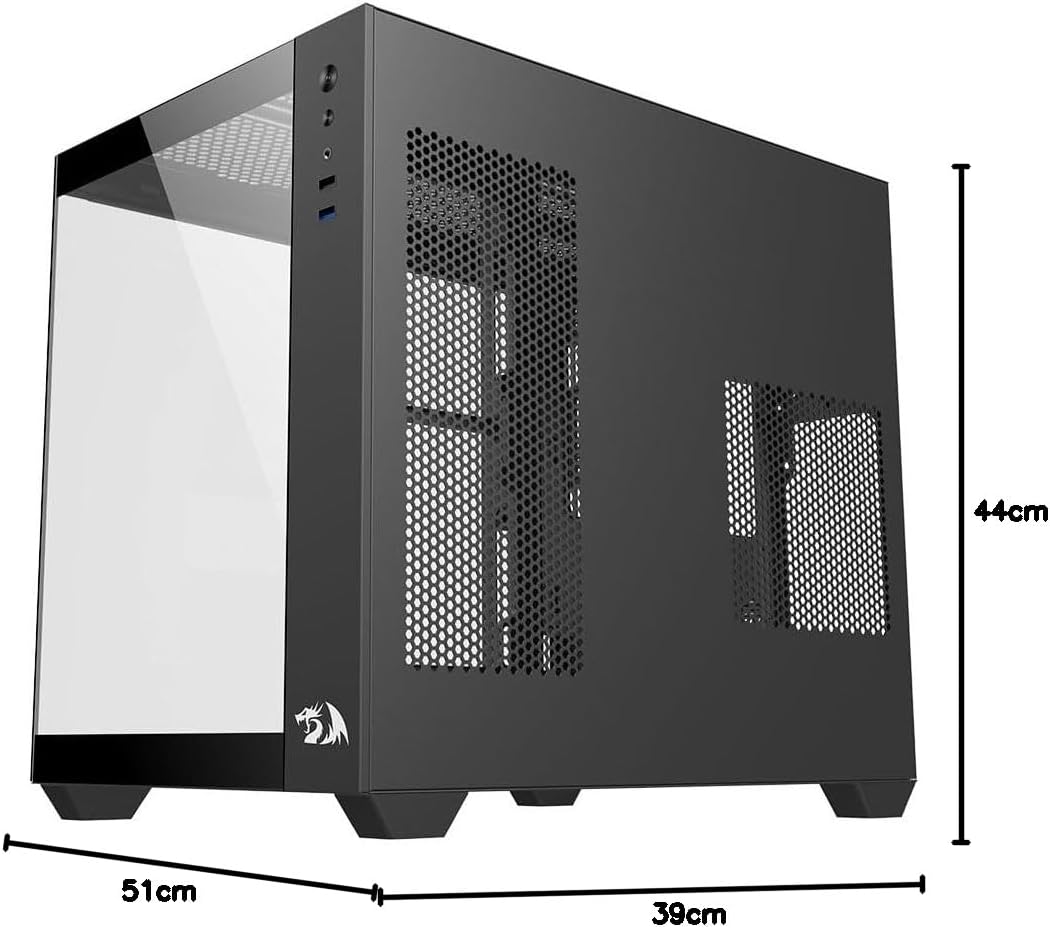
Figure 7.1: Dimensional diagram of the Redragon CA-604B WIDELOAD LITE case.
8. Warranty and Support
For warranty information and technical support, please refer to the official Redragon website or contact your local Redragon distributor. Keep your proof of purchase for warranty claims.
Redragon Official Website: www.redragonzone.com