1. Introduction and Overview
The Waveshare ESP32-C3 Mini Development Board is a compact, low-power System-on-Chip (SoC) designed for various IoT applications. It features a RISC-V 32-bit single-core processor, operating at up to 160MHz, and integrates 2.4GHz Wi-Fi (802.11 b/g/n) and Bluetooth 5 (LE) connectivity.
This board is equipped with 400KB of SRAM, 384KB ROM, and 4MB of onboard Flash memory, providing ample resources for embedded projects. Its castellated module design and onboard ceramic antenna make it suitable for direct soldering onto carrier boards, facilitating integration into custom hardware.
Key features include a flexible clock system, independent module power supply settings for low power consumption, and an integrated USB serial port full-speed controller. It offers 15 GPIO pins, configurable for various functions, including 3 SPI, 1 I2C, 2 UART, 1 I2S, and 2 ADC interfaces.

Figure 1: Waveshare ESP32-C3 Mini Development Board
2. Package Content
The standard package includes:
- ESP32-C3-Zero Development Board x1

Figure 2: Package Content - ESP32-C3-Zero Development Board
3. Board Specifications
The ESP32-C3 Mini Development Board offers the following technical specifications:
- Processor: Low-power SoC with RISC-V 32-bit single-core processor, up to 160MHz main frequency.
- Wireless Connectivity: Supports 2.4GHz Wi-Fi (802.11 b/g/n) and Bluetooth 5 (LE).
- Memory: 400KB SRAM, 384KB ROM, and 4MB onboard Flash memory.
- Design: Castellated module with onboard ceramic antenna, suitable for SMD applications.
- Power Management: Flexible clock and independent module power supply settings for low power consumption.
- USB: Integrated USB serial port full-speed controller.
- GPIO Pins: 15 configurable GPIO pins.
- Peripherals: 3 × SPI, 1 × I2C, 2 × UART, 1 × I2S, 2 × ADC.
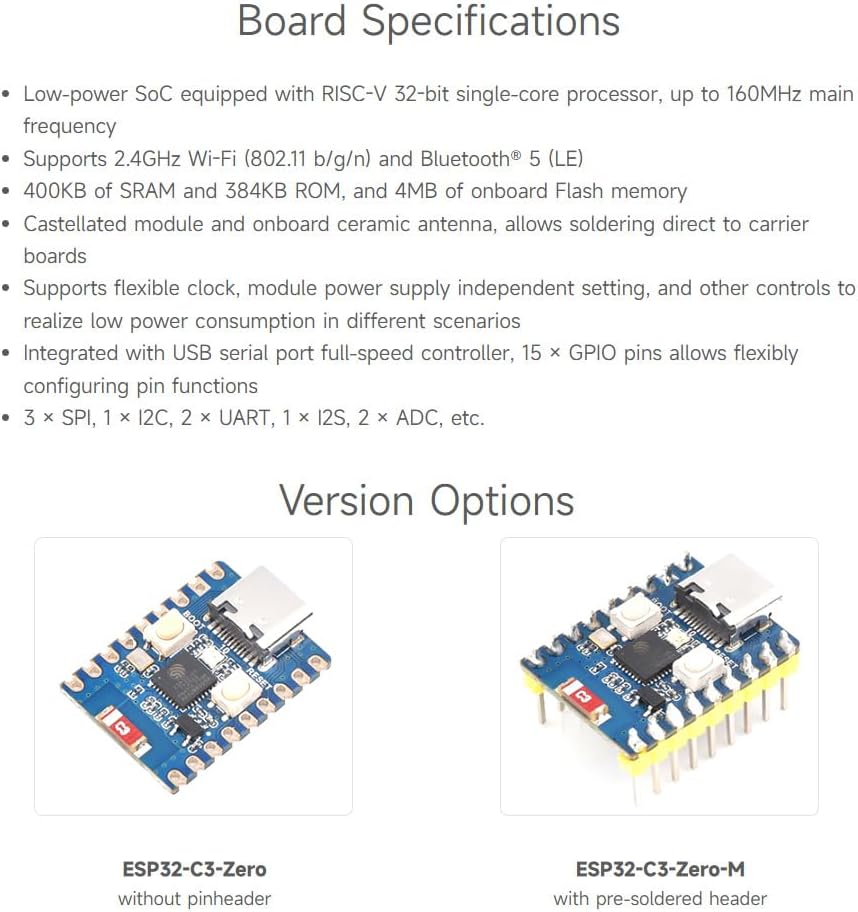
Figure 3: Board Specifications Overview
4. What's On Board (Components)
Refer to the diagram below for an identification of the main components on the ESP32-C3 Mini Development Board:

Figure 4: Onboard Components
- USB Type-C Port: For power supply, data communication, and programming.
- BOOT button: Press and hold this button while pressing the RESET button to enter download mode for flashing firmware.
- RESET button: Resets the ESP32-C3 module.
- WS2812 RGB LED: A programmable RGB LED for status indication or user applications.
- CAT6219-330TD-GT3: CMOS LDO, 500mA (Max) voltage regulator.
- ESP32-C3FN4 single-core processor: The main microcontroller unit, up to 160MHz operating frequency.
- 2.4G ceramic antenna: Integrated antenna for Wi-Fi and Bluetooth communication.
5. Pin Definition
Understanding the pinout is crucial for connecting peripherals and designing circuits. The ESP32-C3 Mini Development Board provides various GPIOs and peripheral interfaces.

Figure 5: Pin Definition
The pinout diagram illustrates the function of each pin, including power, ground, and various GPIOs that can be configured for SPI, I2C, UART, I2S, and ADC functionalities. Always refer to the official documentation for detailed pin multiplexing options.
6. Development Environment Setup
The ESP32-C3 Mini Development Board supports various programming environments, including C/C++ (Arduino, ESP-IDF) and MicroPython.

Figure 6: Supported Development Environments
6.1. C/C++ (Arduino, ESP-IDF)
For C/C++ development, you can use either the Arduino IDE or Espressif's IoT Development Framework (ESP-IDF). The official ESP-IDF framework provides a comprehensive set of examples and tools, compatible with VSCode or Eclipse, for building and debugging applications. The Arduino IDE offers a simpler, more beginner-friendly approach.
- Arduino IDE: Install the ESP32 board package through the Boards Manager.
- ESP-IDF: Follow the official Espressif guide to set up the ESP-IDF environment on your operating system.
6.2. MicroPython
MicroPython is a lean and efficient implementation of the Python 3 programming language optimized to run on microcontrollers. It allows you to program the ESP32-C3 using Python scripts, simplifying development for many applications.
- Installation: Flash the MicroPython firmware onto the ESP32-C3 board using esptool.py.
- Development: Use a serial terminal or an IDE like Thonny to write and upload Python code.
7. Operating Instructions
7.1. Connecting the Board
- Connect the ESP32-C3 Mini Development Board to your computer using a USB Type-C cable.
- Ensure the necessary USB drivers are installed on your computer. For most operating systems, these drivers are installed automatically.
- The board should be recognized as a serial port. You can verify this in your computer's device manager (Windows) or by checking `/dev/ttyUSBx` or `/dev/cu.usbserial-xxxx` (Linux/macOS).
7.2. Uploading Firmware/Code
- Enter Download Mode: To upload new firmware or code, you typically need to put the board into download (bootloader) mode. Press and hold the BOOT button, then briefly press the RESET button, and finally release the BOOT button.
- Use Your IDE: In your chosen development environment (Arduino IDE, VSCode with ESP-IDF, Thonny for MicroPython), select the correct serial port and board type.
- Compile and Upload: Compile your code and initiate the upload process. The IDE will communicate with the board to flash the new program.
- Exit Download Mode: After successful upload, press the RESET button to run your newly uploaded program.
8. Outline Dimensions
The physical dimensions of the ESP32-C3 Mini Development Board are important for integration into custom enclosures or PCBs.
Figure 7: Outline Dimensions (Unit: mm)
The board measures approximately 0.92 x 0.7 x 0.29 inches (23.50 x 18.00 x 7.37 mm). Refer to Figure 7 for detailed measurements in millimeters.
9. Troubleshooting
If you encounter issues with your ESP32-C3 Mini Development Board, consider the following troubleshooting steps:
- Board Not Detected: Ensure the USB cable is functional and properly connected. Try a different USB port or cable. Verify that the necessary USB-to-serial drivers are installed on your computer.
- Upload Errors: Make sure the board is in download mode before attempting to upload code (press and hold BOOT, then press RESET, then release BOOT). Check that the correct serial port and board type are selected in your IDE. Ensure your code compiles without errors.
- Program Not Running: After uploading, press the RESET button to execute the new program. Check your code for logical errors or infinite loops that might prevent it from starting correctly.
- Wi-Fi/Bluetooth Issues: Verify your network credentials (SSID, password) are correct. Ensure the antenna is not obstructed. Check for interference from other 2.4GHz devices.
- Power Issues: Ensure the board is receiving sufficient power. While USB provides power, external components might require additional power supply.
10. Maintenance
To ensure the longevity and reliable operation of your ESP32-C3 Mini Development Board, follow these maintenance guidelines:
- Handle with Care: Avoid dropping the board or subjecting it to physical shock.
- Static Discharge: Always handle the board in an anti-static environment to prevent damage from electrostatic discharge.
- Storage: Store the board in a dry, cool environment, away from direct sunlight and extreme temperatures.
- Cleaning: If necessary, gently clean the board with a soft, dry brush or compressed air. Avoid using liquids or harsh chemicals.
- Power Supply: Use a stable and appropriate power supply (5V via USB Type-C). Over-voltage can damage the board.
11. Technical Specifications Summary
| Feature | Specification |
|---|---|
| Processor | ESP32-C3FN4 (RISC-V 32-bit single-core) |
| CPU Speed | Up to 160 MHz |
| Wi-Fi | 2.4 GHz (802.11 b/g/n) |
| Bluetooth | Bluetooth 5 (LE) |
| SRAM | 400 KB |
| ROM | 384 KB |
| Flash Memory | 4 MB |
| GPIO Pins | 15 |
| Peripherals | 3x SPI, 1x I2C, 2x UART, 1x I2S, 2x ADC |
| Dimensions | 0.92 x 0.7 x 0.29 inches (approx. 23.5 x 18 x 7.4 mm) |
| Weight | 0.317 ounces (approx. 9 grams) |
12. Support and Warranty
Waveshare provides online development resources and technical support for the ESP32-C3 Mini Development Board. For detailed documentation, tutorials, and examples, please visit the official Waveshare website or their product page.
If you encounter any problems or require assistance, please do not hesitate to contact Waveshare customer support. Information regarding warranty terms and conditions can typically be found on the product packaging or the official Waveshare website.
For further assistance, please refer to the contact information provided with your purchase or on the Waveshare official website.


