
1. Product Overview
The NEBULA Capsule 3 Laser Projector is a portable device designed for high-definition visual and audio experiences. It features a laser light source for bright and clear images, integrated Dolby Digital speakers, and runs on Android TV 11.0. This product includes a compact, foldable stand for versatile positioning.
- Ultra-Compact and Portable: The foldable stand weighs only 95 g, with a diameter of 85 mm and a thickness of 20 mm when folded, ensuring easy transport.
- Immersive Audio: Equipped with 8W Dolby Digital speakers for rich, room-filling sound.
- Laser Engine: Delivers 300 ANSI Lumens of brightness in 1080p HD, providing vibrant and clear visuals.
- Android TV 11.0: Access over 700,000 movies and shows from 7000+ apps.
- Long Playtime: Built-in 52Wh battery offers approximately 2.5 hours of movie playback or 6 hours of music playback. Supports PD fast charging.

Image: The NEBULA Capsule 3 Laser Projector, a compact cylindrical device with a prominent lens and speaker grilles.
2. Setup Instructions
2.1 Unpacking
Carefully remove all components from the packaging. Ensure you have the NEBULA Capsule 3 Laser Projector, the foldable stand, and the power cord.
2.2 Attaching the Foldable Stand
The foldable stand provides stability and allows for angle adjustments. To attach the stand:
- Unfold the stand completely to ensure maximum stability.
- Align the screw on the stand with the tripod mount at the bottom of the projector.
- Gently screw the projector onto the stand until it is securely fastened. Do not overtighten.

Image: Hands demonstrating how to attach the foldable stand to the base of the NEBULA Capsule 3 Laser Projector.
For a visual guide on attaching and adjusting the stand, please refer to the video below:
Video: A short demonstration showing the setup and adjustment of the Capsule 3 Laser projector with its foldable stand.
2.3 Powering On and Initial Placement
Connect the projector to a power source using the provided power cord. Press and hold the power button to turn on the device. Place the projector on a stable, flat surface. The foldable stand allows for 0-180 degree rotation, enabling projection onto walls, ceilings, or other surfaces. Ensure the stand's base is fully open for optimal stability when adjusting the angle.

Image: The NEBULA Capsule 3 Laser Projector shown in various positions, demonstrating its 0-180 degree rotation capability with the foldable stand.
3. Operating Instructions
3.1 Basic Controls
The projector can be controlled via physical buttons on the device or through touch controls. Refer to the device's top panel for button layout and functions. The projector features automatic focus and keystone correction for a clear, rectangular image.
3.2 Connecting Devices
The Capsule 3 Laser supports HDMI connectivity for external devices such as gaming consoles, laptops, and media players. It also supports wireless connectivity for smartphones and tablets.
- HDMI: Connect an HDMI cable from your device to the projector's HDMI port. Select the HDMI input source from the projector's menu.
- Wireless Casting: Use the built-in casting features (e.g., Chromecast) to mirror content from compatible smartphones or tablets. Ensure both devices are on the same Wi-Fi network.
3.3 Adjusting Projection
The projector automatically adjusts focus and keystone. If manual adjustment is needed, navigate to the display settings in the Android TV interface. The eye guard feature helps protect eyes by dimming the laser when an obstruction is detected.

Image: The NEBULA Capsule 3 Laser Projector on a table outdoors, with text highlighting its built-in battery, movie playback, music playback, and fast charging capabilities.
4. Maintenance
4.1 Cleaning the Projector
To maintain optimal performance, keep the projector clean. Use a soft, dry cloth to wipe the exterior. For the lens, use a lens cleaning cloth and specialized lens cleaning solution. Avoid abrasive materials or harsh chemicals.
4.2 Storage
When not in use, store the projector in a cool, dry place away from direct sunlight and extreme temperatures. If storing for an extended period, ensure the battery is partially charged (around 50%) to prolong its lifespan.
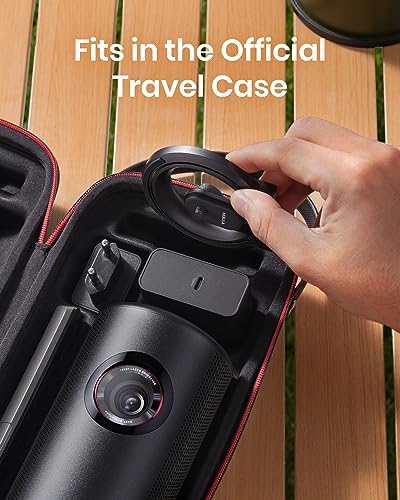
Image: The NEBULA Capsule 3 Laser Projector and its foldable stand being placed into an official travel case, demonstrating its portability and ease of storage.
5. Troubleshooting
- No Power: Ensure the power cord is securely connected to both the projector and a working power outlet. Check if the power adapter is functioning correctly.
- No Image: Verify that the correct input source (HDMI, casting) is selected. Check all cable connections. Ensure the lens cap is removed.
- Blurry Image: The projector has autofocus. If the image remains blurry, try moving the projector slightly or manually adjusting focus through the settings. Ensure the projection surface is flat.
- No Sound: Check the volume settings on both the projector and the connected device. Ensure no external headphones or speakers are connected if you intend to use the internal speakers.
- Remote Control Not Working: Replace the remote control batteries. Ensure there are no obstructions between the remote and the projector.
6. Specifications
| Feature | Specification |
|---|---|
| Brand | NEBULA |
| Model Name | NEBULA Capsule 3 Laser |
| Display Type | Laser |
| Native Resolution | 1920 x 1080 (1080p HD) |
| Brightness | 300 ANSI Lumens |
| Connectivity Technology | HDMI, Wireless (Wi-Fi) |
| Audio | 8W Dolby Digital speakers |
| Operating System | Android TV 11.0 |
| Battery | Built-in 52Wh (approx. 2.5h movie, 6h music playback) |
| Control Method | Button Control, Touch |
| Foldable Stand Weight | 95 g |
| Foldable Stand Dimensions (folded) | 85 mm diameter, 20 mm thickness |
7. Warranty and Support
7.1 Warranty Information
NEBULA products come with a warranty that covers hassle-free replacements or parts exclusively for quality issues. For specific warranty duration and terms, please refer to the documentation included with your purchase or visit the official NEBULA website.
7.2 Customer Support
For any technical assistance, troubleshooting, or product-related inquiries, please contact NEBULA customer support. You can typically reach support by navigating to your order details page, clicking "Ask a question," and sending a message. Responses are generally provided within 1 business day. Lifetime expert help is available.

Image: Icons representing Lifetime Support and Contact Us, indicating available customer service options.


