
MAKITA TD173
MAKITA Impact Driver TD173 User Manual
Model: TD173 | Brand: MAKITA
1. Introduction
Thank you for purchasing the MAKITA TD173 Impact Driver. This manual provides essential information for the safe and effective use of your new tool. Please read this manual thoroughly before operation and keep it for future reference.
The MAKITA TD173 is a high-performance impact driver designed for various fastening tasks, offering enhanced visibility, multiple operating modes, and improved ergonomics.
2. Package Contents
Please check that all items listed below are included in your package:
- TD173 Impact Driver (Tool Body Only)
- TD173 Dedicated Dustproof and Waterproof Storage Case
- VESSEL Bit Set (5 pieces)
*Note: Charger and battery are sold separately and are not included in this set.

Image 1: Contents of the TD173 Impact Driver set, including the driver, case, and bit set.

Image 2: Detailed view of the included VESSEL 5-piece bit set, featuring various sizes and types.
3. Safety Information
Always follow basic safety precautions when using power tools to reduce the risk of fire, electric shock, and personal injury.
- Wear appropriate personal protective equipment (PPE) such as safety glasses, hearing protection, and gloves.
- Ensure your work area is well-lit and clear of obstructions.
- Keep children and bystanders away while operating the tool.
- Do not operate power tools in explosive atmospheres, such as in the presence of flammable liquids, gases, or dust.
- Always disconnect the battery pack before making any adjustments, changing accessories, or storing the tool.
4. Setup
4.1 Battery Installation
- Ensure the impact driver is turned off.
- Align the battery pack with the battery port on the tool handle.
- Slide the battery pack into the port until it clicks securely into place.
- To remove, press the release button on the battery pack and slide it out.
4.2 Bit Installation
- Pull the bit sleeve forward.
- Insert the desired bit into the chuck until it locks.
- Release the bit sleeve. Gently pull on the bit to ensure it is securely fastened.
- To remove, pull the bit sleeve forward and pull the bit out.
5. Operating Instructions
5.1 Powering On/Off and Speed Control
The tool is activated by pressing the trigger switch. The speed can be intuitively controlled by the amount of trigger depression, from low to high speed.
5.2 LED Light Features
The TD173 features an all-around ring-emitting LED light, significantly improving visibility during work. The brightness is approximately 2.5 times brighter than conventional 18V models and can be switched between 3 stages (High/Mid/Low).

Image 3: Illustration of the TD173's powerful ring LED light, showing its brightness and three illumination levels.
The tool also includes a 'Light Mode' which allows it to be used as a simple work light, providing illumination for approximately 1 hour.
5.3 Operating Modes (Easy 4 Modes)
The TD173 offers four optimized modes to assist with various tasks. You can select the optimal mode for your specific application:
- Wood Mode: Starts slowly with the trigger fully depressed, then automatically accelerates for optimal fastening.
- Bolt Mode: For forward rotation, the trigger is ON for maximum speed. For reverse rotation, it automatically stops when the nut loosens (reverse auto-stop).
- Thin Plate Mode: Inserts screws smoothly and automatically stops upon impact detection.
- Thick Plate Mode: Reduces cam-out and screw head stripping.
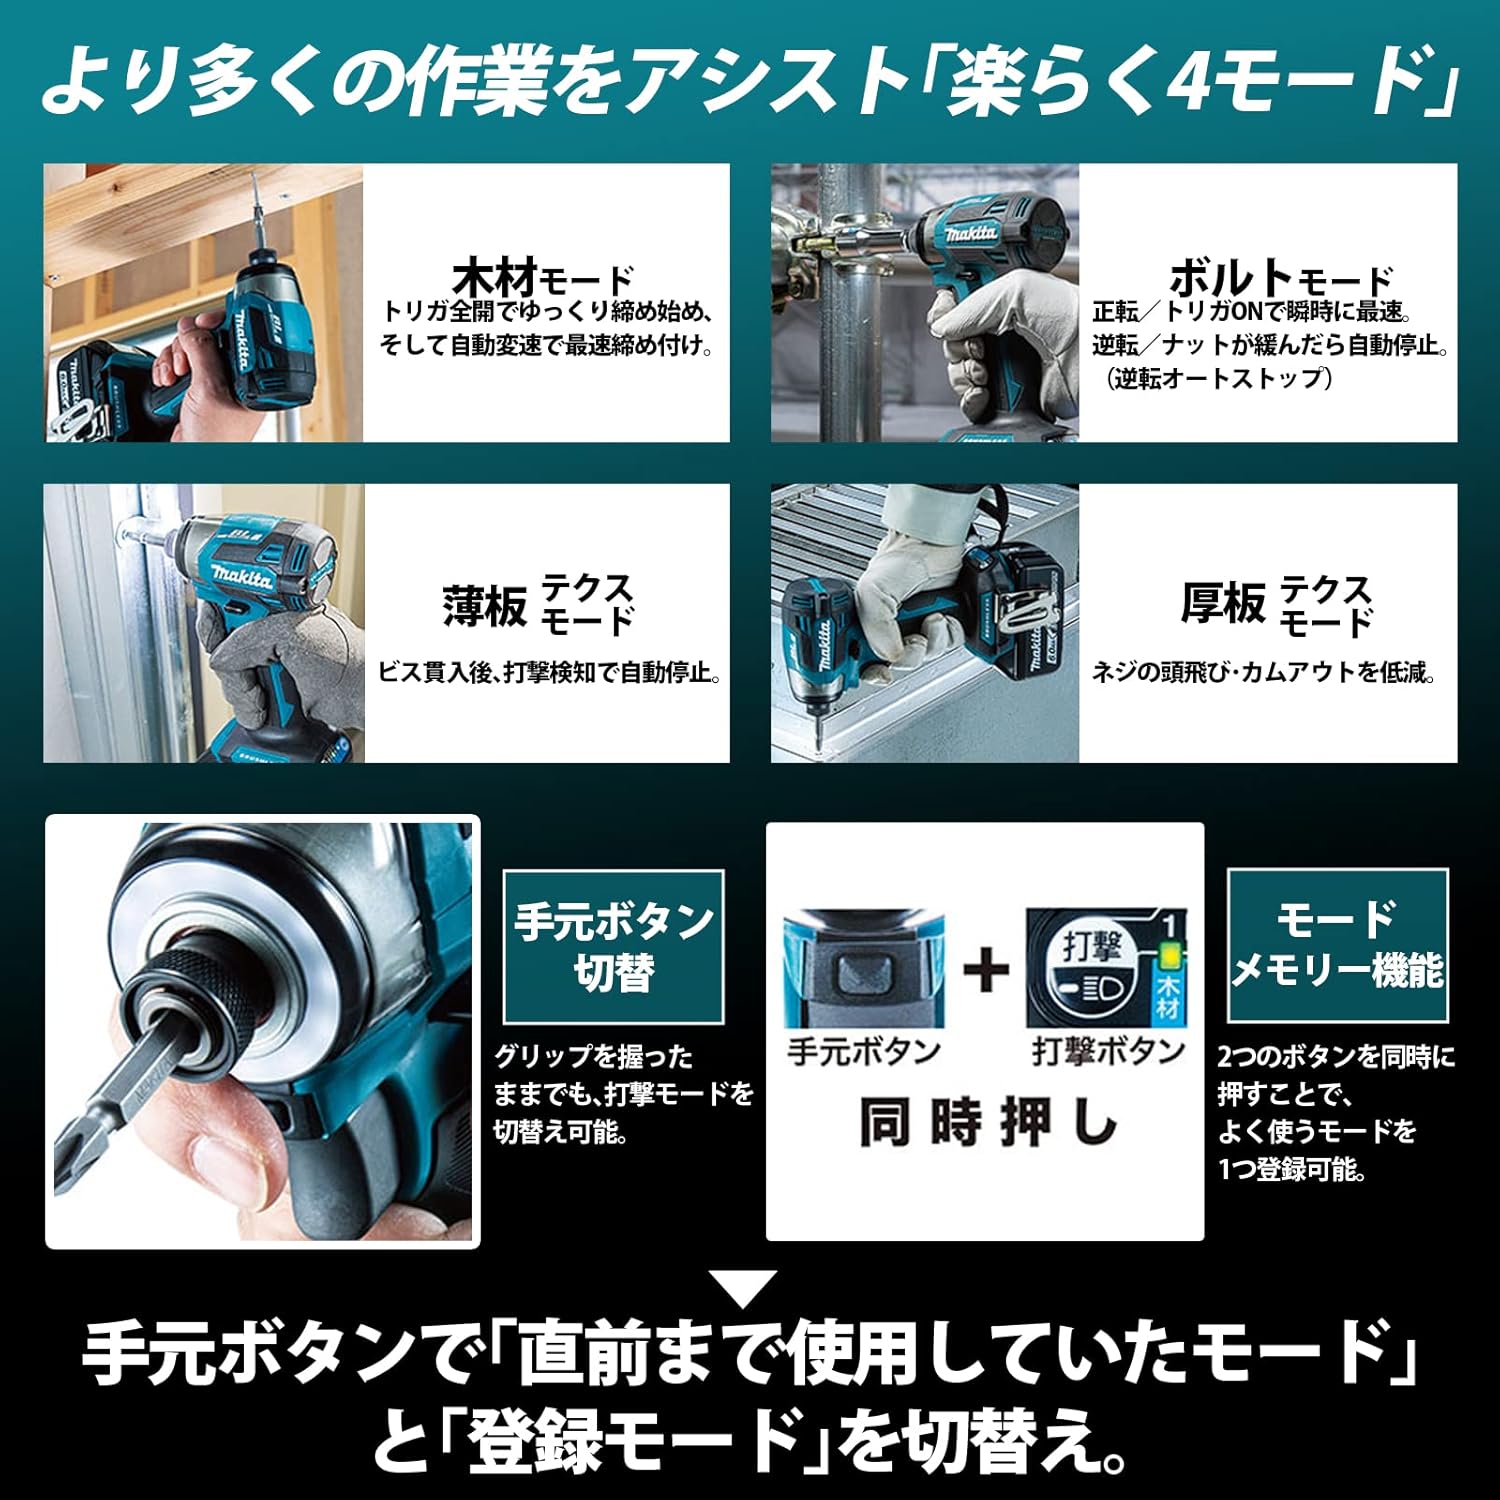
Image 4: Visual guide to the 'Easy 4 Modes' and the mode memory function, showing how to switch between modes.
5.4 Mode Selection and Memory
The control panel is conveniently located at the rear for easy visibility and operation. You can switch between modes and check the remaining battery capacity while holding the tool.
The tool features a mode memory function. By simultaneously pressing two buttons, you can register a frequently used mode for quick access.
5.5 Ergonomics and Design
The TD173 boasts an overall length of 111mm and a weight of 1.5kg (with battery), making it compact and lightweight. The grip is positioned close to the axis, and the hand is close to the head, making it easier to apply pressure along the axis and reducing cam-out.
The battery is offset to the rear, optimizing the center of gravity for well-balanced fastening in all directions and reducing interference with obstacles.

Image 5: Comparison showing the battery offset for optimal balance and the industry's smallest tilt angle during edge fastening (approx. 10.5°).
5.6 Bit Wobble and Sleeve Design
The TD173 features the industry's smallest bit wobble, achieved through the adoption of double ball bearings and a new bit sleeve shape. Ribs on the edge of the sleeve prevent damage to materials even if the sleeve comes into contact with them.
6. Maintenance
Regular maintenance ensures the longevity and optimal performance of your impact driver.
- Cleaning: After each use, wipe down the tool with a clean, dry cloth to remove dust and debris. Do not use harsh chemicals or abrasive cleaners.
- Storage: Store the tool and battery in a cool, dry place, away from direct sunlight and moisture. Use the provided dustproof and waterproof case for protection.
- Battery Care: Always charge batteries using the recommended charger. Do not store fully discharged batteries for extended periods.
- Bit Inspection: Regularly inspect bits for wear or damage. Replace worn bits to ensure efficient and safe operation.
6.1 Case Maintenance
The IP65 dustproof and waterproof plastic case is designed to protect your tool. While resistant to dust and water, it does not guarantee against malfunction if submerged or exposed to extreme conditions. Keep the case clean and ensure the latches are securely closed when transporting or storing the tool.
7. Troubleshooting
If you encounter issues with your TD173 Impact Driver, refer to the following common problems and solutions:
| Problem | Possible Cause | Solution |
|---|---|---|
| Tool does not start | Battery not charged or improperly installed | Charge battery fully; ensure battery is securely clicked into place. |
| Reduced power or speed | Low battery charge; worn carbon brushes (if applicable); tool overheating | Recharge battery; consult service center for brush replacement; allow tool to cool down. |
| Bit wobble is excessive | Bit not properly inserted; damaged bit; chuck issue | Re-insert bit securely; replace bit; if problem persists, contact service. |
| LED light not working | Battery low; LED malfunction | Charge battery; if problem persists, contact service. |
For issues not covered here, please contact MAKITA customer support or an authorized service center.
8. Specifications
| Feature | Detail |
|---|---|
| Model Number | TD173 |
| Type | Impact Driver |
| Max Fastening Torque | 180 N·m |
| Compatible Voltage | 18V |
| Impact Modes | 4 Stages |
| Impacts per Minute (Max) | 0-3800 ipm |
| Rotations per Minute (Max) | 0-3600 rpm |
| LED Light | Ring-emitting LED (3 brightness levels) |
| Tool Dimensions (L×W×H) | 111 × 81 × 234 mm |
| Weight (with BL1860B battery) | 1.5 kg |
| Case Type | IP65 Dustproof/Waterproof Plastic Case |
| Case Battery Capacity | Up to 4 batteries |
| Bit Wobble | Industry's smallest (Double ball bearing) |
| Edge Fastening Tilt Angle | Approx. 10.5° (Industry's smallest) |
9. Warranty and Support
For warranty information, service, or technical support, please refer to the warranty card included with your purchase or visit the official MAKITA website. Keep your proof of purchase for warranty claims.
Related documentsTD173


Ask a question about this manual
Ask about setup, troubleshooting, compatibility, parts, safety, or missing instructions. Manuals+ will review the question and use this page’s manual context to help answer it.