1. Introduction
Thank you for choosing the iPormis King Size Lift Up Storage Bed Frame. This bed frame combines modern design with practical functionality, offering a comfortable sleeping solution with integrated storage and a convenient charging station. This manual provides detailed instructions for assembly, operation, maintenance, and troubleshooting to ensure you get the most out of your new bed frame.

Figure 1.1: Assembled iPormis King Size Lift Up Storage Bed Frame.
2. Safety Information
- Weight Capacity: Do not load more than 1000 pounds on the bed frame. Exceeding this limit may cause damage to the frame or personal injury.
- Assembly: Follow all assembly instructions carefully to prevent instability and ensure safe operation. Incorrect assembly can lead to structural failure.
- Hydraulic Lift System: When operating the hydraulic lift, ensure no objects or body parts are in the path of the moving frame to avoid pinching or injury. The system is designed to be heavy-duty; ensure the mattress is placed on the frame before attempting to lower it for the first time.
- Electrical Safety: The integrated charging station requires a standard 3-prong power outlet. Do not overload the outlets. Disconnect power before cleaning or if any electrical issues arise.
3. Package Contents
Before beginning assembly, verify that all components are present and undamaged. If any parts are missing or damaged, please contact iPormis customer support.
- Bed Frame Components
- Headboard with Integrated Charging Station
- Installation Manual (this document)
- Slats (wooden)
- Toolkits (assembly tools)

Figure 3.1: Typical components included in the package.
4. Setup and Assembly Instructions
Assembly is designed to be straightforward. It is recommended to have two people for assembly. No additional tools are required beyond what is provided.
- Step 1: Assemble the Headboard and Side Rails. Follow the diagrams in the included installation manual to connect the headboard to the side rails. Ensure all bolts are securely tightened.
- Step 2: Attach the Footboard. Connect the footboard to the side rails, ensuring a stable rectangular frame is formed.
- Step 3: Install the Hydraulic Lift Mechanism. Carefully attach the hydraulic rods to the designated points on the bed frame. Ensure the thick part of the hydraulic rod is facing upwards. Refer to the detailed diagrams for correct orientation.
- Step 4: Place the Slats. Lay the wooden slats across the bed frame. The slats are designed for easy assembly and feature noise-free foam to prevent squeaking. Ensure they are evenly spaced and secured if applicable.

Figure 4.1: Details of the sturdy structure and noise-free slats.

Figure 4.2: Hydraulic lift mechanism and safety features.
5. Operating Instructions
5.1 Hydraulic Lift Storage System
The bed frame features an advanced hydraulic lift system, allowing you to effortlessly raise the mattress platform to access the ample under-bed storage space. The maximum lifting weight capacity for the mattress is 154 lbs.
- To Open: From the foot of the bed, firmly grasp the lifting strap or edge of the frame and lift upwards. The hydraulic system will assist in raising the platform smoothly.
- To Close: Gently push the platform downwards from the foot of the bed. The hydraulic system will control the descent, ensuring a soft close. Ensure no items obstruct the closing mechanism.

Figure 5.1: Bed frame with hydraulic lift system open, showing storage.
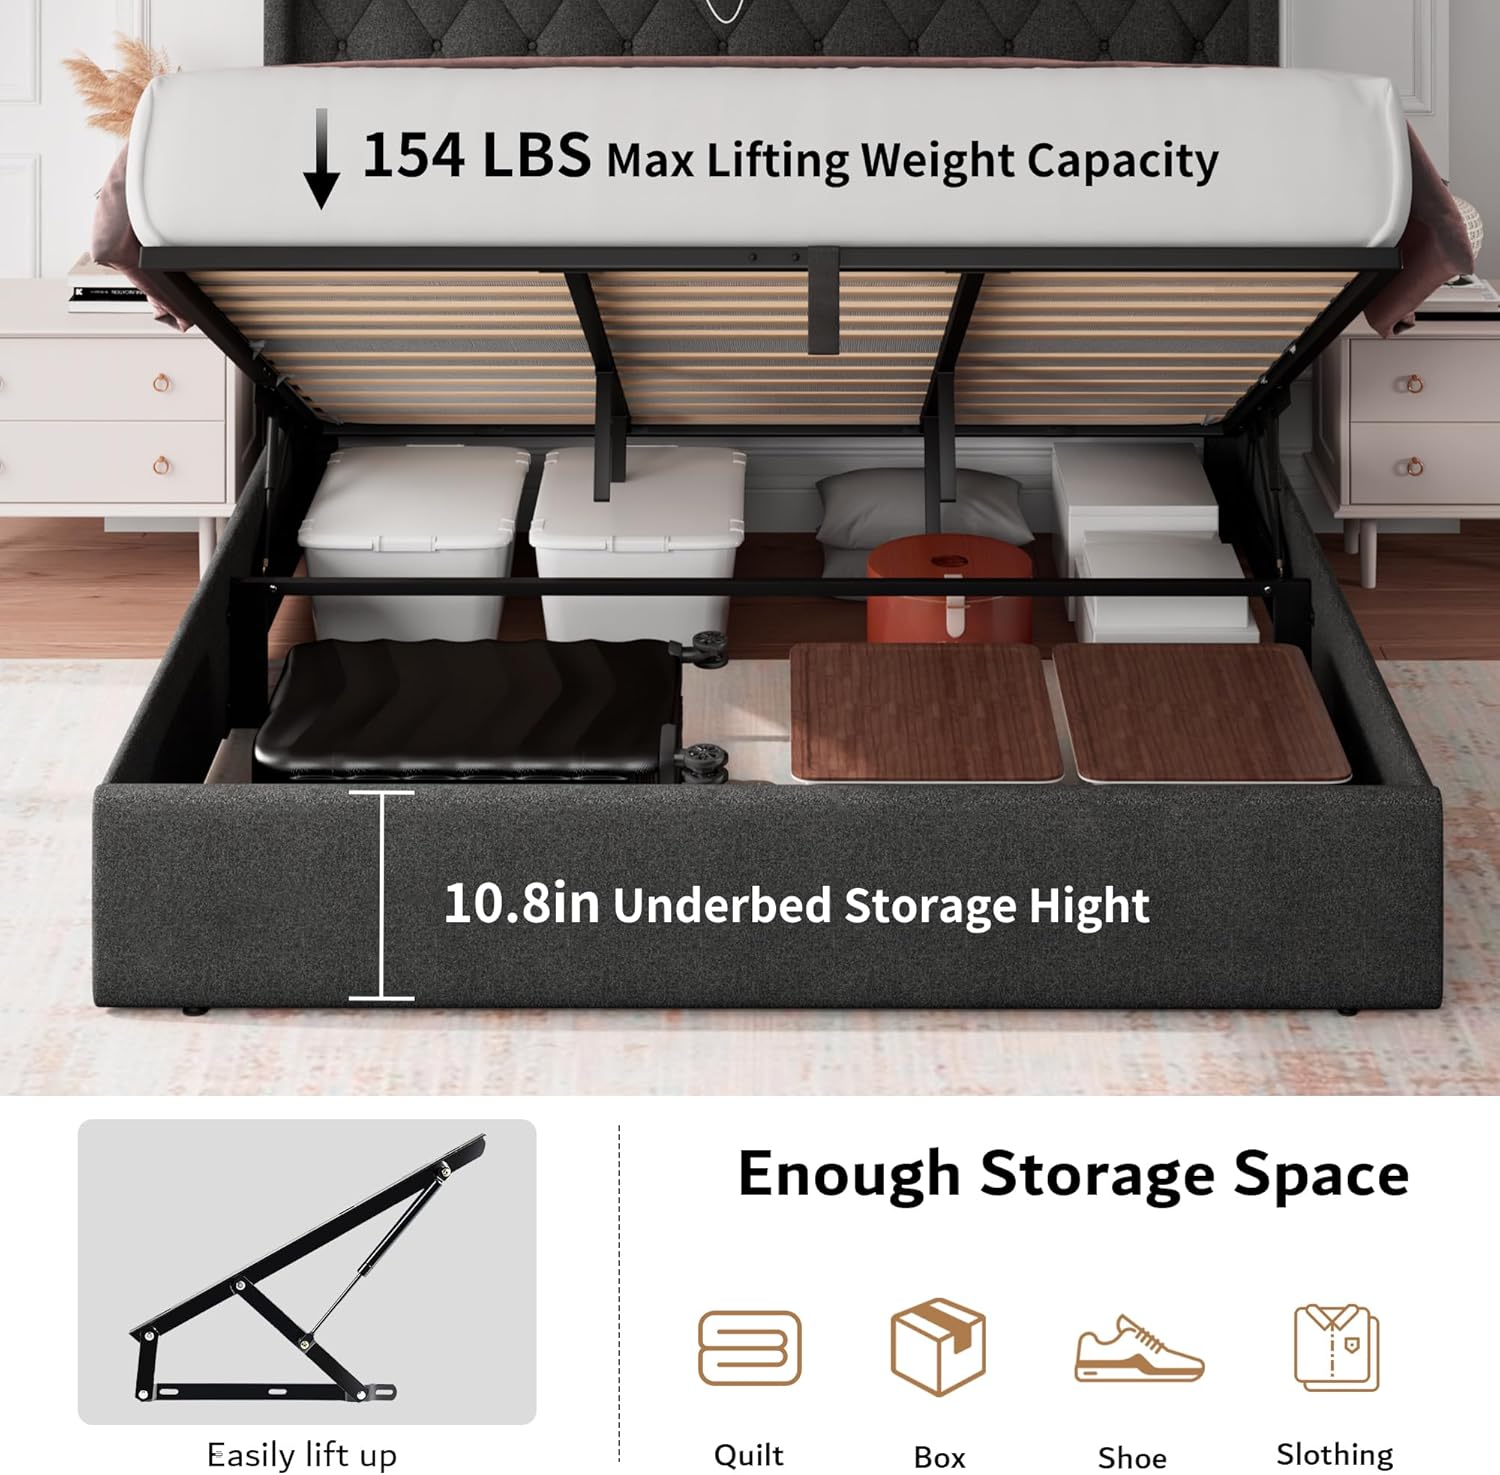
Figure 5.2: Underbed storage height and lifting capacity.
5.2 Charging Station
The tufted headboard includes a built-in charging station for your convenience. It features:
- 2 x 110V/12A AC Outlets
- 1 x USB-A Port (5V/2A)
- 1 x Type-C Port (5V/2A)
- 6.6-Feet Power Cord
To use, simply plug the bed frame's power cord into a wall outlet. You can then connect your devices to the available ports for charging.

Figure 5.3: Headboard with integrated charging station.
6. Maintenance and Care
- Cleaning: The upholstered parts of the bed frame should be dry cleaned only. For general cleaning, use a soft, dry cloth to wipe down surfaces. Avoid harsh chemicals or abrasive cleaners.
- Regular Checks: Periodically check all bolts and connections to ensure they remain tight. Retighten if necessary to maintain stability and prevent noise.
- Hydraulic System: If the hydraulic rods feel stiff or do not operate smoothly, a small amount of oil can be applied to the telescopic part of the air pressure rod.
7. Troubleshooting
7.1 Hydraulic Lift Not Working Properly
If the hydraulic lift mechanism seems stiff or does not lower easily after assembly, please follow these steps:
- Confirm Installation: Ensure the hydraulic rods are installed correctly, with the thick part facing upwards.
- Apply Lubricant: It is recommended to apply a small amount of oil to the telescopic part of the air pressure rod when using it for the first time.
- Place Mattress: After assembly, place your mattress on the bed frame. The hydraulic system requires the weight of the mattress to function correctly.
- Initial Operation: After placing the mattress, wait 15-30 minutes. Then, stand in the middle of the foot end of the bed and press down firmly. Do not worry, it will not break. Avoid pressing from the edges, as this may cause incorrect pressure points.
- Repeat: You may need to try pressing down multiple times until the mechanism starts to go down smoothly.
If the issue persists after following these steps, please contact iPormis customer support for further assistance.
8. Specifications
| Size: | King |
| Product Dimensions (L x W x H): | 85.5" x 79" x 46" |
| Color: | Dark Grey |
| Material: | Fabric & Wood & Iron |
| Weight Capacity: | 1000 lbs |
| Mattress Lifting Weight Capacity: | 154 lbs |
| Underbed Storage Height: | 10.8 inches (slats to floor) |
| Special Features: | Charging Station, Hydraulic Lifting, No Box Spring Needed, Squeak Resistant |
| Assembly Required: | Yes |
| Product Care Instructions: | Dry Clean Only |

Figure 8.1: Product dimensions and weight capacity.
9. Warranty and Support
iPormis is committed to providing high-quality products. For any questions, concerns, or issues regarding your bed frame, please contact iPormis customer support. Please have your model number (821C1-JW) and purchase information ready when contacting support.
While specific warranty details are not provided in this manual, iPormis stands behind its products. For warranty claims or service, please refer to the purchase documentation or contact the seller directly.