
MOUNT PRO B0CHF3PC58
MOUNT PRO Triple Monitor Mount User Manual
Model: B0CHF3PC58
1. Introduction
This manual provides detailed instructions for the installation, operation, and maintenance of your MOUNT PRO Triple Monitor Mount. Please read this manual thoroughly before installation to ensure correct setup and safe usage. Keep this manual for future reference.
2. Safety Information
Important Safety Instructions:
- Ensure your desk surface is stable and capable of supporting the combined weight of the mount and all monitors.
- Do not exceed the maximum weight capacity of 17.6 lbs (8 kg) per arm.
- Use only the provided hardware. If any parts are missing or damaged, contact MOUNT PRO customer service.
- Improper installation may result in property damage or personal injury.
- Adjust gas spring tension carefully. Refer to the adjustment section for proper procedure.
3. Package Contents
Verify that all components are present before beginning installation. While a complete list is not provided, typical components include:
- Main Pole and Base (C-Clamp and Grommet options)
- Monitor Arms (Gas Spring Arms)
- VESA Plates
- Cable Management Clips
- Hardware Kit (screws, washers, Allen wrenches)

Image: Typical package contents for the MOUNT PRO Triple Monitor Mount.
4. Setup and Installation
The MOUNT PRO Triple Monitor Mount offers two installation methods: C-Clamp and Grommet mounting. Choose the method suitable for your desk.
4.1. Choose Mounting Method

Image: Illustration of C-Clamp and Grommet mounting options.
- C-Clamp Mounting: Fits desks with a thickness of 0.39" - 3.15" (10mm - 80mm).
- Grommet Mounting: Fits desks with a thickness of 0.39" - 1.97" (10mm - 50mm) and requires an existing hole in the desk.
4.2. Base Assembly (C-Clamp)
- Attach the L-plate to the bottom of the pole base using the provided screws.
- Secure the C-clamp to the L-plate.
- Place the assembled base onto your desk and tighten the C-clamp to secure it firmly.
Video: Step-by-step guide on how to install the MOUNT PRO Triple Monitor Mount, including base assembly.
4.3. Base Assembly (Grommet)
- If using grommet mounting, detach the bolt from the C-clamp assembly.
- Insert the grommet bolt through the desk hole and secure it from underneath with the washer and nut.
- Attach the pole base to the grommet bolt.
4.4. Pole Installation
- Connect the upper and lower sections of the pole and secure them with the provided screw.
- Slide the pole onto the mounted base and tighten the securing screw.
4.5. Arm and VESA Plate Installation
- Slide the cable clips and fixators onto the pole at desired heights.
- Attach the monitor arms to the pole, securing them with the fixators.
- Attach the VESA plates to the back of your monitors using the appropriate screws. Ensure the screws are tightened securely.
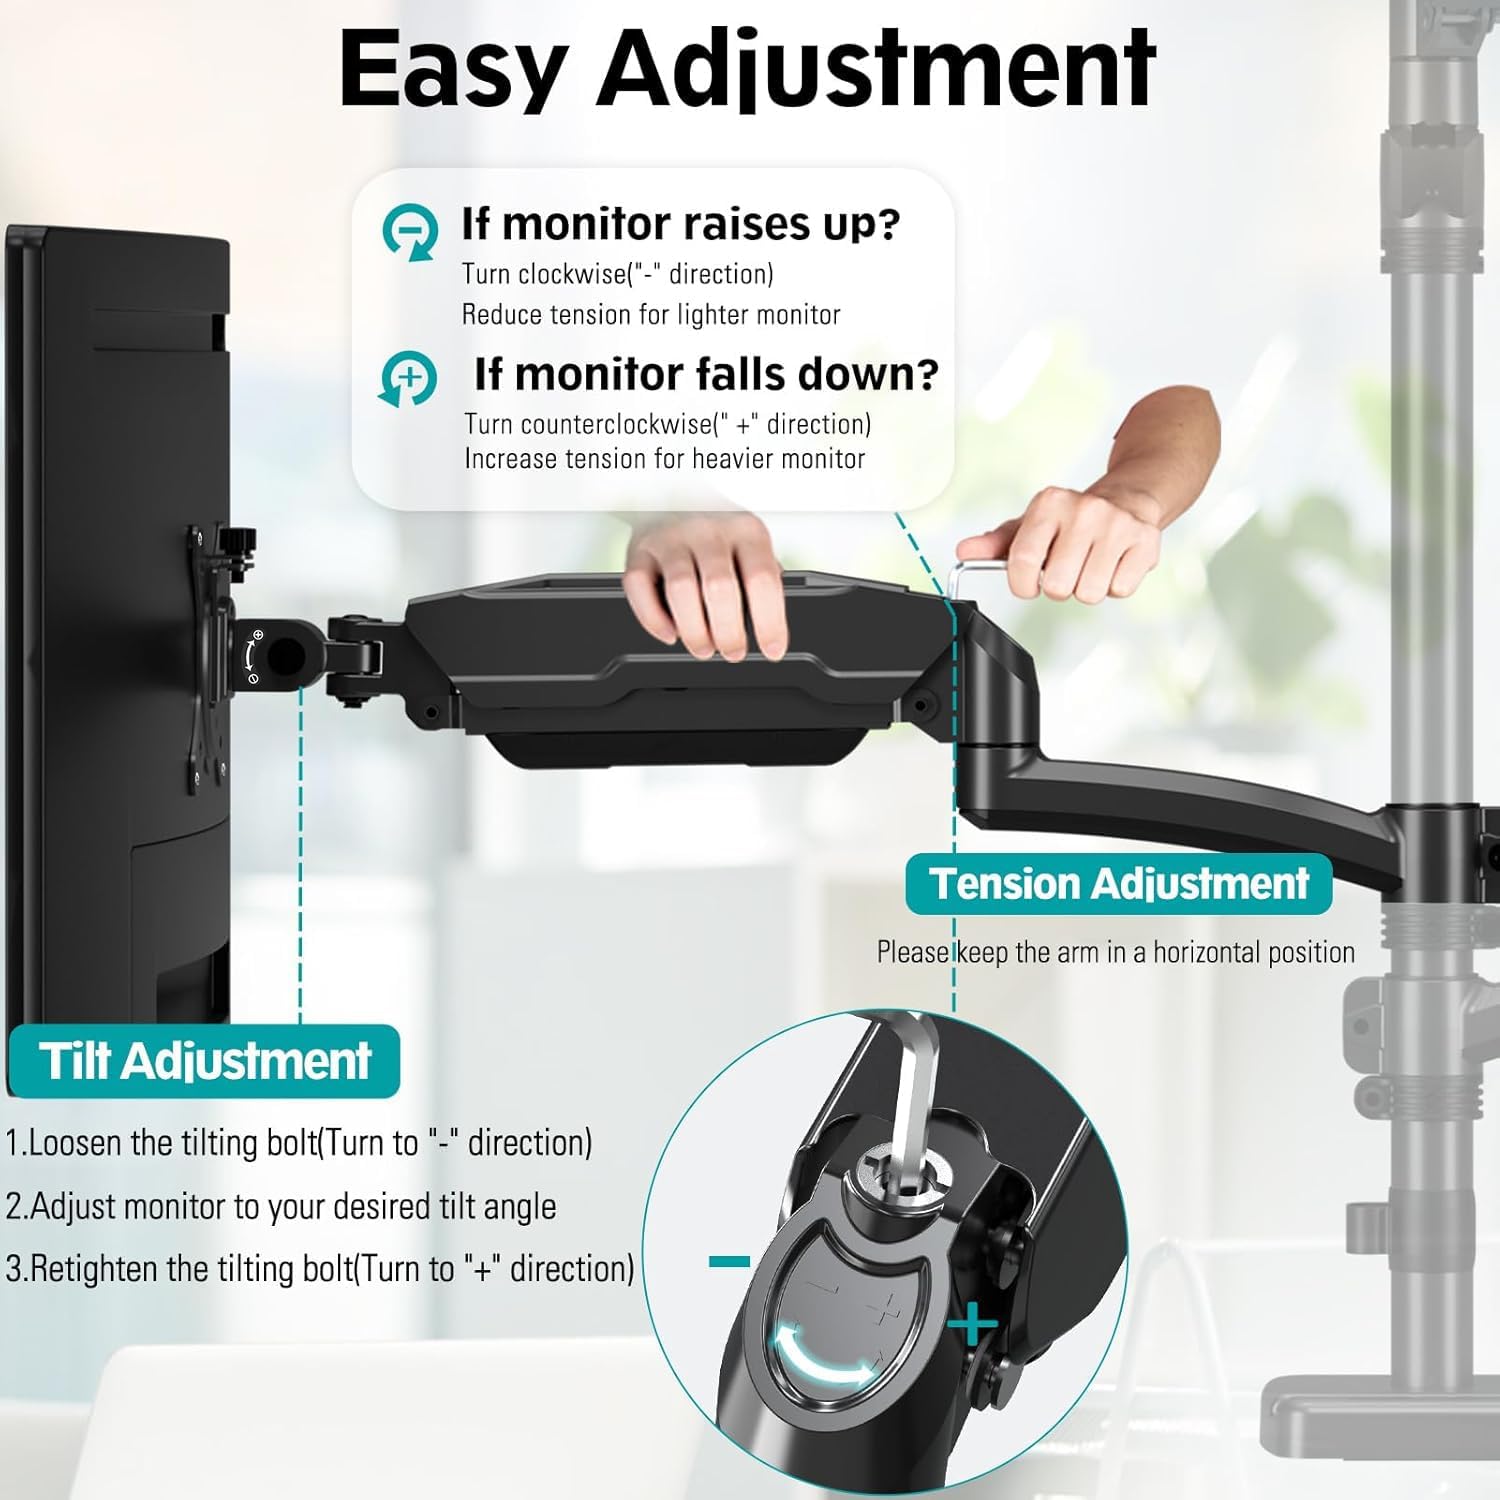
Image: Attaching the VESA plate to the back of a monitor.
4.6. Attaching Monitors
- Carefully slide each monitor (with VESA plate attached) onto the head of its respective arm.
- Secure the monitor to the arm by tightening the locking screw on the VESA head.
5. Operating and Adjustments
The MOUNT PRO Triple Monitor Mount offers extensive adjustability for optimal viewing comfort.
5.1. Gas Spring Tension Adjustment
The gas spring arms allow for smooth height adjustments. Adjust the tension based on your monitor's weight.
- If the monitor raises up, turn the tension screw counter-clockwise ("-" direction) to reduce tension for a lighter monitor.
- If the monitor falls down, turn the tension screw clockwise ("+" direction) to increase tension for a heavier monitor.
- Keep the arm in a horizontal position during adjustment.

Image: Instructions for adjusting gas spring tension.
5.2. Tilt, Swivel, and Rotation
- Tilt: Adjust your screen from +90° to -90° for vertical angle. Loosen the tilting bolt, adjust, then retighten.
- Swivel: Swivel the monitor 180° for horizontal angle adjustment.
- Rotation: Rotate the monitor 360° to switch between landscape and portrait orientations.

Image: Visual representation of tilt, swivel, and rotation adjustments.
Video: Demonstration of the MOUNT PRO Triple Monitor Mount's full motion capabilities.
5.3. Cable Management
Utilize the integrated cable management system to keep your workspace tidy.
- Route monitor cables through the cable clips on the arms and along the main pole.
- Secure the cable covers on the arms to conceal the cables.
6. Maintenance
Regular maintenance ensures the longevity and safe operation of your monitor mount.
- Cleaning: Wipe the mount with a soft, damp cloth. Avoid abrasive cleaners.
- Periodic Checks: Periodically check all screws and connections to ensure they are tight and secure. Re-tighten if necessary.
- Gas Spring: If monitors feel loose or too stiff, re-adjust the gas spring tension as described in Section 5.1.
7. Troubleshooting
If you encounter issues, refer to the following common problems and solutions:
- Monitor sags or does not hold position:
- The gas spring tension may be too low for the monitor's weight. Increase tension by turning the screw clockwise ("+" direction).
- Ensure all VESA plate screws and arm connections are securely tightened.
- Monitor is too stiff to move:
- The gas spring tension may be too high. Decrease tension by turning the screw counter-clockwise ("-" direction).
- Mount feels unstable:
- Ensure the C-clamp or grommet base is securely fastened to the desk.
- Verify that the main pole is firmly attached to the base.
- Check that the combined weight of your monitors does not exceed the mount's capacity.
8. Specifications
| Feature | Specification |
|---|---|
| Brand | MOUNT PRO |
| Model | B0CHF3PC58 |
| Screen Size Compatibility | Max 32" (not compatible with 1000R curved screens) |
| Weight Capacity per Arm | Up to 17.6 lbs (8 kg) |
| VESA Compatibility | 75x75mm, 100x100mm |
| Mounting Type | C-Clamp (0.39"-3.15" desk thickness), Grommet (0.39"-1.97" desk thickness) |
| Movement Type | Rotate, Swivel, Tilt, Articulating |
| Maximum Arm Height | 36.3 inches (from desk surface) |
| Arm Extension | Up to 18.1 inches |
| Material | Aluminum |
| Color | Black |
9. Warranty and Support
For warranty information or technical support, please refer to the MOUNT PRO official website or contact their customer service directly. Keep your purchase receipt for warranty claims.
Ask a question about this manual
Ask about setup, troubleshooting, compatibility, parts, safety, or missing instructions. Manuals+ will review the question and use this page’s manual context to help answer it.